Prep time: 20 minutes
Cook time: 30 minutes
Total time: 50 minutes
Servings: 8 servings
If you are someone who enjoys baking and has a special fondness for pastries, you know how delightful it is to indulge in something sweet and flaky. The Delicious Espresso Apple Cream Cheese Danish is a recipe that captivates the senses with its incredible flavors and textures. Picture the warm, flaky dough cradling a rich cream cheese filling complemented by the unparalleled aroma of espresso and the tartness of apples. This pastry offers the perfect solution for busy mornings, brunch gatherings, or a special treat after dinner. In this article, not only will you uncover the secret to making this delectable treat, but you will also receive tips, variations, and answers to frequently asked questions that will set you up for success in the kitchen.
What Is Delicious Espresso Apple Cream Cheese Danish Recipe?
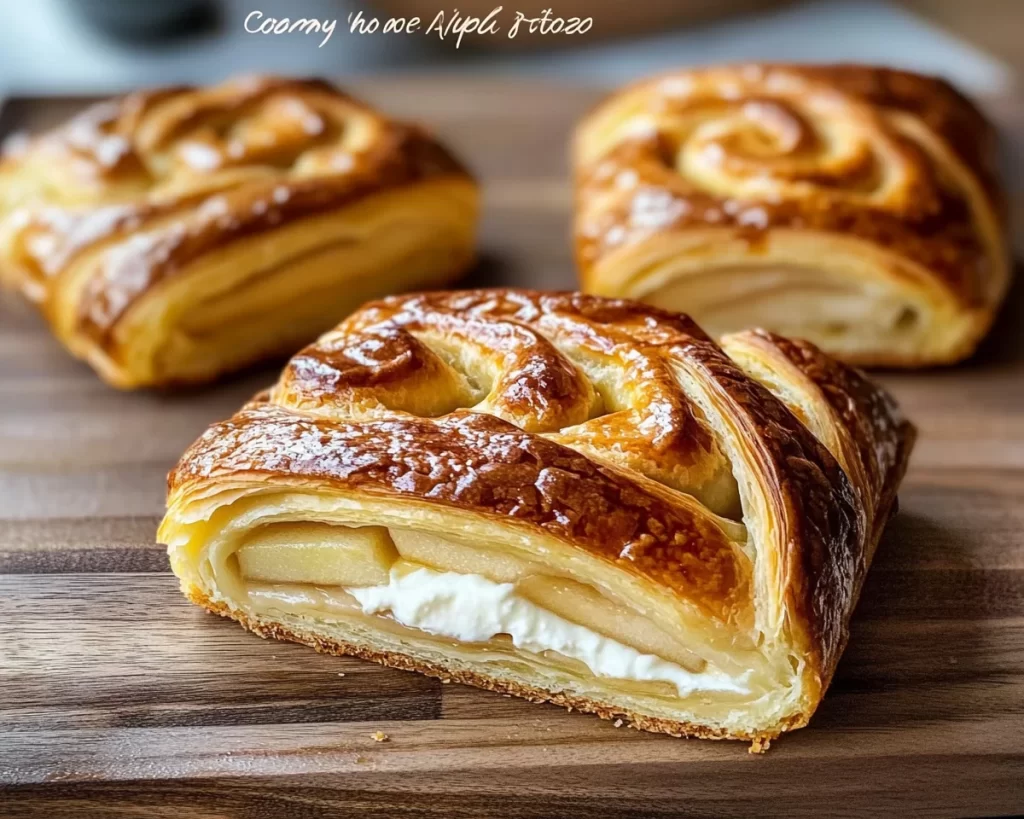
The Delicious Espresso Apple Cream Cheese Danish is a pastry that elegantly combines multiple elements to create a perfect harmony of flavor and texture. Originating from classic Danish pastry recipes, this variation showcases the rich, buttery layers that are characteristic of a traditional Danish. The highlight of this recipe lies in its delightful filling — the cream cheese adds a luscious, creamy element, while the espresso provides a deep, robust flavor. And let’s not forget the apples, which introduce a wonderful sweetness and slight tartness that beautifully balances the richness of the other ingredients.
The dough itself is flaky and tender, with just the right amount of crispness on the outside. Each bite melts in your mouth, revealing the scrumptious filling tucked inside. This Danish stands out because it caters to both decadent cravings and coffee lovers alike; it’s perfect for breakfast alongside your favorite brew or as a sweet afternoon snack. When served warm out of the oven, the aroma envelops the entire kitchen, inviting everyone to gather around and enjoy. Whether you’re new to baking or a seasoned pro, you will love how accessible and rewarding this recipe is.
Why You’ll Love This
There are numerous reasons why the Delicious Espresso Apple Cream Cheese Danish should become a staple in your baking repertoire. First and foremost, the flavor profile is simply divine; the juxtaposition of the creamy, tangy filling and the vibrant apples creates an unbelievably satisfying experience that many pastries fail to deliver. Additionally, the richness of the espresso elevates the dish to new heights, making it a perfect companion to your morning coffee or afternoon tea.
In terms of ease, this recipe is surprisingly straightforward. Even if you are new to baking, you will find the instructions clear and manageable. The use of pre-rolled puff pastry simplifies the process, allowing you to focus on the filling and assembly. Moreover, this dessert is cost-effective; it utilizes everyday ingredients that you may already have in your pantry. Finally, the versatility of the recipe allows for numerous adaptations based on your preferences or dietary restrictions. Regardless of whether you are serving a handful of friends or preparing a family feast, this pastry can be customized for any occasion.
Ingredients You’ll Need
- 1 sheet of puff pastry: This serves as the base of your Danish, bringing flaky texture and a buttery taste.
- 8 ounces cream cheese: A key ingredient that provides richness, creaminess, and tanginess.
- 1/2 cup granulated sugar: This sweetens the filling and helps balance the tartness of the apples.
- 1/2 cup finely chopped apples: Fresh apples add a delightful sweetness and juicy texture.
- 1 tablespoon espresso powder: This adds depth and aroma, making the pastry more complex in flavor.
- 1 teaspoon vanilla extract: Enhances the overall flavor and adds a lovely warmth.
- 1 egg (for egg wash): This gives the Danish its golden-brown color and shiny finish when baked.
- Powdered sugar (optional for dusting): Adds an extra touch of sweetness and makes the dessert visually appealing.
Each ingredient plays a critical role in creating the perfect balance of flavors. The puff pastry acts as a delightful vessel, while the cream cheese forms the rich core. Choosing the right apples, such as Granny Smith or Honeycrisp, can significantly influence the flavor; sweeter varieties work, but a hint of tartness can create an excellent contrast. Espresso powder is vital for imparting that distinctive coffee flavor without overpowering the other ingredients, making it essential to use a quality product.
How to Make
- Begin by preheating your oven to 375°F (190°C). This ensures that your pastry bakes evenly and achieves the ideal crispiness.
- Unwrap the sheet of puff pastry and lay it out on a lightly floured surface. Use a rolling pin to gently roll it out to create a slightly larger rectangle. Be careful not to overwork it; we want to maintain those buttery layers.
- In a mixing bowl, combine the cream cheese, granulated sugar, espresso powder, and vanilla extract. Use a hand mixer or whisk to blend until the mixture is smooth and creamy. The coffee aroma should fill the air; this is a good indication that your filling is ready.
- Add the finely chopped apples to the cream cheese mixture, folding them in gently so that they are evenly distributed without breaking down. If you like cinnamon, you can add a pinch to enhance the flavor further.
- Cut the puff pastry into squares—around 3×3 inches each will work perfectly. Take care to ensure that all pieces are roughly the same size for even baking.
- Place a generous spoonful of the cream cheese mixture in the center of each square. Gently fold the corners of the pastry over the filling, pinching them together to create a secure pocket. Alternatively, you can create a pinwheel or braid; the choice is yours!
- Transfer the prepared pastries onto a baking sheet lined with parchment paper. Make sure to leave some space between each Danish to allow for even baking.
- In a small bowl, whisk the egg and brush a generous amount over the tops of the pastries. This will give them a beautiful golden-brown color when baked.
- Bake in the preheated oven for 25 to 30 minutes, or until the pastries puff up and turn golden brown. Keep an eye on them towards the end, as oven temperatures can vary.
- Once baked, remove from the oven and let cool for a few minutes. If desired, dust with powdered sugar for a lovely presentation. Serve warm and watch how quickly they disappear!
As you follow these steps, pay attention to the texture of the dough and the aroma of the filling; this can be really enjoyable and adds to the overall experience of baking. You may also find it helpful to prepare the cream cheese filling ahead of time so that it can be chilled, which sometimes makes it easier to handle.
Variations & Substitutions
Apple Cinnamon Variation: If you want to incorporate a warm flavor, consider adding ground cinnamon to the cream cheese filling. About a teaspoon will do the trick. This variation pairs beautifully with the apples and adds a comforting aroma. It’s perfect for fall or any time you’re looking for something heartwarming. Just make sure to taste the filling before proceeding, as the cinnamon can sometimes overpower the delicate flavors.
Caramel Drizzle Variation: For those who have a sweet tooth, adding a caramel drizzle once the Danish has cooled can take the dish to the next level. You can use store-bought caramel sauce or make your own by melting sugar until it’s golden brown, then adding in cream. This caramel drizzle would not only enhance the sweetness but also add a lovely glossy finish that looks appealing.
Berry-Filled Danish: If you prefer berries over apples, you can easily swap out the chopped apples for fresh blueberries or raspberries. This variation brings a bright, tangy element to the pastry, which pairs well with the cream cheese. Increase the sugar a bit in the filling, as berries tend to be more tart. The colors of the berries also add a visually stunning contrast when served.
Nut-Free Option: This Danish is naturally nut-free, but if you want to keep it that way while still adding crunch, consider incorporating toasted oats or a sprinkle of crushed pretzels into the cream cheese filling — feel free to get creative. Just ensure that whatever you choose does not clash with the core flavors of the espresso or apple.
Gluten-Free Variation: If you or someone you know has gluten intolerance, you can utilize a gluten-free puff pastry available at many grocery stores. Keep an eye on baking times, as gluten-free options may require slight adjustments in time and temperature.
Common Mistakes to Avoid
While making the Delicious Espresso Apple Cream Cheese Danish may seem simple, there are a few common pitfalls to be aware of. Firstly, be cautious not to overwork the puff pastry. Overworking the dough can lead to tough pastries rather than the light, flaky texture you’re aiming for. Handle the dough gently, and remember that a little rolling is all you need to achieve the desired size.
Another mistake to avoid is not allowing your pastries to cool slightly after they come out of the oven. Serving them too hot can lead to a messy filling that spills out when cut. Instead, let them rest for about five minutes to set. Additionally, keep an eye on the baking time. Different ovens may have slightly different cooking times, so checking for that golden brown color is essential to avoid under or overbaking.
Finally, when choosing your apples, make sure to select ones that hold up well during baking. Softer varieties might turn too mushy and lose their texture, leading to a subpar experience. Stick to firmer types like Granny Smith or Honeycrisp for the best results.
Storage, Freezing & Reheating Tips
The Delicious Espresso Apple Cream Cheese Danish is best enjoyed fresh, but you can store leftovers to enjoy later. To refrigerate, simply place any uneaten pastries in an airtight container; they can be kept in the fridge for up to three days. When you are ready to eat them, a quick reheating in the oven or toaster oven will help restore some of that lovely crispness.
If you’d like to freeze the Danish, it’s recommended to do so before baking. After assembling the pastries, place them on a baking sheet and freeze until solid. Once frozen, transfer them to a freezer-safe bag or container. This method allows you to have a warm, freshly baked treat whenever the craving strikes. When you’re ready to bake, no thawing is necessary; simply follow the baking instructions, adding a couple of extra minutes to the bake time.
Food safety is paramount. Always make sure your pastries are completely cooled before storing them in the fridge or freezer to prevent excess moisture, which can lead to sogginess. If you plan to use any fillings that are particularly perishable (like fresh apples), consume quickly for the best quality.
Frequently Asked Questions
Can I use store-bought cream cheese frosting instead of plain cream cheese?
While cream cheese frosting could work in a pinch, it may alter the flavor and texture of your filling. Frosting is generally much sweeter, which can overwhelm the espresso and apple flavors. If you enjoy a sweeter filling, it’s better to adjust the sugar in the plain cream cheese mixture rather than substituting entirely.
Is it necessary to use espresso powder for this recipe?
Using espresso powder is highly recommended for capturing that deep coffee flavor, but if you don’t have any on hand, you can substitute with instant coffee granules. Just remember that it may result in a slightly different flavor profile. For those who do not drink coffee, feel free to omit it altogether for a vanilla and apple Danish that is still delicious.
Can I make this Danish without eggs?
Yes, you can make a vegan version of this recipe. Substitute the egg wash with a mixture of almond milk and a bit of flour for a similar effect. To replace the cream cheese, consider using a plant-based cream cheese alternative. The end result will be a beautiful and tasty Danish that everyone can enjoy.
Can I add spices to the filling?
Absolutely! Incorporating a pinch of nutmeg or a dash of cardamom can add extra warmth and complexity to the filling. Just remember to start with a small amount, as these spices can be quite strong. Adjust according to your personal taste to find the perfect balance that you love.
How do I know when my Danish is perfectly baked?
Keep an eye on the color of your pastries as they bake. The Danish is ready when it has puffed up and turned a beautiful golden brown color. A faint aroma of espresso and baked pastry will fill the kitchen, which is another good sign. If the filling starts bubbling out of the seams, it’s also an indication that they are perfectly done.
Conclusion:
The Delicious Espresso Apple Cream Cheese Danish is a fantastic recipe that truly elevates a classic pastry with rich flavors and an enticing filling. Whether you’re enjoying it for breakfast or serving it at a gathering, this pastry is sure to impress. With its creamy filling, the delightful balance of sweetness from the apples, and a hint of espresso, it’s a treat that is simply irresistible. Try your hand at making these pastries, and feel free to customize them to suit your preferences. Your kitchen will soon be filled with warmth and delightful aromas, and you’ll find yourself making them again and again. Enjoy the process and remember to share the joy with family and friends—it’s a treat that’s best enjoyed with loved ones!


