Prep time: 20 minutes
Cook time: 25 minutes
Total time: 45 minutes
Servings: 24
Irresistible Old Fashioned Pecan Tassies are a delightful treat that many of us have cherished since childhood. Imagine flaky pastry cups filled with a luscious, gooey mixture of pecans and sweet syrup, all baked to perfection. These little bites of heaven evoke warm memories of family gatherings, holiday celebrations, and cozy evenings at home. The truth is, once you taste these heavenly bites, they will become a staple in your dessert rotation. In this article, you’ll learn how to prepare these delightful tassies, along with invaluable tips, variations, and troubleshooting guidance to ensure your baking adventure is a success.
What Is Irresistible Old Fashioned Pecan Tassies?
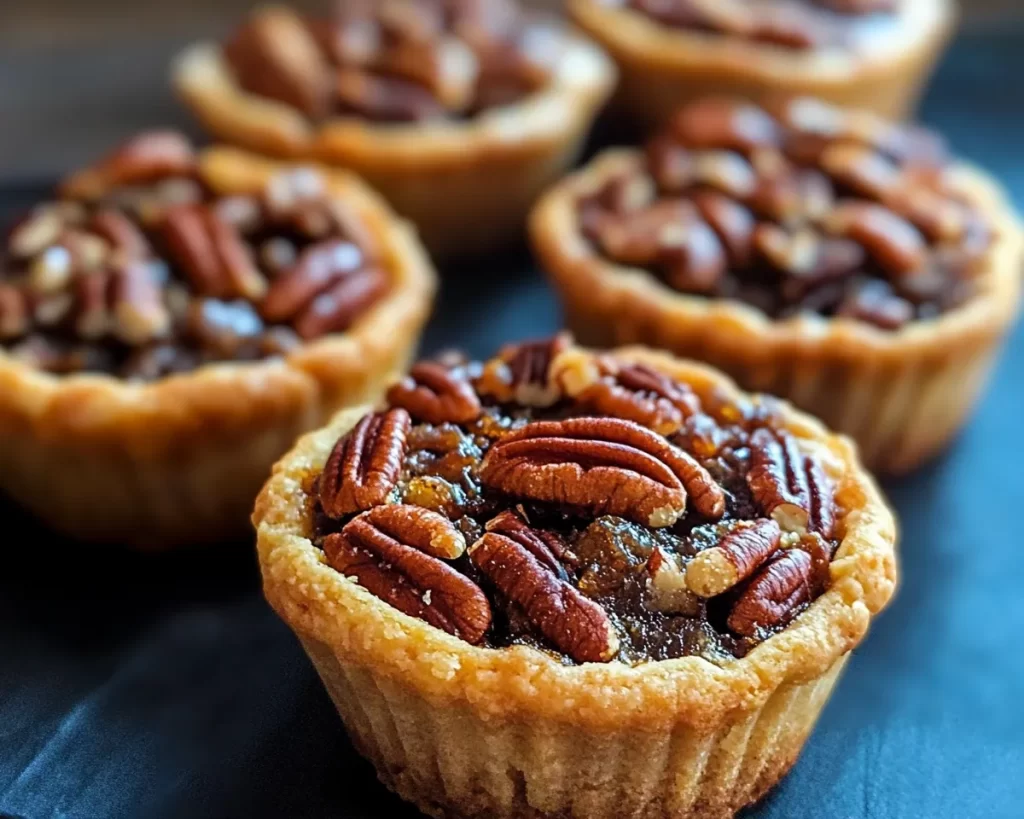
Irresistible Old Fashioned Pecan Tassies, originating from southern culinary traditions, are miniature pecan pies made individually in tart pans. The defining feature of this delightful dessert is its crumbly, buttery crust that perfectly complements the rich, nutty filling. The filling is typically made with a mixture of chopped pecans, eggs, sugar, and vanilla—a delightful combination that when baked, transforms into a custard-like consistency, with nuts adding a delightful crunch.
These tassies have an exquisite texture: the shell is tender and flaky, while the filling is both chewy and creamy. The distinctive flavor profile captures the warmth of brown sugar and vanilla, combined with the unmistakable taste of toasted pecans. When you pop one into your mouth, you will be greeted by the sweet aroma that embraces your senses.
Moreover, these delightful treats are often enjoyed during festive seasons, making them a favorite for Christmas parties and family gatherings. It wouldn’t be an exaggeration to say that a tray of these tassies can disappear in minutes, leaving a trail of satisfied smiles.
Why You’ll Love This
There are countless reasons why you’ll love making Irresistible Old Fashioned Pecan Tassies at home. First and foremost, their **taste** is beyond compare. The combination of crunchy pecans and the sweet, syrupy filling creates a perfect balance of flavors, making each bite an experience. Additionally, they are incredibly **easy** to prepare. With a straightforward list of ingredients and simple steps to follow, even novice bakers can achieve impressive results.
Cost-effective, these tassies require ingredients that are often found in your pantry. Pecans, while they can be a bit pricey, can be purchased in bulk to save on costs. Moreover, the recipe utilizes items like butter, sugar, and flour, keeping your budget intact. They are also versatile; you can adapt them to fit various dietary needs or preferences.
Furthermore, some may think that making these tasters is complicated or time-consuming. However, when broken down into manageable steps, you’ll find that even if you are busy or on a tight schedule, you can whip up a batch before you know it. A perfect make-ahead dessert for gatherings, these tassies can easily be made a day in advance and served fresh.
Ingredients You’ll Need
- All-purpose flour: This forms the base of your crust. If you’re looking for a gluten-free option, consider almond flour or a gluten-free flour blend.
- Butter: Unsalted butter is ideal for the crust, bringing in richness. Ensure it is cold for a flaky texture.
- Granulated sugar: This adds sweetness to your crust, balancing the nutty flavor of the filling.
- Pecans: Chopped pecans are the star of this recipe. Feel free to toast them lightly to enhance their flavor.
- Brown sugar: Packed brown sugar adds a deeper, caramel-like sweetness to the filling. Light or dark brown sugar can be used depending on your preference.
- Eggs: These bind the filling together and contribute to the smooth texture.
- Vanilla extract: A hint of vanilla enriches the overall flavor. Opt for pure vanilla extract for the best taste.
Having these ingredients on hand is essential for creating the quintessential tassies, and knowing their roles can assist in making adjustments if necessary.
How to Make
Here’s a step-by-step guide to help you create these delightful Irresistible Old Fashioned Pecan Tassies:
- Preheat your oven to 350°F (175°C). This step ensures that the tassies bake evenly and attain a beautiful golden-brown color. Make sure your oven is hot enough before placing the trays inside.
- In a mixing bowl, combine 1 cup of all-purpose flour and 1/2 cup of unsalted butter. Use a pastry cutter or your fingertips to mix until the mixture appears similar to coarse crumbs. It’s important not to overmix; you want to keep the mixture light and fluffy for a tender crust.
- Add 1/4 cup of granulated sugar into the mixture, blending until incorporated. This adds sweetness to the crust while ensuring it holds together well. Once you achieve a sandy texture, it will be ready for the next step.
- Press the dough into the bottom and up the sides of a mini muffin pan. Make sure to create an even thickness throughout, about 1/8 inch. This step forms the shell; ensure there are no cracks to keep the filling from leaking.
- Now, move on to the filling. In a separate bowl, whisk together 2 large eggs, 1 cup of packed brown sugar, and 1 teaspoon of vanilla extract. Ensure the eggs are beaten well, blending with the sugars to create a smooth mixture. This ensures a consistent texture in the filling.
- Once combined, gently fold in 1 cup of chopped pecans. Make sure to distribute the pecans evenly, as they will form the delightful crunch within the filling. The goal is to create a filling that has enough nuts for flavor without overpowering the sweetness of the syrup.
- Spoon the pecan filling into each crust, filling them about three-quarters full. Avoid overstuffing them, as the filling will expand during baking. You want to maintain that perfect balance between crust and filling.
- Bake in the preheated oven for about 25 minutes. Keep an eye on them; ideally, they should turn a lovely golden color. The filling will puff up slightly, and a toothpick inserted should come out clean.
- Once baked, let them cool in the pan for about 10 minutes before transferring them to a wire rack to cool completely. This cooling time helps them set up and enhances their flavor as the ingredients meld together.
After you’ve followed these steps, your delightful pecan tassies will be ready to enjoy! Their aroma wafting through your home will certainly entice everyone who’s nearby.
Variations & Substitutions
Chocolate Pecan Tassies: For a decadent twist, incorporate some chocolate chips into your filling. Semi-sweet or dark chocolate pairs beautifully with the rich, nutty pecans—creating a harmonious balance between sweet and savory. Just add about 1/2 cup of chocolate chips alongside the pecans. This variation is ideal for chocolate lovers and provides a delightful contrast in flavor.
Maple Pecan Tassies: To give your tassies an autumnal twist, substitute maple syrup for some of the sugar in the filling. Using 1/4 cup of maple syrup in place of 1/4 cup of brown sugar introduces that deep, robust flavor to the filling. This variation is perfect for Thanksgiving and resonates well with the changing seasons, melding beautifully with the flavors of fall.
Nut-Free Version: If you’re preparing these treats for someone with nut allergies, you can substitute pecans with sunflower seeds. The flavor will be different, but the texture can still deliver that delightful crunch. Using sunflower seed butter instead of traditional butter can also work well in this recipe, giving you a creamy filling without any nuts.
Vegan Pecan Tassies: For a vegan variation, replace the eggs with a flaxseed meal mixture (1 tablespoon of flaxseed meal mixed with 3 tablespoons of water, left to sit until it thickens) and use a vegan butter substitute. Likewise, ensure that your sugar is vegan-friendly, as some sugars are processed with bone char.
Spiced Variation: For those who enjoy a bit of heat, consider adding a pinch of ground cinnamon or nutmeg into the filling mixture. This addition elevates the flavor profile, creating an aromatic experience that will delight the senses. A touch of spice can transform these little desserts into something truly unique.
Each variation presents an exciting twist on the classic, allowing you to experiment based on preferences or dietary needs.
Common Mistakes to Avoid
Baking, while rewarding, comes with its own set of challenges. One common mistake is overmixing the dough for the crust. When you overmix, the crust can become tough rather than flaky. Always mix just until combined, and remember: less is often more in baking!
Another issue often encountered is underbaking the tassies. If they appear too jiggly when you take them out of the oven, resist the urge to take them out early. Allowing them to bake fully ensures that the filling sets properly, yielding the perfect gooey texture. Similarly, if you overfill them, the filling may spill over, creating a mess in your muffin tin. It’s best to fill them just under the rim if you want a burst of flavor without losing some of your filling!
Finally, allowing your tassies to cool adequately before removing them from the muffin pan is another area where things can go awry. If removed too early, they may break apart. Allow them to rest for about 10 minutes in the pan before attempting to remove them gently. This step will allow the pastry to firm up, making it much easier to pop them out intact.
Storage, Freezing & Reheating Tips
Proper storage is essential for keeping your Irresistible Old Fashioned Pecan Tassies fresh. These delightful treats can be kept at room temperature for up to three days in an airtight container. For optimal freshness beyond that period, consider refrigerating them. They will comfortably sit for up to a week while chilled.
If you want to make them ahead of time, freezing is a fantastic option. You can freeze them either before or after baking. To freeze unbaked dough, wrap it tightly in plastic wrap and place it in an airtight container. When ready to bake, thaw it in the refrigerator overnight. For baked tassies, allow them to cool completely, then place them in a single layer in a freezer-safe bag or container. They can be frozen for up to three months!
When reheating, simply place the thawed tassies in a preheated oven at 350°F (175°C) for about 10-15 minutes, or until warmed through. This ensures they maintain that delightful texture and flavor, similar to when they were first baked. Always remember to allow baked goods to cool completely before freezing or refrigerating to keep their texture intact.
Frequently Asked Questions
Can I make the dough in advance? Yes! You can prepare the crust dough up to two days ahead of time and keep it wrapped tightly in the refrigerator. When ready to assemble, simply roll it out or press it into the muffin tin directly from the fridge. This saves time for a busy day and makes for seamless preparation.
Can I incorporate other nuts into the filling? Absolutely! While pecans are traditional, you can experiment with other nuts like walnuts or hazelnuts. They will indeed change the flavor, giving you a different yet equally delicious result. Just remember to chop them finely to ensure they mix evenly in the filling.
Are there any gluten-free options available? Yes! As mentioned, you can substitute all-purpose flour with gluten-free flour blends. Be sure to check the blend you choose for optimal results, as some can yield slightly different textures.
How do I know when they are done baking? The tassies should be golden brown on top, and the filling will puff up slightly. You can also insert a toothpick in the center; if it comes out clean, they are ready to come out of the oven.
What if I don’t have a mini muffin tin? If you don’t own a mini muffin tin, you can use a regular muffin tin; however, be mindful that the baking time may vary. Increase baking time by about 5-10 minutes. Enjoy extra-large tassies!
Conclusion:
Irresistible Old Fashioned Pecan Tassies are not only a delicious treat but also a wonderful addition to any gathering or celebration. Their delightful combination of flavors and textures will have you and your loved ones craving more. With various adaptations and easy steps to follow, it’s time for you to try this recipe. Customize it to suit your taste, and don’t hesitate to share with friends and family. They’ll surely appreciate the effort, and you might even inspire others to create their own tassies! Grab your ingredients, gather your confidence, and kick off this delicious baking adventure today!


