Prep time: 30 minutes
Cook time: 30 minutes
Total time: 1 hour
Servings: 12
St. Patrick’s Day is a time for celebration, and what better way to celebrate than with a deliciously festive dessert? The St. Patrick’s Day Green Velvet Sheet Cake is not only visually striking with its vibrant green hue, but it is also moist and decadent, making it the perfect treat for gatherings. This unique cake will definitely become a showstopper at any party.
In this article, you will learn how to create this delightful cake from scratch. Packed with flavor and charm, every slice promises a soft texture and a rich taste that encapsulates the spirit of the holiday. You’ll also discover helpful tips on variations, storage, and even common mistakes to avoid in your baking journey. Get ready to impress your friends and family with this mouthwatering dessert!
What Is St Patrick’s Day Green Velvet Sheet Cake?
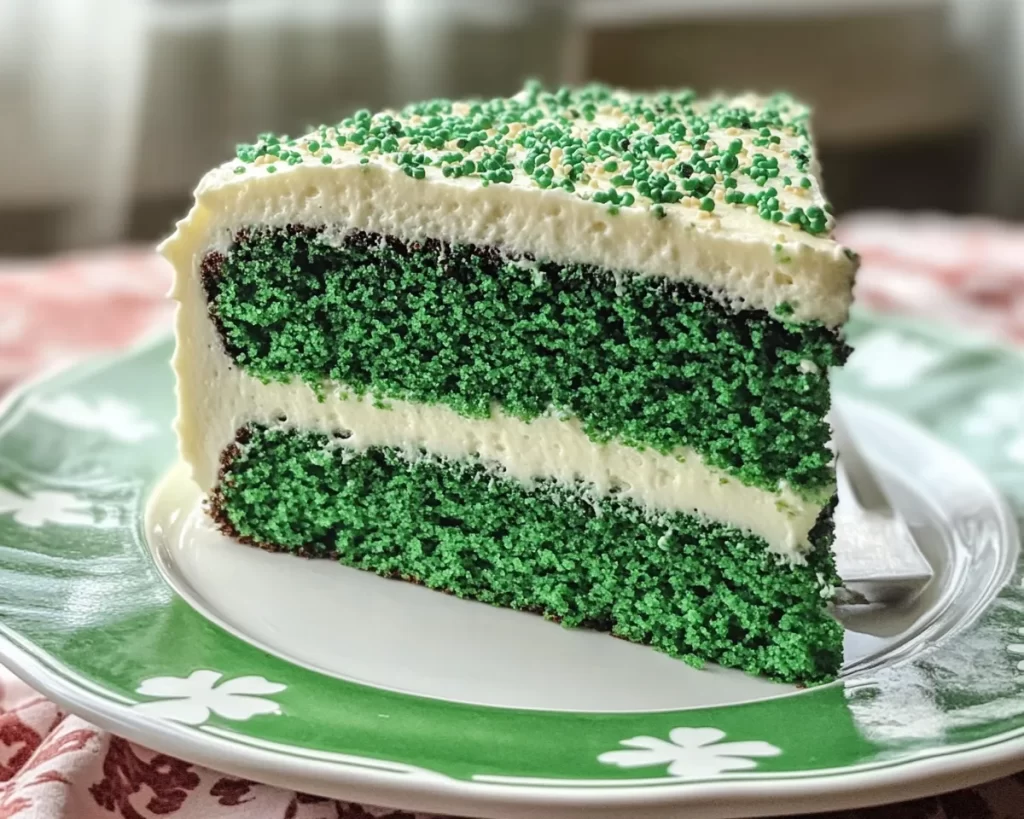
St. Patrick’s Day Green Velvet Sheet Cake is a delightful twist on the classic red velvet cake. Originating from the Southern United States, red velvet cake has long been a favorite for its rich flavor and striking color. The green version of this cake draws inspiration from St. Patrick’s Day, making it a fun and thematic choice for celebrating the holiday.
This cake typically has a light, airy texture and a subtle cocoa flavor that balances the sweetness perfectly. The vibrant green color comes from adding green food coloring to the batter, making it an eye-catching centerpiece. The traditional cream cheese frosting adds a tangy, creamy finish that complements the cake’s flavor beautifully. When you slice into this cake, you’ll notice a tender crumb and a luscious frosting that ties it all together, ensuring every bite is a delight.
Why You’ll Love This
You will fall in love with the St. Patrick’s Day Green Velvet Sheet Cake for several reasons. First and foremost, its taste is nothing short of sensational! The slightly chocolatey flavor combined with the creamy frosting creates a perfect harmony that is hard to resist. Furthermore, this cake is a breeze to make, even for beginners in the kitchen.
One of the most appealing aspects of this cake is its versatility. You can serve it for St. Patrick’s Day, birthdays, or any gathering that calls for a fun, festive dessert. Additionally, the ingredients are typically budget-friendly, so you can create this stunning cake without breaking the bank. While many may think that baking a cake requires advanced skills, the truth is that with this recipe, you’ll be able to whip up a masterpiece effortlessly. Just follow the simple steps, and you’ll impress everyone with your baking prowess!
Ingredients You’ll Need
- All-purpose flour: This is the base of your cake, giving it structure. You can substitute with gluten-free flour if needed.
- Cocoa powder: Just a small amount adds depth to the flavor without making it taste chocolatey. Use unsweetened cocoa for the best results.
- Baking soda: This is your leavening agent, helping the cake rise. Ensure it is fresh for maximum effectiveness.
- Salt: Enhances overall flavor, balancing the sweetness. It’s an important component in any baked goods.
- Vegetable oil: Keeps the cake moist and tender. You could also use melted coconut oil or unsalted butter.
- Granulated sugar: Sweetens the cake and contributes to the texture. Brown sugar can add moisture and a hint of caramel flavor.
- Eggs: Provide structure and richness. If looking for a vegan option, you can try using flax eggs.
- Buttermilk: Adds moisture and tanginess to the cake. If you don’t have buttermilk on hand, you can make a quick substitute with milk and vinegar.
- Vanilla extract: Enhances the flavor of the cake. Always opt for pure vanilla for the best taste.
- Green food coloring: The star ingredient that transforms your cake into a festive delight. You can adjust the amount based on your desired hue.
- Cream cheese: The base for your frosting. It adds a delicious tanginess, making it irresistible.
- Powdered sugar: Sweetens and thickens the frosting. Make sure to sift it to avoid lumps.
- Heavy cream: This is used to make the frosting even more luscious. You can also use whole milk or a non-dairy alternative.
How to Make
- Preheat your oven: Start by setting your oven to 350°F (175°C). This ensures that your cake rises beautifully during the baking process. While the oven heats, you can prepare your baking pan. Grease a large sheet pan (about 18×13 inches) with butter or non-stick spray, and line it with parchment paper for easy removal after baking.
- Combine dry ingredients: In a large bowl, whisk together the all-purpose flour, cocoa powder, baking soda, and salt until blended. This step is essential for ensuring that your dry ingredients are evenly distributed and that your cake rises uniformly when baked. Set the bowl aside for a moment.
- Mix wet ingredients: In another bowl, combine the vegetable oil and granulated sugar. Beat them together until well combined. Add the eggs, buttermilk, and vanilla extract, mixing thoroughly until everything is incorporated. As you mix, notice the rich, smooth texture that develops — this is what makes your cake moist and delicious.
- Add food coloring: Once your wet mixture is smooth, add the green food coloring. Start with a few drops and mix well; you can always add more to achieve your desired intensity. It is crucial to get the color just right, especially for a festive occasion. The batter should be a vibrant green that pops.
- Combine wet and dry ingredients: Gradually add the dry mixture to your wet ingredients, mixing until just combined. Overmixing can lead to a tough cake, so stir until you no longer see dry flour. You’ll notice the batter becoming shiny and smooth, a signal that you’re almost there!
- Bake it off: Pour the batter into your prepared sheet pan, spreading it evenly to ensure consistent baking. Bake in the preheated oven for about 25-30 minutes or until a toothpick inserted into the center comes out clean. As it bakes, your kitchen will fill with the delicious aroma of baking cake, making it hard to wait!
- Cool the cake: Once baked, remove the cake from the oven and let it cool in the pan for about 10-15 minutes. Then, carefully transfer it to a wire rack to cool completely. Skipping this step could lead to a soggy bottom, so give your cake ample time to cool down.
- Prepare the frosting: In a large bowl, beat together the cream cheese and heavy cream. Gradually add in the powdered sugar and vanilla extract, mixing until smooth and fluffy. This frosting is incredibly creamy and rich, and by mixing it perfectly, you achieve a delightful texture that will complement your cake beautifully.
- Frost the cake: Once your cake is fully cooled, generously spread the cream cheese frosting over the top using a spatula. Feel free to get creative with decorating! You can add festive sprinkles or even a sprinkle of cocoa powder for contrast. Each slice will deliver creaminess atop the soft cake, creating a delectable experience.
- Slice and serve: Cut your cake into squares and serve it at your celebration. Watch as your friends and family enjoy a slice, and don’t forget to enjoy one yourself! The combination of flavors, textures, and the celebratory appearance make it a sure hit!
Variations & Substitutions
Gluten-Free Variation: If you’re looking to make this cake gluten-free, you can easily substitute all-purpose flour with a 1:1 gluten-free flour blend. Many blends are available that work well in baking, providing the necessary structure without compromising flavor. Just be careful not to overmix your batter, as gluten-free flours can behave differently compared to regular flour.
Chocolate Green Velvet Cake: For a more decadent twist, consider increasing the cocoa powder to half a cup. This will give the cake a more chocolatey flavor while retaining its signature green hue. This variation is perfect for chocolate lovers, adding an indulgent depth to the dessert that is fantastic alongside the cream cheese frosting.
Vegan Green Velvet Cake: To create a vegan version of this cake, you can swap out eggs with flaxseed eggs — simply mix one tablespoon of ground flaxseed with three tablespoons of water, letting it sit for a few minutes to thicken. Use plant-based milk instead of buttermilk, and opt for coconut oil instead of vegetable oil for moisture. This modification allows everyone to join the celebration, regardless of dietary preferences.
Mint Chocolate Chip Green Velvet Cake: Adding mint extract to the frosting creates a refreshing mint chocolate chip flavor profile. Just use a couple of drops, as mint extract can be quite strong. You can even fold mini chocolate chips into the batter for an extra surprise with each bite. This variation is especially crowd-pleasing, as it combines two favorite flavors into one delightful cake.
Layered Green Velvet Cake: Instead of a single sheet cake, you can bake the batter in two round cake pans to create a stunning layered cake. Just ensure you adjust your baking time. A nice layer of frosting between the two layers will not only elevate the cake’s height but also make it a show-stopping centerpiece for any gathering.
Common Mistakes to Avoid
When preparing your St. Patrick’s Day Green Velvet Sheet Cake, being aware of common mistakes can save you time and frustration. One frequent error is using expired baking soda, which is essential for leavening. Always check the expiration date before tossing it into the mix; if it has lost its potency, your cake may not rise properly, leading to a dense texture.
Another mistake is overmixing the batter. While you want your ingredients to be well combined, overmixing can add too much air into the batter, resulting in a dry and tough cake. Mix just until the flour is incorporated and resist the urge to beat it endlessly.
Be sure to allow your cake to cool completely before frosting. Applying frosting to a warm cake can cause it to melt, making a mess and making it difficult to get those clean, smooth edges. Patience is key here, as the waiting time will reward you with a beautifully finished dessert.
Lastly, when adding food coloring, it’s important to remember that the final appearance may change slightly during baking. Don’t be afraid to add a little extra color if needed, but start with a small amount and increase gradually until you achieve the desired shade.
Storage, Freezing & Reheating Tips
Proper storage is crucial to keeping your St. Patrick’s Day Green Velvet Sheet Cake fresh and tasty. If you have any leftovers, store them in an airtight container at room temperature for up to three days. If you anticipate the cake lasting longer than that, refrigeration is your best bet. Just ensure it is well covered to prevent it from drying out.
For longer-term storage, you can freeze the cake. Once completely cooled, wrap it tightly in plastic wrap and then in aluminum foil to prevent freezer burn. It can be stored in the freezer for up to three months. When you’re ready to enjoy it again, thaw it in the refrigerator overnight to maintain its moisture before frosting it.
Reheating isn’t typically necessary since this cake is best served at room temperature. However, if you prefer it slightly warm, you can pop an individual slice in the microwave for about 10-15 seconds. Be cautious not to overheat it, as cakes can become tough and lose their delightful texture.
Frequently Asked Questions
Can I use another type of frosting instead of cream cheese frosting?
Absolutely! While cream cheese frosting pairs perfectly with this cake, you can use whipped cream, buttercream, or even a chocolate ganache for a different flavor experience. Each option will bring its unique taste and texture to the cake, so feel free to experiment based on your preferences.
Is it possible to make this cake ahead of time?
Definitely! You can bake the cake a day or two before your event. Just store it properly as mentioned in the storage section, and frost it right before serving. This will ensure that the cake remains fresh and the frosting maintains its texture.
Can I use less food coloring for a lighter green cake?
Yes, if you prefer a subtler green hue, you can adjust the amount of food coloring to your liking. Just keep in mind that the final color will be influenced during baking, so test with a small amount first and increase as needed until you achieve your desired result.
What can I do if my cake doesn’t rise?
If your cake didn’t rise, it could be due to expired baking soda or improper mixing. Always check the freshness of your leavening agents, and avoid overmixing your batter. Keeping your oven properly preheated is also essential for giving your cake the boost it needs to rise successfully.
Is this cake suitable for vegan diets?
Yes, with a few simple substitutions, such as using flax eggs and plant-based milk, you can create a vegan-friendly version of this delightful cake. Each variation will still deliver the same moist texture and delicious taste, allowing everyone to indulge in this festive dessert.
Conclusion:
In summary, the St. Patrick’s Day Green Velvet Sheet Cake is not just a visually stunning treat but also a delicious one that can brighten any celebration. Its unique flavor, ease of preparation, and versatility make it a must-try for anyone looking to add something special to their festive menu. I encourage you to try this recipe, customize it to your liking, and share it with loved ones. Your baking adventure awaits, and this cake could become a cherished tradition. Bake, enjoy, and celebrate the joy of cooking!


