Prep time: 15 minutes
Cook time: 20 minutes
Total time: 35 minutes
Servings: 12 scones
When St. Patrick’s Day rolls around, thoughts inevitably drift to hearty meals, traditional fare, and the warmth of a home filled with cozy aromas. Among the many delights celebrated on this festive day, St Patrick’s Day Irish Cheddar and Herb Scones stand out with their delightful flavors and comforting textures. Imagine biting into a warm scone, the rich, sharp flavor of cheese melding beautifully with fragrant herbs. It’s a combination that not only brings smiles but also fills the kitchen with an irresistible aroma.
This recipe isn’t just about deliciousness; it’s a versatile gem that appeals to everyone, from busy parents seeking quick snacks for their kids, to novice bakers looking to impress. St Patrick’s Day Irish Cheddar and Herb Scones are an exciting way to elevate any meal. Plus, you’ll learn key techniques for achieving that glorious texture and flavor, as well as variations to make the dish suit your personal taste. Embrace the holiday spirit by creating these easy-to-make scones, which will have everyone anticipating your next baking adventure.
What Is St Patrick’s Day Irish Cheddar and Herb Scones?
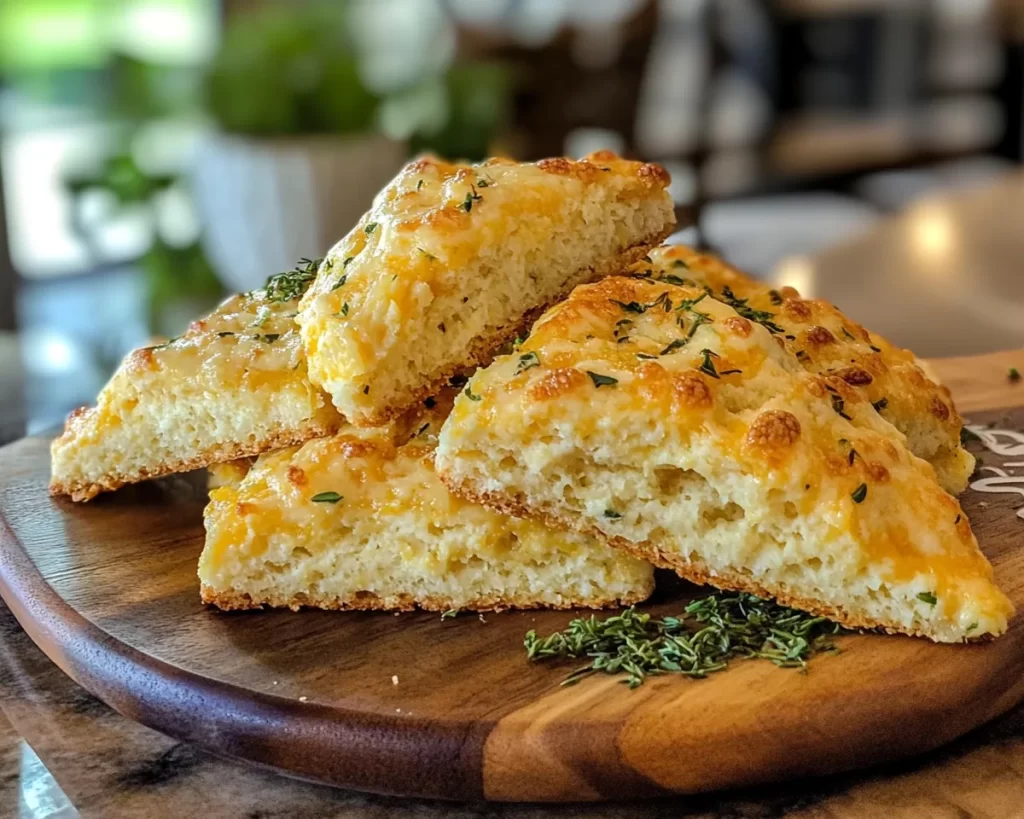
St Patrick’s Day Irish Cheddar and Herb Scones are delightful baked goods that combine the rich, creamy taste of Irish cheddar cheese with fresh herbs, creating a flavor sensation that is both savory and comforting. Traditionally, scones are known for their crumbly texture and lightness, thanks to the use of baking powder as a leavening agent. The texture is crucial, as it allows for a delightful contrast when paired with butter and jam or enjoyed on their own.
These scones have roots in Irish cuisine and often celebrate the local flavors of the region. The use of Irish cheddar, known for its sharpness and depth of flavor, elevates this dish to a true culinary experience. Texture is key when it comes to making scones. You want them light and fluffy on the inside with a slightly crispy outer layer. The addition of herbs not only infuses the scones with aromatic flavors but also enhances the visual appeal, making these treats both a pleasure to eat and behold.
Why You’ll Love This
There are countless reasons to fall in love with St Patrick’s Day Irish Cheddar and Herb Scones. For one, the flavor profile is simply extraordinary; the sharp cheese combined with a medley of herbs creates an exciting bite that packs a punch. If you’re new to baking or just looking for an easy, quick recipe, you’re in luck! These scones are straightforward to whip up, making them perfect for any home cook, regardless of experience.
Let’s not forget about the cost-effectiveness of this recipe. Most of the ingredients are common kitchen staples and can often be found at your local grocery store. This means you won’t need to break the bank to enjoy a delicious treat. Moreover, these scones are versatile and can easily be customized to fit various dietary needs. Whether you’re trying to stick to a budget, looking for something quick and satisfying, or simply want to treat yourself and your family, these scones are a great choice.
One common misconception is that homemade scones require extensive baking skills. In reality, they are quite forgiving and can be easily adapted to suit different tastes. Lent yourself some confidence! The combination of flavor, texture, and ease make St Patrick’s Day Irish Cheddar and Herb Scones a go-to recipe for any occasion.
Ingredients You’ll Need
- 2 cups all-purpose flour: This is the base of the scones and gives them structure. You can substitute with whole wheat flour for a nuttier flavor.
- 1 tablespoon baking powder: This is an essential leavening agent that ensures your scones rise properly.
- 1/2 teaspoon salt: It enhances flavor and balances out the richness of the cheese.
- 1/4 cup unsalted butter: The butter adds richness and also contributes to that flaky texture.
- 1 cup shredded Irish cheddar cheese: The star ingredient! It’s sharp and flavorful.
- 1/4 cup fresh herbs (e.g., chives, parsley): Fresh herbs add a burst of flavor. Feel free to mix and match based on your preferences.
- 3/4 cup buttermilk: This adds moisture and helps tenderize the dough. You can use regular milk mixed with a splash of vinegar as a substitute.
- 1 egg (for an egg wash): This gives the scones a beautiful, shiny finish.
Each ingredient works harmoniously to create a balance of flavor, texture, and aroma, making these scones a delightful addition to any meal or occasion.
How to Make
- Preheat your oven: Start by preheating your oven to 400°F (200°C). This ensures the scones bake evenly. Preparing your oven ahead of time makes a big difference in the final texture.
- Mix dry ingredients: In a large mixing bowl, combine the all-purpose flour, baking powder, and salt. Whisk them together thoroughly to ensure all the leavening agent is evenly distributed. Taking this step seriously ensures your scones will rise properly.
- Add butter: Cut the unsalted butter into small cubes and add it to the flour mixture. Using your fingertips or a pastry cutter, work the butter into the flour until the mixture resembles coarse crumbs. Be careful not to overwork the dough; you want to see small chunks of butter. This is crucial for achieving a flaky texture.
- Incorporate cheese and herbs: Add the shredded Irish cheddar cheese and chopped fresh herbs into the mixture. Gently fold them in, ensuring they’re evenly distributed throughout the dough. The cheese will melt during baking, creating delightful pockets of flavor.
- Add buttermilk: Gradually pour in the buttermilk while gently mixing until the dough begins to come together. Be cautious not to overmix; it’s okay if it’s a little crumbly at this stage. The key is to bring it to a cohesive dough without developing too much gluten.
- Shape the dough: Lightly flour a clean surface and turn the dough out onto it. Press the dough gently into a circle about 1 inch thick. Use a knife or pastry cutter to slice the dough into 8-12 wedges, depending on your preferred size. Alternatively, use a round biscuit cutter to make individual scones.
- Prepare for baking: Line a baking sheet with parchment paper for easy cleanup. Place the scones on the baking sheet, ensuring they have some space between them. They will expand during baking!
- Egg wash: Whisk the egg and brush it over the tops of the scones. This gives them a lovely golden color and shiny finish when done.
- Bake: Put the scones in the preheated oven and bake for 20-25 minutes or until they are lightly golden on top. You will know they’re done when a toothpick inserted into the center comes out clean. The smell will be enticing, filling your kitchen with warmth and goodness!
- Cool and enjoy: Once out of the oven, allow the scones to cool on the baking sheet for 5 minutes before transferring them to a wire rack. Serve them warm, enjoy the cheesy aroma, and relish the deliciousness!
Following these steps carefully will ensure that your scones come out perfectly every time. The process is straightforward and allows you to take pride in your homemade treats without spending all day in the kitchen.
Variations & Substitutions
Cheddar and Bacon Variation: Add cooked, crumbled bacon to the dough for a smoky flavor that complements the cheese beautifully. This savory twist can make the scones even more irresistible, especially for those who love a heartier bite. Just be sure to balance the amount of salt in the recipe since bacon can be quite salty.
Gluten-Free Variation: If you or someone you know has a gluten intolerance, you can substitute the all-purpose flour with a 1:1 gluten-free flour blend. Be aware that the texture may vary slightly; however, it’s still a great way to enjoy these scones without gluten. It’s particularly important to check pre-made mixes for any additional binders that might be necessary.
Herb Variations: While chives and parsley are wonderful, you can experiment further with other herbs like rosemary, thyme, or even dill. Each herb brings its unique aroma and flavor, transforming the entire dish. Try using a blend to discover a new favorite!
Spicy Variation: If you like the heat, you can incorporate chopped jalapeños or a pinch of cayenne pepper into the dough. This adds a delightful kick that elevates your scones to a whole new level of savory goodness. Perfect for those who enjoy a juxtaposition of flavors.
Cheese Substitutions: While Irish cheddar is fantastic, feel free to swap it for other types of cheese like gouda, pepper jack, or feta for a different flavor experience. Each type of cheese contributes its unique qualities, making it easy to personalize the recipe to suit your palate.
With these variations, the possibilities are endless! Whether you’re looking for something indulgent or a healthier option, there’s a way to customize your scones to your liking.
Common Mistakes to Avoid
Creating the perfect scone is easier than it seems, but there are a few common pitfalls to be aware of. The first is overmixing the dough. Scones benefit from gentle handling; overmixing can lead to tough, dense scones that are far from light and fluffy. Make sure to mix just until the ingredients come together.
Another frequent mistake is not having the oven hot enough. Scones need that initial high heat to rise properly. If your oven isn’t preheated adequately, the scones may spread more than rise, resulting in an undesirable texture. Always make sure your oven is preheated to the specified temperature for best results.
Lastly, don’t forget to consider the freshness of your baking powder. If it’s old and lost its potency, your scones may not rise well, resulting in flat scones. A simple test to check its freshness is to add a teaspoon of baking powder to a small bowl of hot water—if it bubbles aggressively, you’re good to go!
By keeping these tips in mind, you can ensure your scones turn out deliciously every time, making your baking experience joyful rather than stressful.
Storage, Freezing & Reheating Tips
After enjoying your freshly baked St Patrick’s Day Irish Cheddar and Herb Scones, you may find yourself with some leftovers. These scones store well, but it’s important to do it correctly to maintain their texture. Store the scones in an airtight container at room temperature for up to three days. You can also place parchment paper between layers to prevent sticking.
If you want to keep them longer, consider freezing them. To do this, let the scones cool completely, then place them in a freezer-safe bag or container. They can last up to three months when frozen. Just remember to date the container so that you use them within a suitable timeframe.
When you’re ready to enjoy your frozen scones, just pop them in the oven at 350°F (175°C) for about 10-15 minutes. This reheating method helps to restore that fresh-baked goodness, ensuring they taste just as delightful as the day they were made.
Following these simple storage, freezing, and reheating tips will make sure you enjoy your scones even longer. It’s a great way to prepare ahead for a busy week or special occasion without losing the amazing flavors your scones provide.
Frequently Asked Questions
Can I make the dough ahead of time? Yes, you can prepare the dough in advance and refrigerate it for up to 24 hours before baking. Just ensure to wrap it tightly in plastic wrap to prevent drying out. When you’re ready to bake, let it sit at room temperature for about 15 minutes before shaping it into scones.
How do I know when the scones are done baking? You will know the scones are done when they are lightly golden on top and a toothpick inserted in the center comes out clean. Keep an eye on them as they bake since oven temperatures can vary.
Can I substitute the buttermilk with regular milk? Yes, you can substitute buttermilk with regular milk mixed with a tablespoon of vinegar or lemon juice to mimic the acidity of buttermilk. This will still help achieve that tender texture you desire in scones.
Why did my scones turn out too dense? Dense scones often result from overworking the dough or using too much flour. It’s essential to handle the dough as minimally as possible and to measure your flour accurately. Using a scale can help ensure you’re using the right amount.
How can I make these scones healthier? You can make several adjustments to create a healthier version of the scones. Consider using whole wheat flour instead of all-purpose flour, and you can reduce the amount of cheese to lessen the fat content. Additionally, you can add vegetables, such as finely grated zucchini or carrots, for extra nutrition.
Conclusion:
In summary, St Patrick’s Day Irish Cheddar and Herb Scones are a wonderful blend of ease, flavor, and versatility that make a perfect addition to any meal. With the right techniques and a bit of practice, you can easily create delightful scones that will impress family and friends alike. Don’t hesitate to customize them to suit your preferences or dietary needs, making the recipe truly your own. Give this recipe a try, and you might just find yourself coming back to it again and again. Happy baking!


