Prep time: 20 minutes
Cook time: 30 minutes
Total time: 50 minutes
Servings: 12
The joy of Easter often comes hand-in-hand with a delightful array of treats, and what better way to celebrate than with a batch of scrumptious Easter Chocolate Bunny Brownies? Imagine biting into a rich, fudgy brownie adorned with adorable chocolate bunnies, making every piece feel like a little piece of holiday magic. This recipe isn’t just another brownie; it’s a fun and festive twist that captures the spirit of Easter celebrations.
What sets this recipe apart is its combination of rich chocolate flavor, chewy texture, and the playful touch of chocolate bunnies. Whether you’re whipping up a batch for a family gathering or simply indulging in some personal baking time, these brownies will surely become a favorite. In this guide, you’ll learn not just how to prepare the brownies, but also tips for customizing them, variations to suit different diets, and troubleshooting common mistakes.
What Is Easter Chocolate Bunny Brownies?
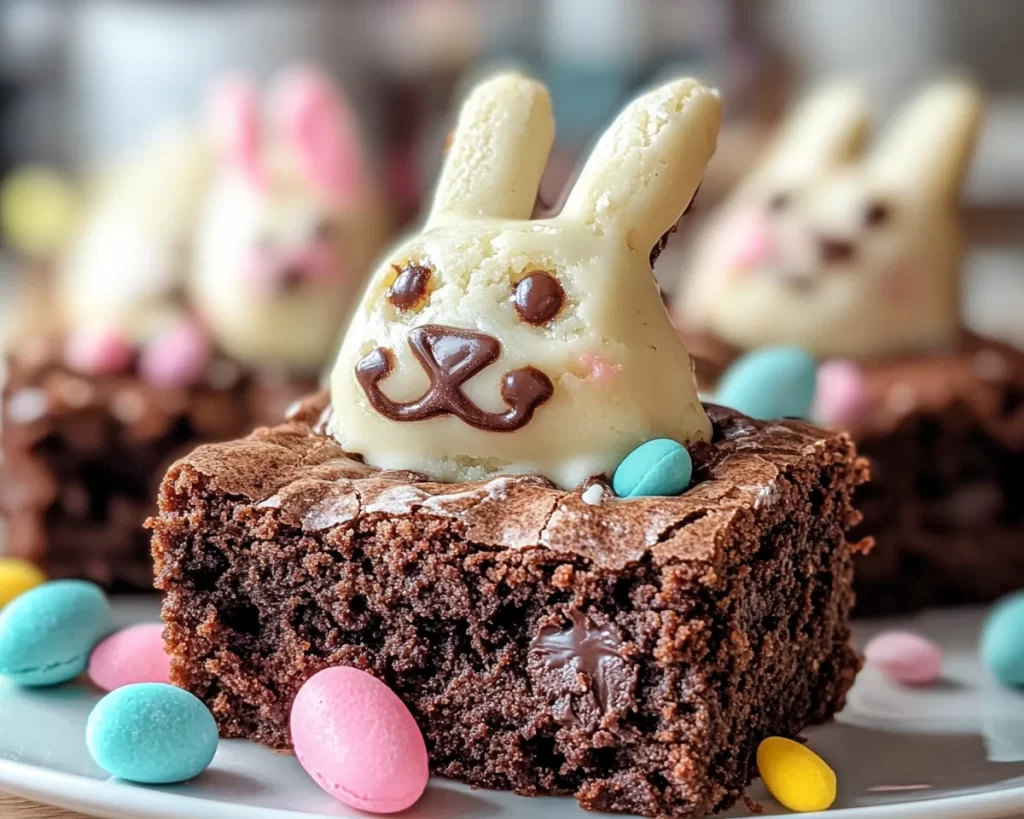
Easter Chocolate Bunny Brownies are decadent brownies topped with playful chocolate bunny decorations that make them an ideal dessert for the festive season. Originating from classic brownie recipes, this version incorporates melted chocolate and cocoa powder to create an intensely rich flavor. The brownies are soft and chewy, boasting a glossy top, often crackled, which is another hallmark of an excellent brownie.
These brownies are much more than just a dessert; they bring a sense of nostalgia and cheer to any gathering. The texture is designed to be incredibly fudgy, paired with a slight crust on top — a combination that makes each bite incredibly satisfying. It’s customary to prepare them during the Easter season, but their appeal stretches far beyond just one holiday, making them suitable for any occasion where delight and sweetness are welcomed.
While traditional brownies satisfy the sweet tooth on their own, adding the cute chocolate bunnies elevates the fun factor dramatically. They can easily appeal to both kids and adults alike, offering a delightful centerpiece on any Easter dessert table.
Why You’ll Love This
There are many reasons to fall in love with these Easter Chocolate Bunny Brownies. Firstly, their spectacular taste will always be at the forefront — rich chocolate mingling with sweet marshmallow-flavored bunnies brings joy to everyone. Furthermore, this recipe is straightforward with easily obtainable ingredients, which ensures that even novice bakers can join in the fun.
Additionally, the cost-effectiveness of making these brownies can’t be understated. The ingredients are simple pantry staples, and using homemade brownies reduces the price compared to purchasing high-end bakery items. You’re not just saving money; you’re also creating a treat that holds sentimental value.
It’s also versatile, allowing you to customize ingredients based on dietary needs. Whether you want to substitute the sugar for natural sweeteners or coconut flour for gluten-free options, you can create a version of this treat that fits various dietary restrictions. Many bakers may worry about ending up with dry or burnt brownies, but this recipe will teach you that certain tips and tricks can make all the difference in achieving the perfect texture.
Ingredients You’ll Need
- 1 cup unsalted butter: Provides richness and moisture.
- 2 cups granulated sugar: Sweetens the brownies and contributes to their fudgy texture.
- 4 large eggs: Acts as a binding agent and contributes to the overall texture.
- 1 teaspoon vanilla extract: Enhances the flavor profile of the brownies.
- 1 cup all-purpose flour: The primary dry ingredient that provides structure.
- 1 cup unsweetened cocoa powder: The key component providing that deep chocolate flavor.
- 1/2 teaspoon salt: Balances sweetness and enhances flavors.
- 1 cup chocolate chips: For added texture and melty chocolate goodness.
- Chocolate bunny decorations: A fun topping that brings festive spirit.
Each ingredient plays an essential role in creating the interior texture and flavor of the brownies. For instance, opting for dark chocolate chips can deepen the flavor, making the brownies even richer. If you’re catering to a gluten-free audience, substituting all-purpose flour with almond or coconut flour can be effective; however, adjustments may be necessary as these alternative flours behave differently. Similarly, if you want a healthier spin on the recipe, using coconut sugar can be a viable substitute for granulated sugar, resulting in a richer flavor while still keeping the sweetness intact.
How to Make
1. **Prepare Your Oven and Pan**: Begin by preheating your oven to 350°F (175°C). Grease a 9×13 inch baking pan with butter or line it with parchment paper for easy removal of the brownies later. Ensuring the pan is well-prepared will prevent sticking.
2. **Melt the Butter**: In a medium saucepan over low heat, melt the unsalted butter. Make sure to stir it gently and watch closely to prevent it from browning, as you want it melted but not cooked.
3. **Mix in Sugar and Eggs**: Once the butter has melted, remove it from heat, and then whisk in the granulated sugar until combined. Next, add the eggs one by one, making sure to beat them in completely before adding the next. Lastly, include the vanilla extract. This step adds essential moisture and flavor to your brownies while creating a smooth base.
4. **Combine Dry Ingredients**: In a separate bowl, mix together the all-purpose flour, unsweetened cocoa powder, and salt. Whisk until combined; this ensures that the cocoa powder is evenly distributed throughout the batter.
5. **Incorporate Dry and Wet Mixtures**: Gradually fold the dry ingredients into the wet mixture using a spatula, being careful not to overmix. The goal here is to just combine both mixtures until the flour is no longer visible. Overmixing can lead to a tougher texture in your brownies.
6. **Add Chocolate Chips**: Gently fold the chocolate chips into the batter for added texture. These chocolate morsels will melt beautifully as the brownies bake, creating a luscious experience with every bite.
7. **Transfer to Baking Pan**: Pour the brownie batter into the prepared baking pan, spreading it evenly with your spatula. Ensure there are no air pockets, and evenly distribute the batter across the pan for uniform baking.
8. **Bake the Brownies**: Place the pan in the preheated oven and bake for about 25-30 minutes. A good rule of thumb is to check for doneness by inserting a toothpick into the center. If it comes out with a few moist crumbs, that’s the perfect texture you’re looking for.
9. **Cool and Decorate**: Once they are done, remove the brownies from the oven and let them cool completely in the pan on a wire rack before adding chocolate bunnies on top. This step is important; if you decorate them while hot, the bunnies will melt, losing their shape.
10. **Cut and Serve**: After they’re cool, cut them into squares. If you’re feeling extra festive, top each brownie with a small chocolate bunny before serving. You now have charming brownies that are not only delicious but visually enticing, making them perfect for your Easter gathering.
Variations & Substitutions
Gluten-Free Brownies: You can easily adapt this recipe for gluten-free diets by substituting all-purpose flour with a gluten-free baking blend. Be sure to use one that measures cup-for-cup against regular flour to ensure that the texture remains consistent. The rich chocolate flavor remains intact, and these brownies can be enjoyed by everyone, regardless of dietary restrictions.
Nutty Brownies: For those who love a textural contrast, consider adding chopped walnuts or pecans to the batter. Nuts will add a delightful crunch alongside the fudgy brownie base. They’re also a good source of healthy fats and protein, making your treat somewhat more nutritious while enhancing the flavor complexity.
Mint Chocolate Brownies: If you’re a fan of mint, consider adding a few drops of peppermint extract into your wet mixture. This gives the brownies a refreshing twist that pairs wonderfully with chocolate. Top with crushed mint candies or a drizzle of mint chocolate sauce for an even more extravagant treat.
Healthier Version: Swap out half of the granulated sugar for unsweetened applesauce for a cleaner ingredient profile. While this substitution may alter the sweetness slightly, it introduces moisture and a subtle fruit flavor that complements the chocolate well. You can also use whole wheat flour to boost the fiber content, creating a more filling dessert.
Vegan Easter Chocolate Bunny Brownies: To create a vegan version, substitute butter with coconut oil, eggs with flax eggs (1 tablespoon ground flaxseed mixed with 2.5 tablespoons water per egg), and ensure your chocolate chips are dairy-free. These variations still yield a rich, fudgy brownie that anyone can enjoy, regardless of dietary restrictions.
Common Mistakes to Avoid
One of the most common mistakes that can occur when making brownies is overbaking them. Overbaking will lead to dry, crumbly textures instead of the desired fudgy consistency. Always check your brownies a few minutes before the recommended cooking time to avoid this.
Another frequent error is not allowing the brownies to cool adequately before cutting them. Attempting to slice brownies that are still hot can result in a messy situation where they fall apart. Proper cooling allows the flavors to set and the texture to become perfectly dense.
Not preparing your baking pan correctly can also pose a problem. If you forget to grease it or use parchment paper, you may face the tedious task of prying out the brownies, leading to a crumbled mess. Make sure you prepare your pan ahead of time to ensure a smooth release.
Finally, mixing the batter too much can spoil the texture of your brownies. Aim for gentle folds when combining wet and dry ingredients. Overmixing incorporates excess air into the batter, resulting in tougher brownies rather than the desired melt-in-your-mouth experience.
Storage, Freezing & Reheating Tips
When it comes to storing your Easter Chocolate Bunny Brownies, you’ll want to keep them in an airtight container to maintain freshness. They can be kept at room temperature for up to a week. If you live in a particularly warm climate, refrigeration can help keep them firm, but be aware that they may harden slightly.
For longer storage, brownies can be frozen. Cut them into squares and wrap each piece in plastic wrap. Then place them in a freezer-safe container or zip-top bag. They can stay fresh in the freezer for up to two months. When you’re ready to enjoy them, simply let them thaw at room temperature for a couple of hours, or pop them in the microwave for a quick reheat.
Always ensure you check your brownies for any signs of freezer burn when pulling them out. If they appear discolored or dry, it may be best to discard them. However, if they’ve been properly wrapped, you should find that they maintain their quality very well.
To reheat brownies, placing them in the microwave for a 10-15 seconds will bring back that soft, melt-in-your-mouth texture, making them a truly pleasurable treat once more.
Frequently Asked Questions
Can I make these brownies ahead of time for a party? Yes, these brownies can definitely be made ahead of time. In fact, making them a day or two in advance can enhance their flavor and overall texture. Simply store them in an airtight container at room temperature until you are ready to serve.
What if I don’t have chocolate bunnies for decoration? If chocolate bunnies are not available, feel free to use any fun Easter-themed chocolate candies. You can opt for mini eggs, chocolate-covered marshmallows, or even colorful sprinkles that capture the festive spirit of the holiday.
Can I use a different type of chocolate instead of cocoa powder? Yes, you can substitute unsweetened cocoa with melted dark chocolate or semi-sweet chocolate. However, be cautious about adjusting the sugar content since melted chocolate can be sweeter than cocoa powder.
How can I tell when the brownies are done baking? The best test for doneness is to insert a toothpick into the center of the brownie dish. If it comes out with a few moist crumbs clinging to it, then the brownies are perfectly baked. Be careful not to wait until it comes out completely dry, as that’s a sign they may be overbaked.
Can I add additional toppings to these brownies? Absolutely! If you want to get creative, feel free to experiment with toppings such as whipped cream, caramel sauce, chocolates, or even fresh fruits. Sliced strawberries or raspberries add a refreshing contrast to the rich flavor and are a great way to elevate presentation.
Conclusion:
These Easter Chocolate Bunny Brownies are not only a delightful treat, but they also hold a special place in the hearts of many during the Easter season. Their rich flavor and fudgy texture will leave your guests asking for more, while the interactive nature of decorating with chocolate bunnies makes them a fun baking project for families.
I encourage you to try this recipe, experiment with your variations, and make it your own. Don’t hesitate to share your unique creations and experiences with friends and family. Happy baking, and may your Easter celebrations be filled with joy and sweet moments!


