Prep time: 20 minutes
Cook time: 1 hour
Total time: 1 hour 20 minutes
Servings: 8
When it comes to celebrating special occasions like Mother’s Day, nothing says “I love you” quite like a homemade dessert. The mere thought of a perfectly crafted pavlova, with its crisp outer shell and soft, airy interior, topped with luscious berries and whipped cream, is bound to make your mouth water. This delightful Mother’s Day Berry Pavlova is not only visually stunning but also beautifully fragrant, making it a standout centerpiece for any gathering. Whether you’re a busy parent looking to impress or a kitchen novice, this recipe will guide you through every delightful step, ensuring that you create a dessert that will leave everyone raving.
In this article, you will learn everything you need to know about making the perfect Mother’s Day Berry Pavlova, including tips and variations to customize it to suit your tastes. From understanding the origins of this iconic dessert to diving into essential ingredients and detailed instructions, you’re in for a sweet culinary adventure.
What Is Mother’s Day Berry Pavlova?
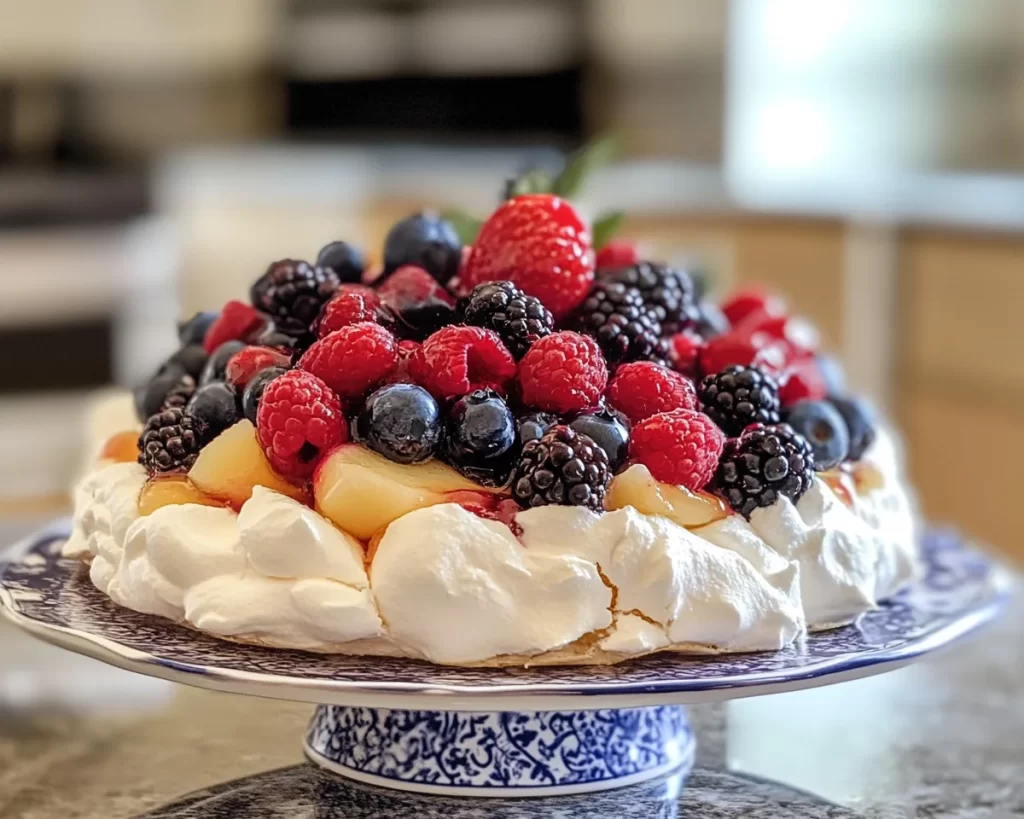
The Mother’s Day Berry Pavlova is a twist on the classic pavlova, a dessert believed to have been created in honor of the Russian ballerina Anna Pavlova in the 1920s. Originating from either Australia or New Zealand, this dessert consists of a delicate meringue base that is both crunchy and chewy at the same time, providing the perfect textural contrast to the toppings. Traditionally, the pavlova is crowned with whipped cream and an assortment of fresh fruits, with berries making it an especially appealing choice for Mother’s Day celebrations.
The flavor of this pavlova is simply divine. The sweetness of the meringue balances harmoniously with the tartness of the berries, while the fluffy whipped cream adds a velvety richness that makes each bite an absolute delight. This beautiful dessert not only pleases the palate, but it also captivates the senses with its vibrant colors and textures. With its lightness, the pavlova is a fantastic option for spring and summer gatherings, especially when fresh berries are in abundance.
While the configuration of a classic pavlova involves just a few basic elements, the beauty lies in its simplicity and the ease with which it can be adapted to suit your preferences. Making it for Mother’s Day can turn a simple dessert into an unforgettable experience that you and your loved ones will cherish forever.
Why You’ll Love This
First and foremost, you’ll love this Mother’s Day Berry Pavlova because of its delicious flavor and stunning presentation. The combination of creamy, sweet whipped cream, tart berries, and the crisp meringue is nothing short of heavenly. This dessert is also incredibly versatile—perfect for those who might prefer a lighter dessert after a big meal.
Additionally, this pavlova is surprisingly easy to prepare. With just a handful of ingredients and minimal cooking skills, you can create a dessert that seems extravagant. This recipe debunks the myth that impressive desserts require tedious techniques, making it an accessible option for anyone from beginners to experienced bakers.
What’s more, making this pavlova is budget-friendly! With the right ingredients, you can whip up this delicious dessert without breaking the bank. You can also use seasonal fruits, which allows you to save even more while enjoying fresh produce. Lastly, the pavlova can be made ahead of time, freeing you from stress in the kitchen on the day of your gathering. Nothing is more satisfying than preparing a dessert that yields such applause!
Ingredients You’ll Need
- Egg whites: The key to a perfect pavlova, egg whites are whipped to create a fluffy structure. Ensuring they are at room temperature improves volume.
- Granulated sugar: Sugar stabilizes the meringue and adds sweetness. Using superfine sugar can enhance the texture and prevent graininess.
- Cornstarch: This ingredient gives the pavlova its softness by absorbing moisture. Without it, the meringue may become too chewy.
- White vinegar: Adding vinegar helps to stabilize the egg whites, creating a stronger meringue that holds its shape throughout baking.
- Heavy cream: Essential for topping, heavy cream is whipped to a light and fluffy consistency, adding richness to the dessert.
- Fresh berries: A mix of strawberries, blueberries, and raspberries provides vibrant color and contrasting tartness. Seasonal, fresh berries will yield the best flavor.
- Powdered sugar: When whipped with heavy cream, powdered sugar adds sweetness and helps achieve a stable texture.
The combination of these ingredients creates a beautiful pavlova that is both visually appealing and delicious. With a few careful steps and attention to detail, you can achieve a stunning dessert that will impress family and friends alike.
How to Make
- Preheat the oven: Start by preheating your oven to 275°F (135°C). This low temperature ensures a gentle baking process, preventing the pavlova from cracking.
- Prepare the baking sheet: Line a baking sheet with parchment paper. This will help the pavlova to release easily after it is baked. With a pencil, trace a 9-inch circle on the parchment as a guide for your pavlova, then flip the paper over so the pencil marks do not touch the meringue.
- Whip the egg whites: Using a stand mixer or a hand mixer, start whipping the egg whites on low speed until they become frothy. This usually takes about a minute.
- Increase the speed: Gradually increase the speed to medium-high and continue whipping until soft peaks form. This process typically takes 3-5 minutes. Soft peaks mean that the egg whites are fluffy with tips that fall over when the beaters are removed.
- Incorporate the sugar: Beginning incrementally, add in the granulated sugar, one tablespoon at a time. Allow the sugar to fully dissolve before adding more. Continue whipping until stiff, glossy peaks form. This indicates your meringue is ready.
- Add cornstarch and vinegar: Gently fold in the cornstarch and vinegar using a rubber spatula. Be careful not to deflate the meringue; the folding should be gentle yet thorough to maintain its airy texture.
- Shape the pavlova: Spoon the meringue mixture onto the prepared parchment paper, using the traced circle for guidance. Smooth the top with a spatula and create a slight well in the center to accommodate the whipped cream and berries later.
- Baking the pavlova: Place the baking sheet in the oven and bake for 1 hour. After this time, turn off the oven and let the pavlova cool completely in the oven with the door closed. This cooling process prevents cracking by allowing the meringue to dry gradually.
- Whip the cream: In a separate bowl, use a mixer to whip the heavy cream along with the powdered sugar until soft peaks form. It should be fluffy and spreadable—avoid over-whipping, as it could turn grainy.
- Assemble the pavlova: Once the pavlova is completely cool, carefully transfer it to a serving plate. Spread the whipped cream over the top, creating peaks if desired, then scatter the fresh berries on top for a pop of color and taste.
- Serve immediately: The pavlova is best enjoyed right after assembly. With a large serving spoon, carefully slice into pieces, ensuring each serving contains both meringue and toppings for the fullest experience. Enjoy!
Making a pavlova is a sensory experience that can get better with practice. Pay attention to the textures and flavors at each step, allowing yourself to enjoy the process. Don’t be discouraged if your first attempt isn’t perfect; focus on the joy of cooking and sharing.
Variations & Substitutions
Chocolate Pavlova: For those who want to add a decadent twist, consider a chocolate pavlova. Simply incorporate unsweetened cocoa powder into the meringue. Start with 1-2 tablespoons mixed with the dry ingredients during the gradual sugar addition step. The result will be a rich, dark meringue that is the perfect backdrop for whipped cream and berries. This variation is perfect for chocolate lovers and can elevate the dessert’s overall appeal.
Vegan Pavlova: If you’re looking for a dairy-free or vegan option, replace the egg whites with aquafaba, the liquid from chickpeas. Whip aquafaba in the same manner you would egg whites. Additionally, you can use coconut cream instead of heavy cream for the topping. This variation allows everyone to enjoy this classic dessert.
Citrus Pavlova: Spice things up by adding citrus zest to the meringue. Incorporating a teaspoon of lemon or orange zest can enhance the flavor profile of the pavlova while adding a refreshing touch. Pair this zesty meringue with a citrus glaze or a mix of berries with a squeeze of lemon juice for a bright, tangy contrast.
Fruit-Only Pavlova: If you’re in the mood to keep things fresh and simple, you can opt for a fruit-only pavlova. Skip the whipped cream and top the meringue with a vibrant array of berries, some mango, and kiwi. Drizzle a bit of honey or agave syrup over it, allowing the fruit’s natural sweetness to shine while making the dessert lighter and more refreshing.
Common Mistakes to Avoid
One of the most common mistakes when making pavlova is improperly beating the egg whites. To achieve the ideal meringue, make sure your mixing bowl and beaters are completely clean and free of grease. Any fat can interfere with achieving stiff peaks. That being said, be cautious not to over-whip the egg whites; doing so can cause them to turn grainy, making your meringue difficult to work with.
Another critical point to keep in mind is the baking temperature. If you bake the pavlova at too high of a temperature, it can crack easily and become overly browned. Keep the oven low, as specified in the recipe, and remember to let the pavlova cool inside the oven to achieve that perfectly delicate texture.
Finally, don’t rush the assembly process. It’s essential to allow the pavlova to cool completely before adding the whipped cream and berries. If you rush this step, the heat from the pavlova can cause the cream to melt or weep, losing its enticing appearance and luscious texture.
Storage, Freezing & Reheating Tips
When it comes to storage, pavlova is best enjoyed fresh. However, leftovers can be stored at room temperature in an airtight container for up to one day. Be cautious not to cover the pavlova tightly, as it can absorb moisture and lose its crispness. Ideally, store the whipped cream and berries separately and assemble them right before serving to maintain the textures.
If you plan to make pavlova in advance, you can prepare the meringue ahead of time and store it in an airtight container for up to a week at room temperature. The key to keeping the meringue intact is to avoid refrigeration, as moisture from the fridge can ruin its texture.
Freezing pavlova is not generally recommended, as the moisture can affect its delicate structure. If you ever find yourself with leftover pavlova, consider the benefits of repurposing it. Crumble it over yogurt or ice cream for a delightful treat, rather than risking a loss by attempting to freeze it.
Frequently Asked Questions
Can you make pavlova ahead of time?
Yes, you can make the meringue up to a week in advance and store it in an airtight container at room temperature. However, it is best to assemble the pavlova with whipped cream and toppings just before serving to maintain its crisp texture.
What if my pavlova cracks while baking?
Cracks are not uncommon, especially if the baking temperature is too high. If your pavlova cracks, don’t fret! It can still taste delicious. Cover it with whipped cream and berries to hide any imperfections, and it will be just as delightful.
Can I use frozen berries for pavlova?
While fresh berries are ideal, you can use frozen berries if fresh ones are not available. Make sure to thaw and drain them to avoid extra moisture, which could soggy your pavlova.
Why does my pavlova have a chewy texture?
A chewy texture can result from underbaking or too much moisture during the baking process. Ensure that your pavlova is baked at the correct temperature and allowed to cool in the oven for the best texture.
How can I ensure my pavlova doesn’t stick to the paper?
Be sure to use high-quality parchment paper when lining your baking sheet. If you’re concerned, consider lightly greasing the parchment paper beforehand, although it’s usually not necessary.
Conclusion:
This Mother’s Day Berry Pavlova encapsulates the essence of good food—simple yet elegant, satisfying yet light. With its delightful combination of flavors and textures, it’s a show-stopping dessert perfect for celebrating the special women in your life. As you embark on this baking journey, take joy in the process of creating something beautiful and delicious. Don’t hesitate to customize it to your taste, and above all, enjoy sharing this labor of love with family and friends. Now, gather those ingredients and let the sweet magic begin!


