Prep time: 30 minutes
Cook time: 30 minutes
Total time: 1 hour
Servings: 12
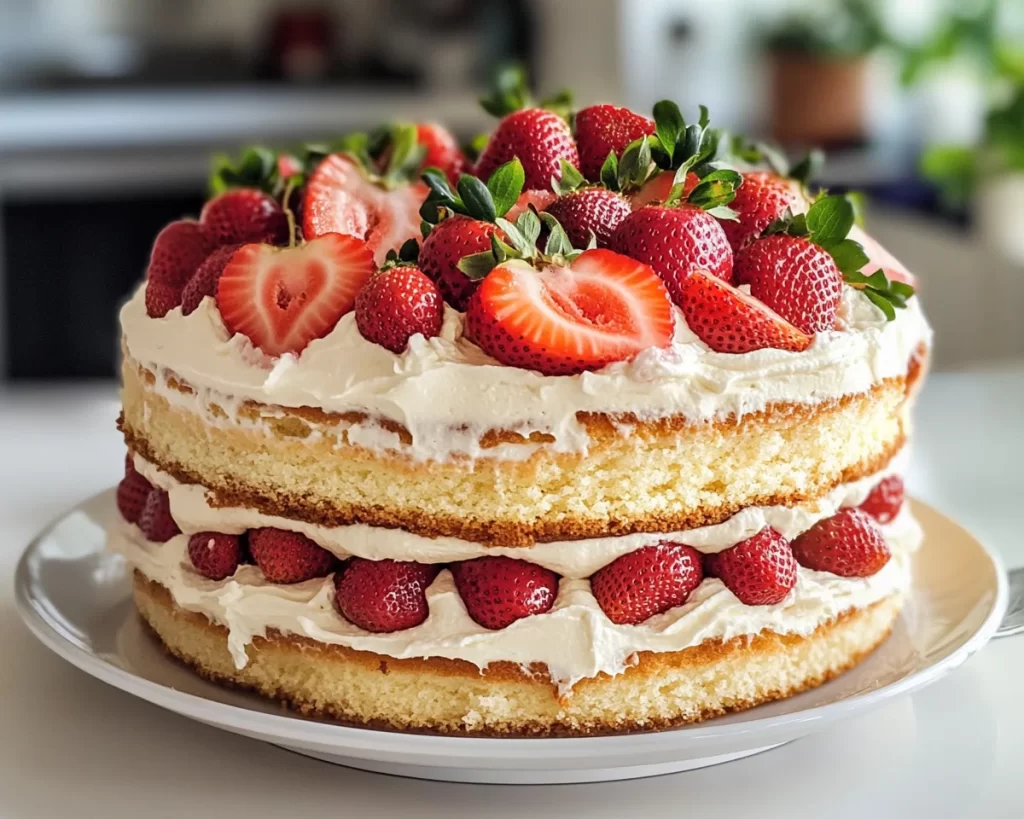
The aroma of freshly baked cake wafting through the home can evoke warm memories and cherished family moments. Nothing embodies those feelings quite like a delightful layer cake, especially when it’s a special occasion like Mother’s Day. This Mother’s Day Strawberry Layer Cake is a splendid way to celebrate the day dedicated to all the loving moms out there. With soft layers of vanilla cake, luscious strawberry frosting, and vibrant strawberry filling, this cake will not only be a feast for the taste buds but also a visual delight.
In this article, you will learn how to create this exquisite layer cake from scratch. I’ll guide you through every step of the process, from the essential ingredients to expert tips for a perfect bake. You’ll also discover some exciting variations to customize the cake to your liking, along with common mistakes to avoid.
What Is Mother’s Day Strawberry Layer Cake?
Mother’s Day Strawberry Layer Cake is a layered cake that embodies the beauty of spring and the essence of the season’s bounty. It is often made with fluffy layers of vanilla cake, separated by layers of sweet strawberry filling, and frosted with a creamy strawberry buttercream. The cake is not just a treat for the stomach but also for the eyes, making it a stunning centerpiece for any celebration.
The flavor profile of this cake is a harmonious blend of sweet and tart, thanks to the strawberries. The vanilla cake serves as the perfect canvas, providing a light and airy texture that contrasts beautifully with the rich, buttery frosting. Each slice promises an enticing medley of flavors and textures, making it a memorable treat. Best of all, this cake symbolizes love and care—elements that are essential when celebrating motherhood.
Why You’ll Love This
There are countless reasons to adore this Mother’s Day Strawberry Layer Cake. Firstly, it’s incredibly **easy** to make, even for those who are beginners in baking. Though it may appear complex with its elegant layers, the steps are straightforward, making it achievable for anyone keen to impress. Secondly, the cost of making this cake is surprisingly reasonable, especially when you consider the fresh strawberries and basic pantry ingredients involved.
Another appealing factor is the **health-forward** twist; by using fresh strawberries, you’re adding natural nutrients and vitamins, elevating this cake to a much better choice compared to store-bought alternatives. Additionally, this cake can be a versatile canvas for variations, allowing you to customize the flavor to suit your preferences.
Moreover, if you’re concerned about baking mishaps, fret not! Many common mistakes can be avoided with a little knowledge and preparation. By knowing what pitfalls to watch out for, you can ensure that your cake will come out perfectly every time.
Ingredients You’ll Need
- All-purpose flour: The foundation of the cake, providing the structure. If needed, you can substitute with **whole wheat flour** for added fiber.
- Sugar: Adds sweetness. You can also use **coconut sugar** or **honey** for a healthier option.
- Baking powder: This leavening agent helps the cake rise. Ensure it’s fresh for the best results.
- Salt: Balances the sweetness and enhances flavor.
- Unsalted butter: Incorporate for a rich, creamy texture and flavor. **Vegetable oil** can be substituted for a lighter cake.
- Eggs: These help bind the ingredients and add moisture. For a vegan version, consider using **flaxseed eggs**.
- Milk: Adds moisture to the batter. You can use any milk, including dairy-free options like almond or oat milk.
- Vanilla extract: The secret ingredient that elevates the flavor of the cake.
- Fresh strawberries: A key ingredient for both the filling and frosting, lending its delightful flavor and bright color.
- Powdered sugar: Essential for making a fluffy and sweet frosting.
Each ingredient plays a significant role in creating the perfect cake, and customizing them can add unique variations that suit your taste.
How to Make
- Preheat your oven: Begin by preheating your oven to 350°F (175°C). This step is crucial because a properly heated oven ensures even baking. While the oven is warming up, prepare your cake pans by greasing them with butter or oil and lightly dusting them with flour.
- Mix the dry ingredients: In a large mixing bowl, whisk together the all-purpose flour, baking powder, and salt. This step ensures that the leavening agent is evenly distributed throughout the flour. Setting aside the dry mixture will allow you to focus on the wet ingredients next.
- Cream the butter and sugar: In a separate bowl, use a mixer to cream the unsalted butter and granulated sugar together until the mixture is light and fluffy. This can take about 3-4 minutes. The air incorporated during this step is key for a fluffy cake.
- Add the eggs: Crack in the eggs one at a time, mixing well after each addition. This allows for even incorporation, ensuring a uniform texture in your cake. Be sure to scrape down the sides of the bowl to integrate all ingredients fully.
- Include the vanilla: Add the vanilla extract to the wet mixture and blend well. The sweet aroma of vanilla will elevate your cake, adding to the overall flavor profile.
- Combine wet and dry ingredients: Gradually add your flour mixture into the wet ingredients while alternating with milking. Start and end with the flour mixture. Be careful not to over-mix, as this can lead to a dense cake.
- Pour batter into pans: Divide the batter evenly between your prepared cake pans. Use a spatula to smooth out the tops, ensuring even baking.
- Bake: Place the pans in your preheated oven and bake for about 25-30 minutes. Keep an eye out for a golden-brown color and a toothpick inserted into the center should come out clean.
- Cooling: Once baked, remove the cakes from the oven and let them cool in the pans for about 10 minutes. Then, carefully transfer them onto a wire rack to cool completely. Proper cooling is essential before frosting.
- Prepare the frosting: In a mixing bowl, beat together softened unsalted butter and powdered sugar. Gradually add in fresh strawberries mash (reserving some for decoration if you wish) until the frosting is fluffy and well-combined.
- Assemble the cake: Once your cakes are cool, place one layer on a serving platter. Spread a generous layer of strawberry filling on top and place the second cake layer on top of it. Frost the top and sides with the strawberry buttercream.
- Decorate: Finish by decorating the top with fresh strawberries and a sprinkle of powdered sugar for a delightful touch. This not only looks beautiful but also enhances the flavor.
Making this cake may take some time, but the result is a masterpiece that will delight everyone at the party!
Variations & Substitutions
Coconut Strawberry Layer Cake: If you love **coconuts**, this variation adds shredded coconut to both the cake batter and frosting. The coconut adds a chewy, tropical flavor that pairs wonderfully with strawberries, creating an exotic twist on this classic dessert. It’s perfect for anyone who enjoys a more unique flavor profile.
Gluten-Free Strawberry Cake: To make this cake gluten-free, you can use a blend of gluten-free all-purpose flour available in stores or create your mix using almond flour and coconut flour. Ensure the baking powder you’re using is gluten-free as well, and you’ll have a cake that everyone can enjoy, regardless of dietary restrictions. This version has a denser texture, which can be quite satisfying.
Vegan Strawberry Layer Cake: For a vegan version, substitute the eggs with flaxseed eggs or applesauce. Use plant-based butter and almond or oat milk in the recipe. This adaptations create a cake that is just as moist and flavorful, ensuring all your guests, regardless of dietary preferences, can partake in the deliciousness!
Chocolate Strawberry Layer Cake: For chocolate lovers, incorporate cocoa powder into the cake batter, transforming the vanilla base into a rich chocolate layer cake. The combination of chocolate and strawberries is irresistible and a delightful treat for anyone with a sweet tooth. You may want to also add chocolate chips for an added treat!
Lemon Strawberry Layer Cake: Adding lemon zest and juice into the batter creates a refreshing citrusy twist that complements the strawberries. Lemon doesn’t just enhance the cake’s flavor but adds a delightful zing. This variation is ideal for spring celebrations and adds a feel of freshness.
Each variation allows you to customize the cake, making it a versatile recipe you can pull out time and time again for different occasions.
Common Mistakes to Avoid
One common pitfall is using expired baking powder. Always check the **expiration date** before baking; if your leavening agent is stale, your cake will not rise properly, resulting in a dense texture.
Another mistake people frequently make is over-mixing the batter. Over-mixing can create a tough, dense cake rather than the desired fluffy texture. Only mix until just combined—this will give you the perfect crumb.
Properly cooling the cake layers is also essential. If you frost a warm cake, the frosting can melt and slide off. Ensure each layer is completely cool before applying any frosting to prevent this from happening.
Crumbly cakes often occur due to the wrong flour-to-fat ratio. If your cake crumbles too easily, test your flour measurement and ensure you are using the correct ratios to maintain moisture.
Finally, never skip the step of greasing your cake pans. Without proper preparation, your cake could stick and break during the unmolding process, ruining your beautiful layers.
Storage, Freezing & Reheating Tips
Store any leftover slices of the Mother’s Day Strawberry Layer Cake in an airtight container in the refrigerator. This will help maintain its moisture and prevent it from drying out. You can keep it refrigerated for up to 3-4 days.
For long-term storage, this cake freezes beautifully. Wrap each slice tightly in plastic wrap and then place them in a freezer-safe bag or container. When properly stored, the cake should remain fresh for about 2-3 months. When ready to enjoy, thaw it in the refrigerator overnight or at room temperature for a few hours before serving.
If you need to reheat any slices, do so gently in the microwave for about 10-15 seconds or in the oven at a low temperature (around 300°F or 150°C) until just warmed through. This will give you back some of that fresh-baked texture and flavor without drying it out.
Always keep **food safety best practices** in mind: do not leave the cake out at room temperature for more than 2 hours, as this can lead to spoilage, especially with the fresh strawberries in the frosting.
Frequently Asked Questions
Can I make this cake ahead of time? Yes! You can bake the cake layers in advance and store them in the refrigerator or freezer as mentioned above. You can also prepare the frosting ahead of time. Just make sure to store everything properly to maintain their freshness. Assembling the cake on the day it will be served usually yields the best results.
How do I make the frosting the right consistency? The consistency of your frosting can depend on the amount of powdered sugar you use. For a thicker frosting, add more powdered sugar gradually until you reach the desired thickness. If it’s too thick, you can add a splash of milk or cream to achieve a smooth, spreadable texture.
What strawberries should I use? Fresh, ripe strawberries are preferable for this cake. Look for berries that are bright red and firm; avoid those that are overly soft or have any signs of mold. You can also use frozen strawberries in the frosting, but make sure to thaw and drain them first to avoid excess moisture.
Is it okay to substitute the milk used in the recipe? Absolutely! If you or someone in your family has a dairy intolerance or follows a vegan diet, you can substitute regular milk with **almond milk**, **oat milk**, or **soy milk** without compromising the cake’s moisture or flavor.
How long should I allow the cake to cool before frosting? Make sure to allow your cake layers to cool completely, which can take about 1-2 hours. Frosting warm layers can lead to melting, messy, and less appealing presentation. Patience will pay off with a beautifully frosted cake!
Conclusion:
This Mother’s Day Strawberry Layer Cake is not just a dessert; it’s an experience that brings joy, love, and flavor to your celebrations. Making this cake will not only satisfy your sweet tooth but also foster treasured memories with your loved ones. Don’t hesitate to customize it and make it your own! I encourage you to try this recipe, and I can assure you that your loved ones, especially your mom, will appreciate the effort. Share your beautiful creations and spread the love! Happy baking!


