Prep time: 20 minutes
Cook time: 25 minutes
Total time: 45 minutes
Servings: 12
Are you on the hunt for a delightful dessert to grace your Easter table? The search ends here with these Easter Mini Cheesecake Cups. Imagine creamy, rich cheesecake nestled in a buttery graham cracker crust, topped with vibrant fruit or decadent chocolate, all served in convenient mini cups. These treats not only spark joy and admiration from your guests but also invite you to enjoy the process of making them. You’ll learn about their heavenly taste and texture, along with tips for perfecting this recipe.
This festive dessert is cherished for its versatility and appeal across age groups. The beauty of these mini cheesecake cups lies in their ability to accommodate various toppings—be it fresh fruits, chocolate drizzle, or a sprinkle of nuts. You don’t just create mini cheesecakes but also an edible palette for your creative expression!
What Is Easter Mini Cheesecake Cups?
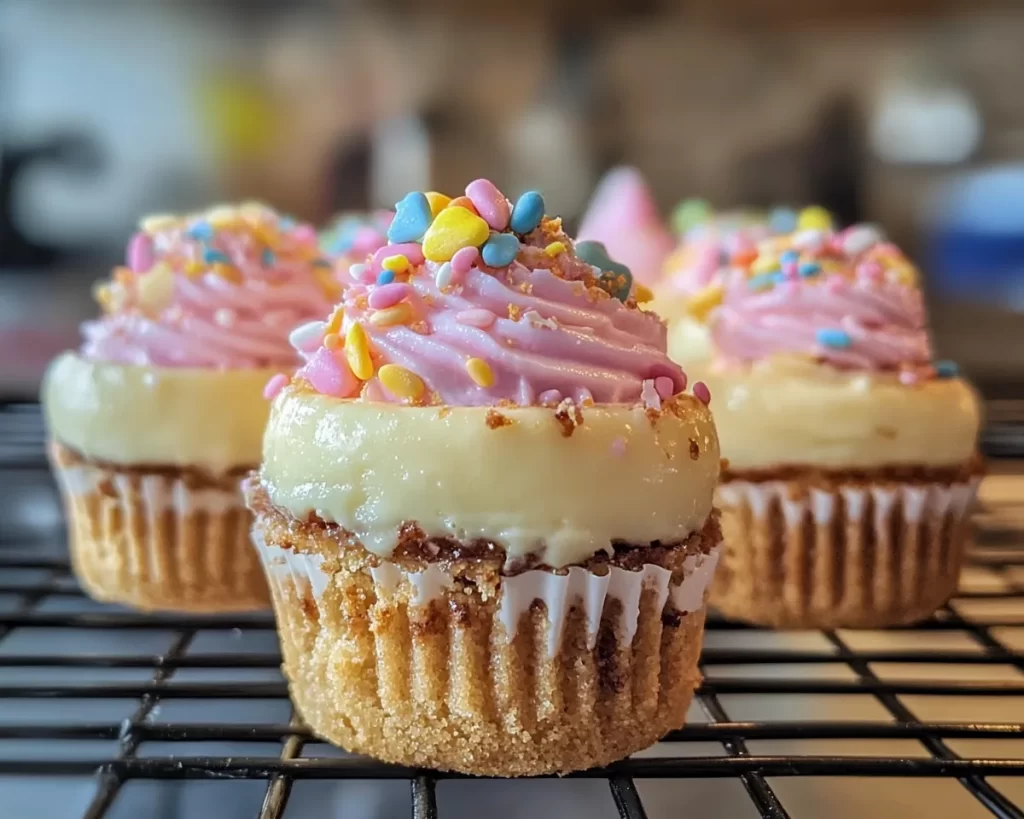
Easter Mini Cheesecake Cups are a delightful twist on the classic cheesecake dessert. The origin of cheesecakes dates back to ancient Greece, yet these mini cups allow for a bite-sized enjoyment, making them perfect for gatherings and celebrations. The texture is smooth and creamy, expertly balanced by the crunch of a graham cracker crust. When you take a bite, you can expect an explosion of flavor that mingles sweetness and a hint of tartness, thanks to the cream cheese and the toppings you choose.
These mini cheesecakes are not only beautiful but also incredibly fun to make. You’ll find that they are versatile, adaptable to various tastes and preferences. This dish is particularly favored during the Easter holiday, symbolizing new beginnings with its fresh seasonal toppings—think pastel colors and vibrant fruit. The joy of eating these mini cheesecake cups is further amplified by their charming presentation—perfect for any festive table!
Why You’ll Love This
There are numerous reasons why you’ll fall head over heels for Easter Mini Cheesecake Cups. First and foremost, their taste is simply divine. The combination of creamy cheesecake filling and crunchy crust creates a texture that’s hard to resist. They’re not overly sweet, providing a delicious balance that appeals to adults and children alike.
Another fantastic aspect is their **ease of preparation**. Unlike traditional cheesecakes that require baking in a larger pan and often a water bath, these mini versions simplify the process significantly. Additionally, they can be made ahead of time, freeing up your Easter day for more cherished moments with family and friends.
Cost-wise, these cheesecake cups are economical. Most ingredients are pantry staples or easily accessible, and they can feed a crowd without breaking the bank. Furthermore, they embody versatility. You can switch up the toppings and adapt the recipe to meet dietary restrictions, whether you’re catering to gluten-free, dairy-free, or vegan preferences.
Another common misconception about cheesecake is that it’s overly complicated or requires significant culinary skill. With this recipe, you’ll see that you can achieve impressive results with just a few straightforward steps, making it ideal for the **beginner cook**.
Ingredients You’ll Need
- Graham crackers: 1 cup, crushed. This will form the base of your mini cheesecakes, providing that classic crust texture. You can substitute with gluten-free crackers if needed.
- Granulated sugar: 3 tablespoons. Adding this to the crust and filling enhances the sweetness, making it irresistible.
- Unsalted butter: 5 tablespoons, melted. This binds the crust together and adds richness; consider using coconut oil for a dairy-free option.
- Cream cheese: 16 ounces, softened. The star of the show, providing the creamy texture. You can use a low-fat version if you wish to lighten it up.
- Sour cream: 1 cup. This ingredient adds tang and creaminess, which is essential for achieving a balanced flavor.
- Eggs: 2 large. They help bind everything together and give structure to the custard-like filling.
- Vanilla extract: 1 teaspoon. A must-have flavor booster; using pure vanilla extract elevates the dish’s quality.
- Your choice of toppings: Fresh fruits, chocolate chips, caramel sauce, or nuts. Choose based on seasonality and personal preference.
Make sure to check your pantry and refrigerator before heading to the store, as some of these ingredients might already be available. Adjust the quantities based on how many mini cups you wish to make for your Easter gathering.
How to Make
- Prepare the crust: In a medium mixing bowl, combine the crushed graham crackers with granulated sugar and melted butter. Stir until the mixture resembles wet sand. This step is significant because the butter must evenly coat the crumbs to ensure a cohesive crust. Using a tablespoon, press the mixture firmly into the bottoms of mini cupcake liners placed in a muffin tin. Aim for an even layer across the bottom; this will provide excellent support for the filling.
- Bake the crusts: Preheat your oven to 325°F (160°C). Bake the crusts in the oven for about 5 minutes. This not only sets the crust but also enhances its flavor by toasting the graham cracker crumbs. As the crust bakes, your kitchen will be filled with a delicious aroma—a sure sign of wonderful treats to come!
- Make the filling: In a large mixing bowl, beat softened cream cheese using an electric mixer until smooth. Add sour cream, sugar, eggs, and vanilla extract. Beat on low speed until well combined. This step is crucial; ensure there are no lumps in the cream cheese, resulting in a velvety filling. If you want, you can mix in some lemon zest for an added layer of flavor.
- Fill the cups: Once the crusts have cooled slightly, carefully pour the cheesecake filling over the crusts, filling each cup about 3/4 full. Be mindful not to overfill as the filling will expand slightly while baking. This is also the time to add any extra flavorings you might want, such as chocolate chips or fruit puree.
- Bake the cheesecakes: Return the muffin tin to the oven and bake for about 20 minutes. You’ll know they’re done when the centers appear slightly jiggly yet set. Overbaking can lead to cracks in the surface, so keep an eye on them. When they come out of the oven, let them cool in the tin for about 10 minutes.
- Chill and serve: Once cooled, transfer the cheesecake cups to the refrigerator for at least 2 hours. Chilling is essential; it allows the flavors to meld and the filling to firm up. Once chilled, adorn your cheesecake cups with your choice of toppings and serve them to eager friends and family.
You’ll find that by following these careful steps, you’ll achieve a dessert that not only impresses but also delights the taste buds. Feel free to approach every step with just a touch of love and enthusiasm!
Variations & Substitutions
Fruit Topping Variation: Instead of chocolate, you may opt for fresh fruit toppings like strawberries, blueberries, or even sliced peaches. This brings a light, refreshing quality to your mini cheesecakes that aligns perfectly with the spring season. To make the topping shine, consider macerating the fruit by tossing it in a bit of sugar and allowing it to sit, which releases its juices and enhances flavor.
Chocolate Ganache Variation: For those who revel in rich desserts, top your mini cheesecakes with a silky chocolate ganache. Simply heat equal parts cream and chocolate until smooth, then pour over the cooled cheesecakes. Allow it to set for a few hours in the fridge for a decadent experience. This variation is especially popular among true chocolate lovers!
Dairy-Free Option: If you have lactose intolerance or are following a vegan lifestyle, you can use cashew cream or silken tofu blended until smooth as an alternative to cream cheese. Replace eggs with flaxseed or chia seeds mixed with water to achieve the binding effect necessary in the filling. Coconut milk can stand in for sour cream to maintain the creaminess.
Mini Egg Variation: Embrace the Easter theme by adding crushed mini chocolate eggs as a mixing ingredient into your cheesecake filling or as a topping. The chocolate and crunch give a festive and fun twist that children— and adults— will absolutely adore!
Each of these variations enhances the flavor profile of your Easter Mini Cheesecake Cups, making them suitable for guests with diverse tastes and preferences. Don’t hesitate to get creative!
Common Mistakes to Avoid
One common mistake when making cheesecakes is overmixing the filling. This can introduce too much air, leading to cracks while baking. Always beat on low speed and stop mixing as soon as just combined. Another issue is baking at too high a temperature. Cheesecakes need a gentle heat to bake evenly, so always stick to the recommended temperature.
Overbaking is another crucial faux pas. Keep a close eye on your mini cheesecakes as they bake. They should still have a slight jiggle in the center when you take them out of the oven. Let them cool slightly before moving them, which helps minimize cracks. Remember to allow ample chilling time after baking; impatience can lead to soft fillings or crumbs saucing around.
Lastly, not lining the muffin tin with cupcake liners is a mistake that can result in messy serving. Mini cheesecakes can be tricky to remove when unlined, so always use liners for beautiful presentation.
Storage, Freezing & Reheating Tips
Storing your Easter Mini Cheesecake Cups properly ensures they remain fresh and delicious. Once they are completely cooled, store the mini cheesecakes in an airtight container in the refrigerator, where they’ll last up to a week. If you’ve topped them with fresh fruit, it’s best to store these separately to maintain their texture.
If you’re planning to make these treats well in advance, consider freezing them. First, make sure they’re entirely cooled to room temperature, then wrap each cheesecake tightly in plastic wrap followed by aluminum foil to prevent freezer burn. They will last for up to 3 months in the freezer. When you’re ready to enjoy them, simply remove from the freezer and let them thaw in the refrigerator for a few hours or overnight.
Reheating isn’t necessary, but if you prefer your cheesecake warmed slightly, place it in a microwave for about 10-15 seconds. Be careful not to overheat, as it can change the texture.
Always adhere to food safety best practices; never leave cheesecakes at room temperature for more than two hours to avoid spoilage.
Frequently Asked Questions
Can I make these mini cheesecakes ahead of time?
Yes, you can! They are perfect for making a day before a gathering. Just ensure to chill them properly after baking to let the flavors meld together.
What can I substitute for cream cheese?
If you need a dairy-free option, silken tofu blended until smooth can work well in place of cream cheese. You can also use vegan cream cheese alternatives now widely available.
Can I use different crusts for these cheesecake cups?
Absolutely! While graham crackers are traditional, you can use chocolate cookies, vanilla wafers, or even crushed nuts mixed with melted butter for a gluten-free version.
Why did my cheesecake crack?
Cracks often occur due to overmixing the filling or baking at an excessive temperature. To minimize cracks, stick to the recommended temperature and avoid overmixing the filling.
How should I serve these mini cheesecakes?
They can be served directly in the liners, making them perfect for easy serving and enjoying. Add toppings just before serving for the best aesthetic and flavor.
Conclusion:
Easter Mini Cheesecake Cups bring joy and deliciousness to your holiday table with their creamy texture and customizable flavors. These mini treats serve not only as a wonderful dessert but also as a delightful activity for the whole family. Their ease of preparation and versatile nature truly make them a standout choice for Easter celebrations. I encourage you to try this recipe, experiment with your favorite toppings, and share your sweet creations with loved ones. Enjoy the festive spirit that comes with a homemade dessert that’s as fun to make as it is to eat!


