Prep time: 30 minutes
Cook time: 45 minutes
Total time: 1 hour 15 minutes
Servings: 8 servings
There’s something magical about a homemade dessert that captures the essence of seasonal fruits. When I think of Mother’s Day, the vibrant colors and delicious sweetness of strawberries immediately come to mind. This Mother’s Day strawberry tart is not just a delightful dessert; it embodies heartfelt memories, family gatherings, and sunlit afternoons. As you slice into this tart, the luscious strawberries glisten atop a buttery, flaky crust, giving you a slice of heaven that’s equally gorgeous and indulgent.
This recipe is remarkably straightforward—perfect for beginners and experienced bakers alike. You’ll learn how to construct a beautiful tart with a perfect balance of textures: a crisp base, a creamy filling, and piled-high strawberries. Along the way, I’ll share tips for success and easy variations to suit every palate. Let’s dive into the world of strawberry tarts and create a dish that will have everyone swooning.
What Is Mother’s Day Strawberry Tart?
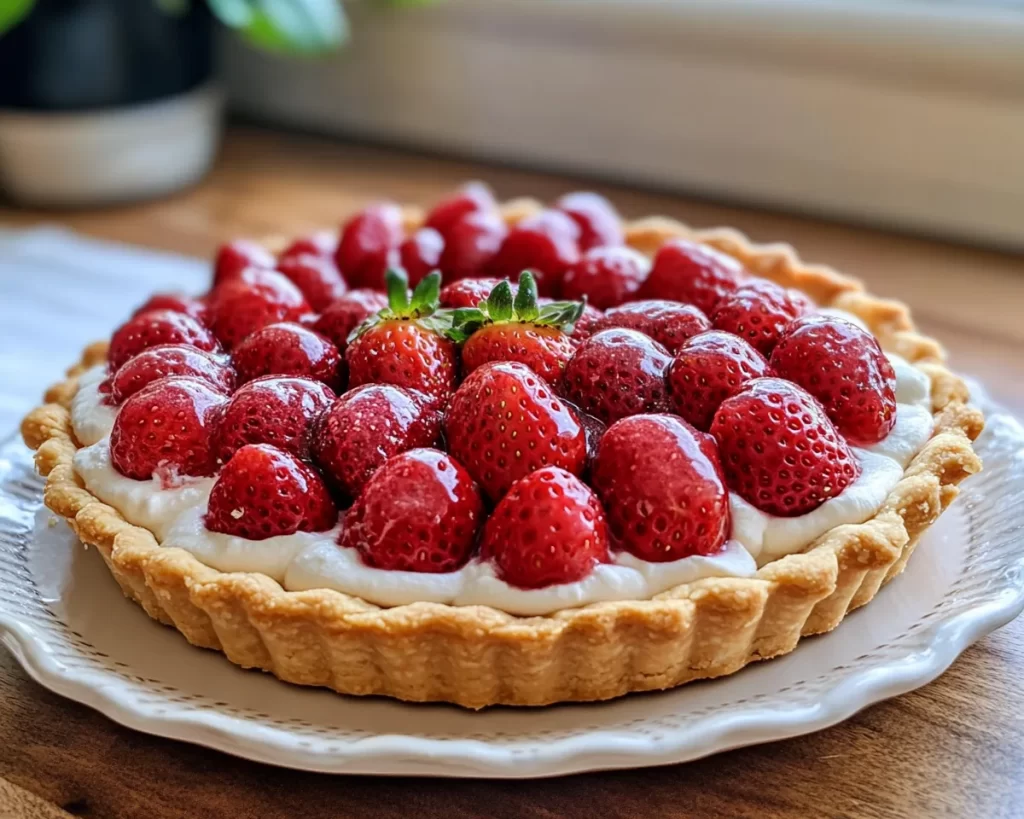
The Mother’s Day strawberry tart is a delightful dessert that beautifully showcases the freshness of strawberries. This elegant dish traditionally features a crisp and buttery tart shell filled with a velvety pastry cream, topped with glossy strawberries arranged artfully on top. Originating from French pastry traditions, it has gained international popularity, becoming a favorite for special occasions like Mother’s Day, picnics, and summer gatherings.
The crust is made with a buttery blend of flour, sugar, and salt, then baked to golden perfection. The creamy filling, made from milk, eggs, sugar, and vanilla, offers a delightful contrast to the tartness of the fresh strawberries. As you take a bite, you will experience a wonderful combination of textures and flavors—from the luxurious creaminess of the filling to the fresh, sweet strawberries. This tart is not only visually stunning but also brings an incredible fruit-forward flavor that celebrates the essence of spring.
Why You’ll Love This
You’ll fall head over heels for this Mother’s Day strawberry tart for several reasons. Firstly, it’s incredibly delicious, with a perfect harmony of sweet strawberries and rich pastry cream. The flaky tart crust adds a satisfying crunch, making every bite a unique experience. As a bonus, this dessert is versatile—feel free to switch it up with different fruits or toppings based on your preference.
Many people might shy away from making tarts, thinking they’re complicated or time-consuming, but that couldn’t be further from the truth. This recipe breaks down each step, making it easy for busy parents or novice bakers to follow along. Additionally, it’s an affordable dessert, utilizing simple, accessible ingredients that won’t break the bank. With just a bit of preparation and time, you’ll impress family and friends with this stunning dish that feels gourmet yet homemade.
Ingredients You’ll Need
- For the Tart Shell: 1 and 1/4 cups all-purpose flour – This forms the base and structure, so ensure it’s measured correctly for a flaky texture.
- Granulated sugar: 1/4 cup – A touch of sweetness in the crust enhances the overall flavor; feel free to use a sugar substitute if needed.
- Salt: 1/4 teaspoon – Balances sweetness; don’t skip this step!
- Unsalted butter: 1/2 cup, cold and cubed – This creates the flaky layers; it’s essential to use cold butter.
- Cold water: 3 to 4 tablespoons – Helps bind the crust; use ice-cold water for best results.
- For the Pastry Cream: 2 cups whole milk – Provides creaminess and richness in flavor.
- Granulated sugar: 1/2 cup – Sweetens the cream, balancing the tartness of the strawberries.
- Egg yolks: 4 large – Adds richness and thickens the pastry cream.
- Vanilla extract: 2 teaspoons – Enhances the overall flavor profile; use pure vanilla extract for best results.
- Butter: 2 tablespoons – Makes the cream silky smooth and adds richness.
- For the Topping: 1 pound fresh strawberries – The star of this tart; ensure they are ripe and sweet for the best flavor.
- Optional glaze: 1/4 cup apricot jam (or other fruit jams) – Gives the strawberries a lovely sheen; dilute with a bit of water if necessary.
Each ingredient plays a crucial role in creating this mother’s day strawberry tart. Understanding the purpose and potential substitutes will ensure you achieve the best results!
How to Make
- Prepare the Tart Shell: In a medium bowl, mix the all-purpose flour, granulated sugar, and salt until combined. Add the cold, cubed unsalted butter, using a pastry cutter or your fingers to blend until the mixture resembles coarse crumbs. You want to see small bits of butter remaining, as these will create flakiness.
- Add Water: Gradually add the cold water, one tablespoon at a time, mixing gently until the dough comes together. Avoid overworking the dough, as this can make it tough. You’re looking for a slightly crumbly yet cohesive mixture.
- Chill the Dough: Shape the dough into a disk, wrap it in plastic wrap, and refrigerate for at least 30 minutes. This step allows the gluten to relax, making the crust easier to roll out and yielding a tender texture.
- Roll and Bake the Shell: Preheat your oven to 375°F (190°C). On a lightly floured surface, roll out the chilled dough into a circle about 1/8-inch thick. Gently transfer it to a tart pan and press it into the edges. Trim excess dough and poke holes in the bottom with a fork to prevent bubbling. Line the shell with parchment paper and fill it with pie weights or dried beans.
- Bake the Tart Crust: Bake for 20-25 minutes or until the edges are lightly golden. Remove from the oven, carefully lift out the parchment paper with weights, and bake for an additional 5-10 minutes until the center is golden. Allow the shell to cool completely.
- Make the Pastry Cream: In a medium saucepan, heat the whole milk over medium heat until steaming but not boiling. In a separate bowl, whisk together the egg yolks, sugar, and vanilla extract until pale and creamy. Gradually add the hot milk to the egg mixture, whisking constantly to temper the eggs.
- Thicken the Cream: Pour the mixture back into the saucepan and continue to cook over medium heat, stirring constantly until it thickens and coats the back of a spoon (about 5-7 minutes). Remove from heat and stir in the butter until melted and smooth.
- Chill the Cream: Transfer the pastry cream to a bowl, cover it with plastic wrap directly on the surface to prevent a skin from forming, and refrigerate until cooled and set, about 1-2 hours.
- Assemble the Tart: Once the tart shell and pastry cream are completely cool, spread the pastry cream evenly in the tart shell, smoothing the top with a spatula.
- Top with Strawberries: Wash and slice the fresh strawberries. Arrange them artistically on top of the pastry cream, dripping them slightly over the edges for an eye-catching look.
- Add Glaze: If using, gently heat the apricot jam and a splash of water in a saucepan until melted. Brush the glaze over the strawberries, giving them a beautiful shine and extra sweetness.
- Chill and Serve: Chill the assembled tart for at least an hour to set before slicing. Serve chilled and enjoy this delightful Mother’s Day strawberry tart with your loved ones.
Each step in this process requires attention and care. By following these instructions closely, you’re guaranteed to create a beautifully executed tart that is sure to impress!
Variations & Substitutions
Chocolate Strawberry Tart: For those who love chocolate, consider making a chocolate pastry cream instead of the traditional vanilla. Simply add melted dark chocolate to the milk as it heats, stirring until fully incorporated. This adds a luxurious depth to the tart. Top it with fresh strawberries and serve with whipped cream for an indulgent treat that any chocolate lover will adore.
Gluten-Free Strawberry Tart: If you need to make a gluten-free version, substitute the all-purpose flour with a gluten-free blend designed for baking. Check if it contains xanthan gum, which helps with texture, or add a small amount yourself. The crust may bake slightly differently, so keep an eye on it. Do not forget that the filling remains perfectly gluten-free as is!
Vegan Strawberry Tart: To transform this recipe into a vegan delight, replace the dairy ingredients with plant-based alternatives. Use coconut milk for the pastry cream, along with a vegan egg substitute like flaxseed meal mixed with water. Ensure your butter is replaced with a plant-based alternative. This keeps the flavors intact and allows vegan friends to also enjoy a slice of this delectable tart.
Mixed Berry Tart: Instead of relying solely on strawberries, switch it up by using a mix of seasonal berries such as blueberries, raspberries, and blackberries. This variation gives a delightful tartness and color contrast, resulting in a vibrant and refreshing dessert that captures the essence of summer.
Common Mistakes to Avoid
One common mistake when making a tart is overworking the dough. Remember, the goal is to create a tender and flaky crust. Overmixing develops gluten, leading to a tough texture. Keep your butter cold and add the water gradually, mixing gently until just combined.
Another issue is not properly chilling the pastry cream. If you skip this step, it might not thick enough to hold its shape when being spread onto the tart. Be patient and allow the cream to set properly—this will ensure a perfect consistency.
Lastly, ensure that the tart shell is fully cool before adding the pastry cream. A warm crust can melt the cream, making it runny and difficult to slice. Always wait until it is fully cool to maintain the structural integrity of your beautiful tart.
Storage, Freezing & Reheating Tips
To store your Mother’s Day strawberry tart, cover it with plastic wrap or keep it in an airtight container in the refrigerator. It is best enjoyed within 1-2 days, as the strawberries might start to lose their texture or spoil over time. If you anticipate leftovers, try to store the strawberries separately and assemble before serving.
If you’re looking to make this tart in advance, you can prepare the tart shell and pastry cream up to two days ahead. Assemble right before serving for the best flavor and texture.
Freezing is not recommended for this tart, as the crust may become soggy, and the strawberries won’t hold their texture once thawed. If you’d like to freeze the tart shell, you can do so. Once fully cooled, wrap it tightly in plastic wrap and place it in a freezer-safe container. It can be frozen for up to a month; just thaw completely before arranging the filling and strawberries.
Frequently Asked Questions
Can I use frozen strawberries for the tart? Yes, you can use frozen strawberries, but they won’t have the same texture or flavor as fresh ones. If you opt for frozen strawberries, allow them to thaw completely before using them in the tart, and drain excess liquid to prevent a soggy tart.
How can I tell when the tart crust is done? Look for a golden-brown color on the edges. It should be firm but not hard to the touch. The center should be lightly golden as well; if the edges are golden and the center is still pale, continue baking for a few more minutes, keeping a close eye to avoid burning.
Can I make the pastry cream without eggs? Yes! You can create a custard-like filling using cornstarch and non-dairy milk if you prefer a vegan or egg-free option. Look for a recipe specifically designed for vegan pastry cream to ensure it sets properly.
What type of tart pan should I use? A removable-bottom tart pan is ideal for easy serving. If you don’t have one, you can use a regular pie dish, though you’ll need to be more careful when slicing and serving the tart to maintain its shape.
How do I prevent the strawberries from becoming mushy? Use fresh, firm strawberries and avoid purchasing overripe ones. Assembling the tart right before serving will also help them retain their shape and texture. Additionally, you can toss the strawberries in a light sugar coating, which draws out moisture and helps keep them firm.
Conclusion:
This Mother’s Day strawberry tart is not just a dessert; it’s an experience waiting to be shared. With its beautiful layers and incredible taste, it has the power to bring smiles to everyone at the table. I encourage you to try making this tart for your next gathering or as a sweet surprise for someone special in your life. Customize it to suit your preferences, and don’t hesitate to share your creations. Whether you’re baking for family or friends, this recipe is bound to create lasting memories. Get in the kitchen, enjoy the process, and savor every delightful bite!


