Prep time: 15 minutes
Cook time: 10 minutes
Total time: 25 minutes
Servings: 12 cookies
When it comes to baking, cookies have a special place in many hearts. They can evoke wonderful memories of family gatherings, bake sales, or cozy afternoons with a warm cup of tea. One cookie that stands out for its vibrant color and decadent flavor is the red velvet cookie. The combination of a rich, buttery texture with a hint of cocoa and the distinct touch of cream cheese frosting creates a celebration in your mouth. If you haven’t tried these before, now is the perfect time! This recipe for Simple Small Batch Red Velvet Cookies is not only simple but also ideal for sharing a sweet treat without overindulging.
This recipe is all about simplicity and satisfaction. With just a handful of ingredients, you’ll be able to whip up a delicious batch of red velvet cookies in no time. Whether you are a beginner in the kitchen or a seasoned baker looking to try something new, you will appreciate the easy-to-follow steps. By the end of this article, you will learn how to create these delightful cookies, explore variations, and discover tips for success along the way.
What Is Simple Small Batch Red Velvet Cookies?
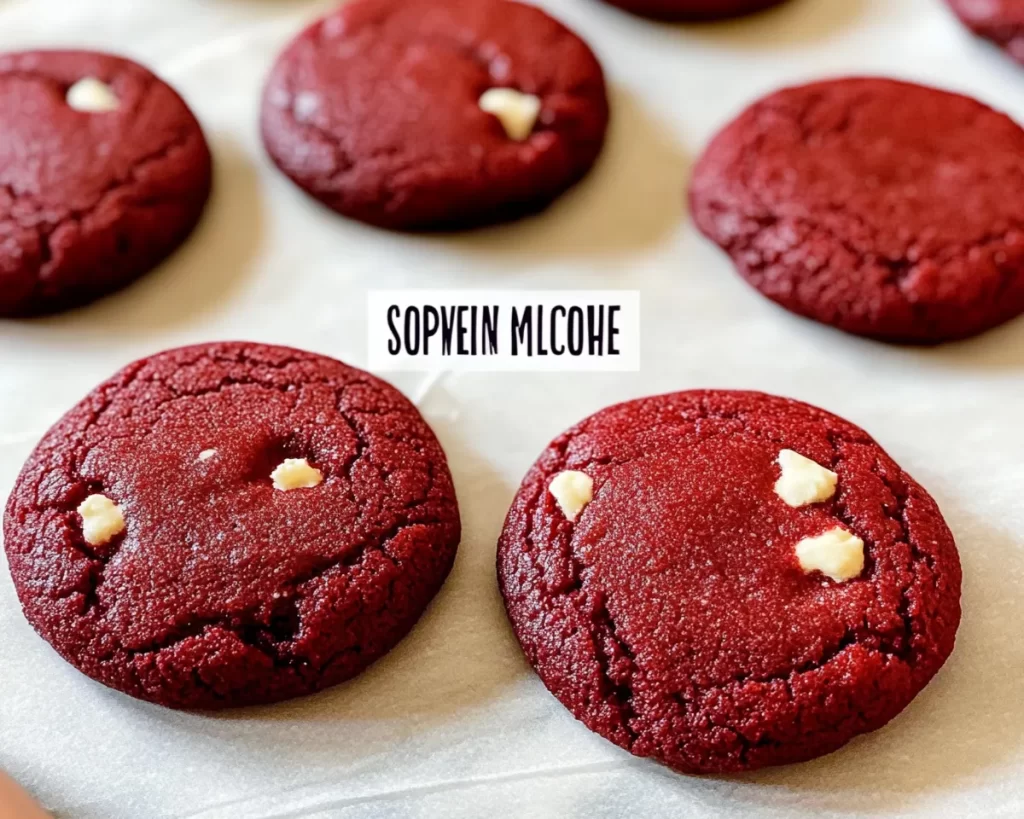
Red velvet cookies are an exciting twist on a classic dessert. Originating from the beloved red velvet cake, these cookies capture the essence of that delicious treat in a more compact form. This dessert is characterized by its vibrant red color, which gives it an eye-catching appeal. The flavor is a delicate balance of sweet vanilla, a hint of cocoa, and creamy undertones, often enhanced by the addition of cream cheese. The cookies are soft and chewy in texture, creating a delightful contrast to the cream cheese frosting that is sometimes drizzled or piped on top.
The beauty of these cookies lies in their simplicity. They deliver all the rich, tangy flavor of traditional red velvet cake, but in a smaller, more manageable portion. This recipe focuses on minimizing waste and effort while maximizing flavor and enjoyment. Each bite is a celebration, transporting you to that nostalgic world of cake and frosting without the need for a full-sized dessert.
Why You’ll Love This
This Simple Small Batch Red Velvet Cookie recipe is perfect for anyone looking to indulge in a sweet treat without the commitment of a full batch. One of the main benefits is its speed and simplicity. The entire process can be completed in under thirty minutes, making it ideal for last-minute guests or an after-school snack. Additionally, since it only yields about twelve cookies, you won’t be overwhelmed with leftovers, which is a boon for portion control.
Another aspect to appreciate is the flavor profile; these cookies offer a delightful symphony of sweetness and a slight cocoa edge. Many people associate red velvet desserts with special occasions, but these cookies allow you to enjoy that unique taste anytime you desire. Some might think that baking red velvet treats requires advanced skills or lengthy preparation, but the truth is this recipe breaks down the process, allowing anyone to bake with confidence.
Lastly, these cookies are incredibly versatile. They can be enjoyed as is, or you can get creative with toppings and additions. Adding white chocolate chips, for instance, can create a refreshing contrast to the cocoa flavor while giving an indulgent twist. The options are endless, and the only limit is your imagination.
Ingredients You’ll Need
- All-purpose flour: This forms the base of the cookies, providing structure and texture. You can substitute with gluten-free flour if needed.
- Cocoa powder: Adds a subtle chocolate flavor that balances well with the sweetness of the cookies. Use unsweetened cocoa powder for best results.
- Granulated sugar: Sweetness is crucial in any cookie recipe. This ingredient ensures that your red velvet cookies have that delightful sugary taste.
- Brown sugar: Adds moisture and depth to the cookie, contributing to its chewiness. You can also use coconut sugar for a healthier alternative.
- Butter: Provides a rich flavor and creates that soft, melt-in-your-mouth texture. Use unsalted butter for better control over the cookie’s saltiness.
- Egg: Binds the ingredients together and helps the cookies rise. Alternatives like flax eggs can be used for a vegan version.
- Vanilla extract: Adds a wonderful aroma and taste. Opt for pure vanilla extract for the most authentic flavor.
- Red food coloring: Essential for achieving that signature red hue. Use gel food coloring for a more vibrant color without adding excess liquid.
- Baking soda: This helps the cookies rise and develop the right texture. Make sure it’s fresh for optimal results.
- Salt: A little bit enhances the overall flavor of the cookie and balances out the sweetness.
- Cream cheese: Perfect for frosting or incorporating into the batter for a tangy twist. Consider using low-fat cream cheese for a healthier option.
Understanding the role of each ingredient can not only improve your baking skills but also help you make informed substitutions if necessary. After gathering these essentials, you can look forward to the delightful aroma of baking red velvet cookies filling your kitchen.
How to Make
- Preheat your oven: Start by preheating your oven to 350°F (175°C). This ensures even cooking of the cookies. While it’s heating, you can prepare your baking sheets by lining them with parchment paper.
- Mix the dry ingredients: In a large mixing bowl, whisk together the all-purpose flour, cocoa powder, baking soda, and salt. This step is essential as it helps to evenly distribute the leavening agent and prevent clumps of cocoa powder in your cookies.
- Cream the butter and sugars: In a separate bowl, combine the softened unsalted butter, granulated sugar, and brown sugar. Using a hand mixer or stand mixer, beat them together until the mixture becomes light and fluffy. This process incorporates air into the batter, which results in a lighter texture.
- Add the wet ingredients: To the creamed butter and sugar mixture, add the egg, vanilla extract, red food coloring, and mix until well combined. The food coloring will turn your batter a lovely red hue, so make sure to mix thoroughly.
- Combine dry and wet ingredients: Gradually add the dry ingredient mixture to the wet ingredients. Stir until just combined, being cautious not to overmix, as this can lead to tougher cookies. The dough should come together beautifully without any dry patches.
- Form the cookies: Use a tablespoon or cookie scoop to portion out the dough onto the prepared baking sheets, leaving enough space between each ball to allow for spreading during baking. You can gently flatten the tops if you prefer a less domed shape.
- Bake: Place the cookie sheets in the oven and bake for 8 to 10 minutes, or until the edges are set but the centers are still soft. Keep a close eye on them, as oven temperatures can vary. Your cookies will continue to bake slightly as they cool, so it’s crucial not to overbake them.
- Cool and frost: Once baked, allow the cookies to cool on the baking sheets for about 5 minutes before transferring them to a wire rack to cool completely. After they have cooled, you can frost them with cream cheese frosting or enjoy them plain.
Making cookies can be a joyful experience, and the aroma wafting through your home while they bake is one of the best parts of the process. Don’t forget to enjoy tasting the dough before you bake—just make sure you’re using pasteurized eggs, or opt for the egg-free versions!
Variations & Substitutions
White Chocolate Chip Red Velvet Cookies: One delightful variation to consider is adding white chocolate chips to your red velvet dough. The creamy, sweet flavor of the white chocolate complements the slight cocoa taste of the red velvet beautifully. If you’re a fan of that classic combination, simply fold in about half a cup of white chocolate chips right before you scoop the dough onto the baking sheets. This will give your cookies a melt-in-your-mouth finish that catapults them to the next level of indulgence.
Chocolate Cream Cheese Frosting: If you’re looking to elevate your cookies, consider making a chocolate cream cheese frosting to pair with them. Rather than sticking solely to traditional cream cheese frosting, mix in some cocoa powder for an added chocolate flavor. This change will create a richer frosting that pairs perfectly with the red velvet base. Whip together softened cream cheese, butter, powdered sugar, and cocoa until you reach a smooth and creamy consistency. Frost the cookies after they have completely cooled for the best results.
Vegan Red Velvet Cookies: For those who prefer plant-based options, you can easily convert this recipe into vegan red velvet cookies. Substitute the egg with a flax egg (1 tablespoon of ground flaxseed mixed with 3 tablespoons of water, allowed to sit until gelatinous) and use vegan butter in place of regular butter. Make sure your cocoa powder and food coloring are vegan-friendly as well. The result will be equally delicious and perfectly suited for vegan diets.
Gluten-Free Red Velvet Cookies: If you’re gluten-intolerant, swapping out regular flour for a gluten-free all-purpose flour blend will work wonderfully. Many brands offer a great substitute that can be measured cup for cup against regular flour. Ensure that there’s no cross-contamination if you’re extremely sensitive to gluten. The texture may vary slightly, but you’ll still enjoy a delectable batch of cookies without any gluten-related concerns.
Common Mistakes to Avoid
When baking red velvet cookies, there are several common pitfalls to watch out for. One frequent issue is overmixing the dough. Mixing too vigorously can lead to tough cookies instead of a soft and tender bite, which is what we all desire. Mixing until just combined is key to achieving the perfect texture.
Another mistake is not measuring the flour accurately. Too much flour will result in a dry cookie, while too little can create spreading and flattening during baking. Use the spoon-and-level method to measure your flour rather than scooping directly from the bag.
Lastly, underbaking can also be a concern. While it’s essential not to overbake, removing the cookies from the oven too soon can lead to a doughy center. A good rule of thumb is to look for slightly set edges and a still-soft center, as they’ll firm up as they cool.
Storage, Freezing & Reheating Tips
To keep your Simple Small Batch Red Velvet Cookies fresh, store them in an airtight container at room temperature for about 3 to 5 days. If you want to keep them for longer, consider freezing the cookies. Allow them to cool completely, then place them in a zip-top bag or an airtight container, separating layers with parchment paper to prevent sticking. They can last in the freezer for up to 3 months.
When you’re ready to enjoy them again, simply take them out and let them thaw at room temperature. If you prefer your cookies warm, you can pop them in a microwave for about 10 seconds or in a preheated oven at 350°F (175°C) for a couple of minutes until warmed through.
Always be cautious about food safety practices. If you’ve used cream cheese frosting, treat your cookies with care. The frosting should be stored in the fridge if the cookies are kept longer than 5 days, and frozen cookies with frosting should be consumed within a month to ensure quality.
Frequently Asked Questions
Can I use a different type of flour? Yes, you can use gluten-free flour blends in place of all-purpose flour. Just make sure to check that it’s a one-to-one substitute that can mimic the properties of regular flour.
Can I make the dough in advance? Absolutely! You can prepare the dough in advance and store it in the refrigerator for up to 24 hours before baking. However, allow it to sit at room temperature for about 15-30 minutes before baking, as cold dough can spread less.
Is red food coloring necessary for flavor? No, the red food coloring does not contribute to the flavor of the cookies; rather, it enhances the visual appeal. If you prefer, you can omit it, and your cookies will still taste delicious, though they will be brown and not red.
How can I make these cookies chewier? To achieve chewier cookies, you can increase the amount of brown sugar in the recipe or add an extra egg yolk for added moisture.
Can I add nuts or chocolate chips? Yes, adding pecans or walnuts can provide a nice crunch! Chocolate chips will add extra richness as well. Mix in about half a cup of your favorite add-ins to the dough for a delightful twist.
Conclusion:
These Simple Small Batch Red Velvet Cookies are a perfect sweet treat that combines ease, flavor, and creativity. With just a few fundamental ingredients, you can make a batch that satisfies your cravings without overwhelming you with leftovers. Whether you stick to the classic recipe or venture into exciting variations, these cookies are sure to occupy a cherished spot in your baking repertoire. I encourage you to embrace the experience, experiment with toppings, and most importantly, enjoy each delightful bite! Give them a try, share with friends, or keep them all to yourself for those cozy moments. Happy baking!


