Prep time: 30 minutes
Cook time: 25 minutes
Total time: 3 hours (includes cooling and assembling time)
Servings: 12 slices
The arrival of spring carries with it the promise of celebration and warmth. Among the many occasions we cherish, spring birthdays hold a special place in our hearts. Imagine a beautiful cake adorned with fresh strawberries and an utterly delightful vanilla frosting — this is the essence of the Spring Birthday Cake: Strawberry Vanilla Layer Cake. Each bite is a fleeting pleasure, evoking memories of sunny days filled with laughter and joy.
This cake is not just visually stunning; it is a harmonious blend of flavors and textures that’ll leave you craving more. The light and fluffy vanilla cake layers are complemented by a creamy, flavorful strawberry frosting, while the strawberries inside add a luscious freshness. In this recipe, you will learn how to create this stunning cake that is perfect for birthdays, picnics, or just any festive occasion. You will discover tips for perfecting each layer and ways to customize the recipe to suit your preferences. This is an adventure in baking that is both enjoyable and rewarding!
What Is Spring Birthday Cake: Strawberry Vanilla Layer Cake?
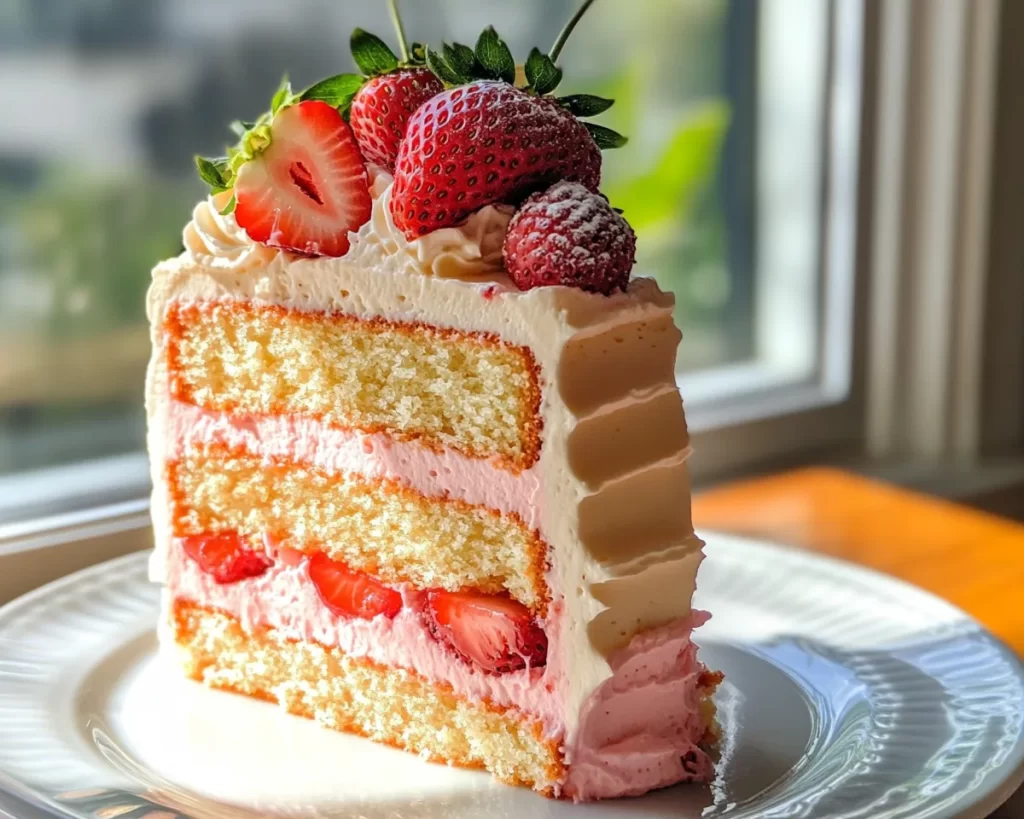
The Spring Birthday Cake: Strawberry Vanilla Layer Cake is a celebration of seasonal ingredients and vibrant flavors. At its core, this cake features delicate layers of **vanilla cake** that are light yet rich, providing the perfect canvas for an array of fruity toppings. The cake’s origin can be traced to the tradition of layer cakes, commonly seen in many cultures, enriched over time with local fruits and flavors. The generous use of **fresh strawberries** in this recipe sets it apart, as these seasonal gems not only lend their gorgeous color but also deliver a burst of refreshing flavor.
As you slice into this festively adorned cake, you’ll notice the creamy frosting, enhanced with fresh strawberry puree, enveloping the layers, creating a delightful contrast of textures. Each forkful is moist and fluffy, reminiscent of tender spring days. The icing is neither too sweet nor too heavy, making it a joyful experience as you savor the taste of **real strawberries**. Whether you are baking for a birthday celebration or simply treating yourself, this cake encapsulates the essence of spring in its flavors and aroma.
Why You’ll Love This
One of the main reasons this cake is a favorite among many is its delightful taste that balances sweetness with the freshness of strawberries. The ease of preparation is another factor that will win you over. Even if you are a beginner in the kitchen, the straightforward steps and clear instructions make this cake approachable. While traditional layered cakes can sometimes be intimidating, the **Strawberry Vanilla Layer Cake** is manageable yet impressive.
Additionally, this cake is versatile; you can easily adapt it to suit various dietary needs. For instance, making it gluten-free or substituting the sugar with a sweetener of your choice is entirely possible, allowing everyone to enjoy a slice. Moreover, with the use of fresh and wholesome ingredients, this cake acts as a joyful yet healthy treat, especially when made with seasonal strawberries. It stands out not only for its flavor but also for its visual appeal, perfect for impressing guests.
In preparing this cake, it’s important to be aware of common misconceptions such as needing advanced baking skills to create a layered cake. With the right approach, patience, and a dash of enthusiasm, you can create a stunning cake that rivals those found in bakeries, making it a delightful addition to your recipe collection.
Ingredients You’ll Need
To help you create this beautiful Spring Birthday Cake: Strawberry Vanilla Layer Cake, here are the essential ingredients along with their roles in the recipe:
- All-purpose flour: This is the base of your cake. It provides the structure and stability necessary for layered cakes. If necessary, you can substitute it with gluten-free flour.
- Sugar: Used to sweeten the cake and enhance its flavor. Consider using organic cane sugar for a more natural option.
- Baking powder: This leavening agent helps the cake rise, making it fluffy and light. Always check the expiration date for best results.
- Salt: A small amount enhances the sweetness and balances the flavors in the cake.
- Unsalted butter: Provides richness and moistness. Make sure it’s at room temperature for easy creaming.
- Eggs: These help bind the ingredients together and contribute to the structure. Use fresh, large eggs for the best results.
- Vanilla extract: Adds depth of flavor to the cake. Look for pure vanilla extract for a more authentic taste.
- Milk: Adds moisture to the batter. You can substitute almond milk or another dairy-free option if needed.
- Fresh strawberries: These will be layered within the cake and used in the frosting. Choose ripe, sweet strawberries for the best flavor.
- Powdered sugar: Essential for making a smooth frosting. Be sure to sift it to avoid lumps.
- Heavy cream: This will be whipped to create a light and airy frosting texture that enhances the cake.
Understanding these ingredients and their roles will help you in making adjustments as needed and achieving the perfect texture and flavor in your cake.
How to Make
Now that you have gathered all the required ingredients, you’re ready to embark on the journey of making this stunning Strawberry Vanilla Layer Cake. Here’s a detailed step-by-step guide:
- Preheat your oven: Begin by preheating your oven to 350°F (175°C). This is a crucial step, as a properly preheated oven ensures even baking. You might want to use an oven thermometer to confirm that your oven is at the correct temperature.
- Prepare your baking pans: Grease and flour two 9-inch round cake pans. Alternatively, you can line the bottom with parchment paper for easier removal. This step ensures that the layers won’t stick, allowing for a smooth release.
- Mix dry ingredients: In a medium bowl, whisk together the flour, baking powder, and salt. This helps to evenly distribute the leavening agent and prevents clumps. Set this mixture aside while you work on the wet ingredients.
- Cream butter and sugar: In a large mixing bowl, beat the unsalted butter with sugar using an electric mixer on medium speed until it’s light and fluffy. This process usually takes about 3 to 5 minutes. The texture should be pale and billowy, which indicates that air has been properly incorporated.
- Add eggs and vanilla: Beat in the eggs one at a time, ensuring each one is fully incorporated before adding the next. Add the vanilla extract; mix until well combined. This will enhance the overall flavor of the cake.
- Combine wet and dry ingredients: Gradually add the flour mixture to the butter-sugar mixture, alternating with milk. Start and end with the dry ingredients. Mix until just combined to avoid overworking the batter, which can lead to a dense cake.
- Pour the batter: Divide the batter evenly between the prepared pans. Use a spatula to smooth the tops to ensure they bake evenly. Tap the pans gently on the counter to remove any air bubbles lurking in the batter.
- Bake the cakes: Place both pans in the preheated oven and bake for 25–30 minutes. The cakes are ready when a toothpick inserted in the center comes out clean. Avoid opening the oven door too early, as this could cause them to sink.
- Cool the cakes: Once baked, allow the cakes to cool in their pans for 10 minutes. Then, gently remove them from the pans and let them cool completely on a wire rack. Cooling is essential before frosting to prevent melting.
- Prepare the frosting: In a mixing bowl, whip the heavy cream until soft peaks form. Gradually add powdered sugar and strawberry puree, continuing to whip until you achieve a fluffy, spreadable consistency. Ensure you don’t over-whip, or the cream could turn grainy.
- Assemble the cake: Place one cake layer on a serving platter. Evenly spread a layer of strawberry frosting on top, followed by fresh strawberry slices. Place the second cake layer on top, then frost the entire cake with the remaining frosting. Be generous; it should be a delightful sight!
- Decorate: Top with additional fresh strawberries for an eye-catching presentation. You can also add sprigs of mint for a pop of color. The final decoration elevates the cake from simple to spectacular.
- Chill before serving: Allow the cake to sit in the fridge for at least 30 minutes. This chilling time helps the cake set and makes it easier to slice. Finally, take it out, slice, and serve to your eager guests!
Each step is designed with detail to guide you through the baking process, ensuring success in creating this beautiful cake.
Variations & Substitutions
Gluten-Free Variation: If you or your guests have dietary restrictions regarding gluten, you can easily make this cake gluten-free. Simply substitute the all-purpose flour with a high-quality gluten-free flour blend. Be sure to also double-check that your baking powder is gluten-free, as some brands may contain gluten. This variation will still yield a deliciously fluffy cake that everyone can enjoy!
Dairy-Free Version: For those who are lactose intolerant or prefer a dairy-free option, substitute the milk with almond milk or oat milk. You should also use dairy-free butter alternatives for the cake and the frosting. The light and airy nature of the cake is retained while ensuring that it meets dietary needs.
Chocolate Strawberry Cake: In a delightful twist on the classic, consider making a chocolate version of your cake. To do this, you would replace about 1/3 of the all-purpose flour with unsweetened cocoa powder. This will create a rich chocolate flavor that perfectly pairs with the fresh strawberries. A chocolate cake with strawberry frosting offers a beautiful contrast of flavors and caters to chocolate lovers!
Berry Medley Cake: Instead of just using strawberries, mix different types of berries such as blueberries and raspberries for a fruity twist. This medley not only enhances the flavor but also adds visual appeal to your cake. You can layer the assorted berries between the cake layers or blend them into the frosting, creating a unique aesthetic and flavor profile.
Vegan Version: To create a vegan-friendly cake, omit eggs and replace them with flaxseed meal mixed with water or use a commercial egg replacer. Make sure to use plant-based milk and dairy-free whipped cream for the frosting. The result is a compassionate yet delicious cake that doesn’t compromise on flavor!
Each of these variations allows you to customize the Spring Birthday Cake to cater to different palates and dietary requirements, ensuring everyone can partake in the celebration.
Common Mistakes to Avoid
As with any baking endeavor, there are common pitfalls to be mindful of to ensure your Strawberry Vanilla Layer Cake is perfectly executed. A critical mistake is **overmixing the batter**, which can lead to a dense cake. Mixing should only occur until the ingredients are just combined.
Another common error is using **cold ingredients**. For optimal results, all ingredients, especially butter and eggs, should be at room temperature. This promotes better incorporation and ultimately a fluffier texture.
Be cautious with oven temperatures; an inconsistent or improperly preheated oven can cause your cakes to rise unevenly or even sink in the middle. A reliable oven thermometer can assist in diagnosing this issue.
Finally, ensure the cakes are fully cooled before frosting. **Melting the frosting** by applying it to warm cake layers can make the entire layered creation become a gooey mess. Patience in the cooling process is key!
If you keep these tips in mind throughout your baking process, you’ll find that your success rate will dramatically increase!
Storage, Freezing & Reheating Tips
The Spring Birthday Cake: Strawberry Vanilla Layer Cake is not only an immediate delight but can also be enjoyed later if properly stored. To preserve its freshness, wrap any leftover cake tightly in plastic wrap and then cover it with aluminum foil or store it in an airtight container. This will keep it from drying out while stored in the fridge.
For storage at room temperature, make sure your cake is well-covered. The cake can typically last for up to 3 days in the fridge and about 2 days at room temperature, depending on the humidity levels. However, if you foresee leftovers beyond this, consider freezing portions of the cake.
To freeze the cake, ensure it is completely cooled, then slice it into individual pieces. Wrap each slice snugly in plastic wrap and place them in a labeled freezer bag. This preservation method allows you to relish a slice of this delightful cake whenever a craving arises! When you’re ready, simply thaw it in the fridge overnight before enjoying.
If you reheated the cake after freezing, only do so in the oven, as microwaving can lead to soggy textures. A quick 10 to 15 minutes in a low-temperature oven will bring back some of its original moistness.
Frequently Asked Questions
Can I make this cake ahead of time?
Yes, you can prepare the layers of the cake ahead of time. Bake and cool the cake layers entirely before wrapping them in plastic wrap and storing them in the refrigerator for up to 2 days. You can also freeze them for longer storage. Frost the cake the day you plan to serve it for the best texture and taste.
What type of strawberries should I use?
Fresh strawberries are preferred for this recipe for their sweetness and vibrant color; strawberries that are in season usually offer the best flavors. Look for firm strawberries that are brightly colored, without any blemishes or soft spots. Organic strawberries are also recommended due to their lack of pesticides, enhancing your dish’s natural freshness.
Can I use frozen strawberries instead?
While fresh strawberries yield the best results in terms of texture and flavor, frozen strawberries can be used in a pinch. If using frozen strawberries, ensure they are thawed and well-drained to avoid excess moisture in your frosting. Keep in mind that the texture and flavor may differ slightly from using fresh strawberries.
How do I achieve a smooth frosting?
To achieve a smooth frosting, ensure that your ingredients, especially the heavy cream and powdered sugar, are at room temperature. Whipping the cream to the proper peak stage and carefully folding it with the strawberry puree and powdered sugar will ensure a smooth consistency.
Can I decorate the cake differently?
Absolutely! While the fresh strawberries provide a classic look, you can opt for different decorations based on your tastes or the occasion. Edible flowers, chocolate shavings, or even a drizzle of chocolate ganache can create a beautiful presentation. Get creative and make it uniquely yours!
Conclusion:
The Spring Birthday Cake: Strawberry Vanilla Layer Cake embodies the joy of celebration and the beauty of spring. Its delightful layers filled with fresh strawberries and crowned with fluffy frosting will undoubtedly enchant all who experience it. This cake is incredibly customizable, making it a versatile treat for any occasion. I encourage you to embrace this recipe, experiment with your variations, and share the fruits of your labor with friends and family.
So roll up your sleeves, gather your ingredients, and indulge in creating this delightful cake that’s as rewarding to make as it is to eat. Enjoy every delicious moment!


