Prep time: 30 minutes
Cook time: 25 minutes
Total time: 55 minutes
Servings: 12 servings
Spring is in the air, and what better way to celebrate the season than with a vibrant and delightful cake? The Spring Cake Designs: Pastel Spring Buttercream Swirls is a show-stopping dessert that embodies the essence of the season. This gorgeous cake is not only visually stunning but also bursting with flavor, making it the centerpiece for any spring celebration, such as birthdays, Easter gatherings, or even just a cozy family get-together. In this recipe, you will learn how to master the art of swirling pastel buttercream, creating an aesthetic that’s as pleasing to the eyes as it is to the palate.
The best part about this charming cake is its versatility. The recipe is easy to follow, making it perfect for both novice bakers and seasoned cooks looking for a fun, refreshing idea. You will also discover variations and tips that can customize this cake for various dietary needs or personal preferences. So whether you need to whip something up for a brunch with friends or a special event, this pastel cake will definitely dazzle.
What Is Spring Cake Designs: Pastel Spring Buttercream Swirls?
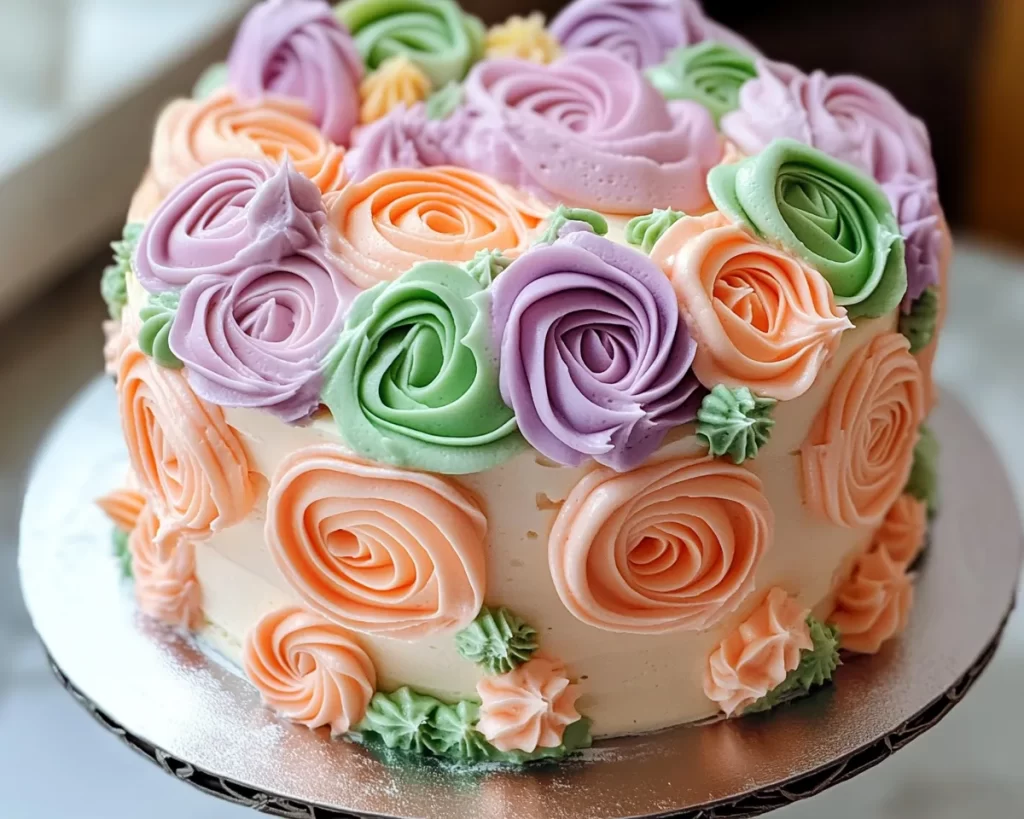
Spring Cake Designs: Pastel Spring Buttercream Swirls is a delightful dessert that brings the colors and flavors of spring to your table. Originating from a layering of light sponge cake with rich, creamy buttercream, this cake features a variety of pastel shades that will remind anyone of blooming flowers in a garden. The cake itself is fluffy and moist, while the buttercream has a silky texture that adds an extra layer of indulgence to every slice.
The original concept revolves around the idea of creating a cake that embodies the freshness and brightness of spring. By using a combination of natural fruit flavors or food coloring, you can infuse a hint of fruity essence into the buttercream. The beauty of this cake comes not just from its taste but also from its vibrant presentation. The pastel swirls on the exterior create a visually appealing outcome that makes it a true centerpiece.
Texture plays a vital role in this recipe. The combination of a soft sponge cake with the smooth buttercream creates a sensory experience that is both satisfying and refreshing. The flavor balance ensures that neither the cake nor the frosting overwhelms your taste buds. Each bite is a celebration of spring, beckoning you to take another.
Why You’ll Love This
There are several compelling reasons you will adore this recipe for Spring Cake Designs: Pastel Spring Buttercream Swirls. First and foremost, the taste is absolutely delightful. The balance of sweetness from the buttercream paired with the lightness of the sponge cake achieves a harmonious flavor profile. This cake excels at showcasing seasonal ingredients, allowing the natural tastes to shine, especially if you decide to incorporate fruit purees.
Another reason to love this cake is its simplicity. While the result may look sophisticated, the process is straightforward. Whether you’re a busy parent looking to whip something special up for a child’s birthday or a beginner stepping into the world of baking, this recipe makes it feel achievable. You don’t need fancy equipment or advanced skills; all you need is a mixing bowl, some basic tools, and a sprinkle of creativity.
When it comes to cost, this cake is budget-friendly. Many of the ingredients can be found in your pantry or local grocery store, ensuring that you won’t break the bank while making an unforgettable dessert. Plus, it provides ample servings, making it ideal for gatherings or parties. The ability to customize flavors and designs also allows for versatility so anyone, including those with specific dietary restrictions, can enjoy a slice.
It’s important to note common misconceptions regarding buttercream. Many people think that it is overly sweet and heavy, but that doesn’t have to be the case! You can adjust the sugar content in the frosting and incorporate natural flavorings to counterbalance the sweetness.
Ingredients You’ll Need
- 2 cups all-purpose flour: This is the backbone of your cake, providing structure. You may substitute with gluten-free flour if needed.
- 1 ½ cups granulated sugar: Sweetens the cake and enhances the overall flavor. For a healthier version, consider using coconut sugar.
- ½ cup unsalted butter: Adds richness to the cake. Use a vegan butter substitute if following a dairy-free diet.
- 1 cup milk: Keeps the cake moist. Non-dairy milk alternatives, like almond or oat milk, can be used.
- 3 large eggs: Acts as a binding agent while adding moisture and richness. For an egg-free version, you can use flax eggs or applesauce.
- 2 ½ tsp baking powder: Provides leavening, ensuring your cake rises properly.
- 1 tsp vanilla extract: A key flavor enhancer, contributing to the overall taste. For alternative flavors, consider almond or citrus extracts.
- 4 cups powdered sugar: Essential for the buttercream frosting, contributing to the sweetness and consistency.
- 1 cup unsalted butter (for frosting): Creates a smooth, velvety texture. Again, you can replace this with plant-based butter.
- Food coloring: Optional, to create the desired pastel swirls. Choose natural coloring for a healthier option.
These ingredients come together to create a delightful blend of flavors. Each plays a crucial role in the final result, leading to a fluffy cake covered in an eye-catching buttercream design.
How to Make
- Preheat your oven to 350°F (175°C). Begin the baking process by ensuring that your oven is at the right temperature. Preheating guarantees even baking throughout your cake. Use an oven thermometer if you want to double-check the accuracy of your oven’s temperature settings.
- Prepare your cake pans by greasing them and lining the bottom with parchment paper. This step ensures that your cake will easily release from the pans once baked. The parchment paper serves as an added layer of protection, preventing any sticking.
- Mix the dry ingredients together in a bowl. In a medium bowl, combine the all-purpose flour, baking powder, and salt. This step helps evenly distribute the leavening agent throughout the flour, ensuring that the cake rises uniformly.
- In a large mixing bowl, cream together the unsalted butter and granulated sugar until the mixture is light and fluffy. This should take about 3-5 minutes using an electric mixer. The air pulled into the mixture during this process will help the cake rise. Don’t rush this step; it’s crucial for texture!
- Add the eggs one at a time, mixing well after each addition. Then incorporate the vanilla extract. This gradual addition ensures that each egg gets fully integrated into the butter and sugar mixture, promoting a smoother batter.
- Alternate adding the dry ingredients and milk to the wet mixture, beginning and ending with dry ingredients. Mix until just combined. Overmixing at this stage can result in a dense cake, so be gentle.
- Divide the batter evenly among your prepared cake pans. Use a spatula to smooth out the tops, ensuring an even surface. This helps achieve uniform layers, which will be important once you assemble the cake.
- Bake the cakes in the preheated oven for about 25 minutes or until a toothpick inserted into the center comes out clean. Keep an eye on them during the last few minutes, as temperatures can vary between ovens.
- Once baked, allow the cakes to cool in the pans for about 10 minutes before transferring them to a wire rack to cool completely. Allowing them to cool in the pans helps them set but don’t leave them in too long, or they might stick.
- While the cakes are cooling, prepare your buttercream. In a large bowl, beat the unsalted butter until creamy, then gradually add in the powdered sugar. This will take some time, and you may need to scrape down the sides of the bowl regularly.
- Add milk as needed. Mix until creamy and fluffy for about 5-7 minutes. Adjust the consistency to your liking; if the frosting seems too thick, add more milk incrementally.
- For the pastel colors, separate the buttercream into different bowls and use food coloring to achieve your desired shades. You can have fun with this step by mixing colors to create your unique pastels! Keep in mind that a little food coloring goes a long way.
- Once the cakes are completely cool, layer them with a generous amount of buttercream in between each layer. Use an offset spatula to smooth the frosting evenly on the sides and top of the cake.
- Create your pastel swirls using a piping bag fitted with various tips. Swirl the different colored butters over the cake, creating beautiful patterns. This is your chance to get creative, and there are no wrong ways to decorate!
- Finally, chill the cake for about 30 minutes before serving to let the frosting set. This will make cutting easier, and the flavors will meld together beautifully.
Cooking does not have to be overly complicated when you have a detailed recipe guiding your steps. Each procedure has its purpose, contributing to the ultimate outcome: a stunning spring cake that will have everyone coming back for seconds.
Variations & Substitutions
Fruit-Flavored Cake: Consider introducing fruit into your batter. Incorporating raspberry, lemon, or orange zest can elevate the overall taste profile and give your cake a refreshing twist. You can replace a portion of the milk with fruit purees as well. This variation is perfect for those who enjoy fruity desserts or are looking to incorporate seasonal fruits into their baking.
Gluten-Free Version: If you’re catering to gluten-sensitive individuals, you can switch out all-purpose flour for a gluten-free mix or almond flour. Just ensure you use a blend that includes a binding agent like xanthan gum. This variation does not have to compromise flavor; you’ll still achieve a moist and tender cake.
Dairy-Free Option: Dairy intolerance is common, but you don’t have to miss out on this delightful cake. Simply substitute the milk and butter with plant-based alternatives like coconut milk and vegan butter. The result will still be richly flavored and moist without sacrificing deliciousness.
Chocolate Cake Variation: For a twist on the original vanilla flavor, you can add cocoa powder to your dry ingredients. This will yield a decadent chocolate sponge, creating an entirely different experience. Pair it with chocolate buttercream for an indulgent take on a classic cake.
Decorative Designs: Instead of a smooth buttercream finish, you could opt for rustic styling. Use a palette knife to create textured frosting instead of perfect swirls. This more casual appearance can appeal to those who appreciate a less-polished, homey look and enjoy a bit of artistic flair in their baking.
Common Mistakes to Avoid
Baking can be quite rewarding, but several common mistakes may leave you frustrated. One of the primary issues is using ingredients that are not at room temperature. When butter or eggs are cold, they don’t mix as evenly, which can lead to a denser cake. Always make sure to allow the butter to come to room temperature for optimal creaming and emulsification during the mixing process.
Another mistake is overmixing the batter after adding the dry ingredients. If you overmix, it can develop the gluten in the flour, leading to a tough cake instead of a tender one. Mix just until ingredients are combined; a few lumps are perfectly acceptable.
Keep an eye on the baking time as well. Even though the recipe provides a time frame, different ovens can yield different results. Always start checking a few minutes ahead of the expected time. Overbaking can lead to dryness, ruining the desired moisture of the cake.
Lastly, let’s address frosting consistency. Sometimes, your buttercream may be too thick or too thin. If yours is not easily spreadable, consider adding a tablespoon of milk at a time until it reaches the right texture. Conversely, if it is too thin, you may need to incorporate more powdered sugar until suitable.
Storage, Freezing & Reheating Tips
Properly storing your Spring Cake Designs: Pastel Spring Buttercream Swirls ensures that it remains fresh and delicious. If you have leftovers, place your cake in an airtight container at room temperature. It will keep well for up to three days. If your home is particularly warm, then it’s best to refrigerate the cake to help keep the frosting stable.
For anyone needing to prepare ahead of time, this cake freezes beautifully. Slice the cake into individual portions, then wrap each piece tightly in plastic wrap before placing them in a freezer-proof container or zip-lock bag. The cake can be frozen for up to three months and is best enjoyed once thawed in the refrigerator overnight.
Reheating is not typically necessary; however, if the cake is chilled, consider letting it come to room temperature before serving. If you prefer a warm slice, you can microwave a piece for about 15 seconds, but be careful not to heat too long, as it can ruin the frosting.
Best practices for food safety are critical. If you’re using any dairy in your cake, such as eggs or butter, make sure to keep an eye on the expiration dates. This also applies when you’re freezing the cake; ensure it’s consumed within the suggested timeline to enjoy it at its best.
Frequently Asked Questions
Can I use other flavors in the buttercream besides vanilla? Absolutely! The world of buttercream is your oyster. You can use various extracts like almond, lemon, or even peppermint to give your frosting an exciting twist. Just remember to adjust the amount based on the strength of the flavoring.
What can I do if my cake layers dome? If your cake layers rise unevenly, leading to a dome shape, you can simply trim the tops off with a serrated knife once they cool. This will give you a more stable base for stacking and frosting, ensuring a beautiful final presentation.
Is there a way to make this cake healthier? Yes! You can reduce the sugar content in both the cake and frosting. Additionally, using unsweetened applesauce or Greek yogurt as a substitute for butter can also reduce the calorie content while keeping the cake moist and flavorful.
How long does this cake last? When stored properly in an airtight container, your Spring Cake Designs: Pastel Spring Buttercream Swirls will remain fresh for about three days at room temperature or up to a week in the refrigerator. If you freeze individual slices, they can last up to three months.
Can I make this cake ahead of time? Yes! You can bake the cake layers a day in advance and frost them just before serving. Alternatively, the frosting can be made and stored in the refrigerator for up to a week before being applied to chilled cake layers.
Conclusion:
The Spring Cake Designs: Pastel Spring Buttercream Swirls is more than just a cake; it’s a celebration of spring, color, and flavor. With its fluffy layers and delightful pastel swirls, this cake can be the highlight of any gathering. Whether you’re hosting a party, bringing a dessert to a potluck, or just treating yourself and your family, this recipe fits the bill.
I encourage you to give this delicious cake a try and make it your own. Feel free to experiment with flavors, colors, and designs. Share it with friends and family and watch as they’re taken in by its beauty and taste. A homemade cake is a love letter baked into layers, so let your creativity shine through!


