Prep time: 30 minutes
Cook time: 12 minutes
Total time: 42 minutes
Servings: 24 cookies
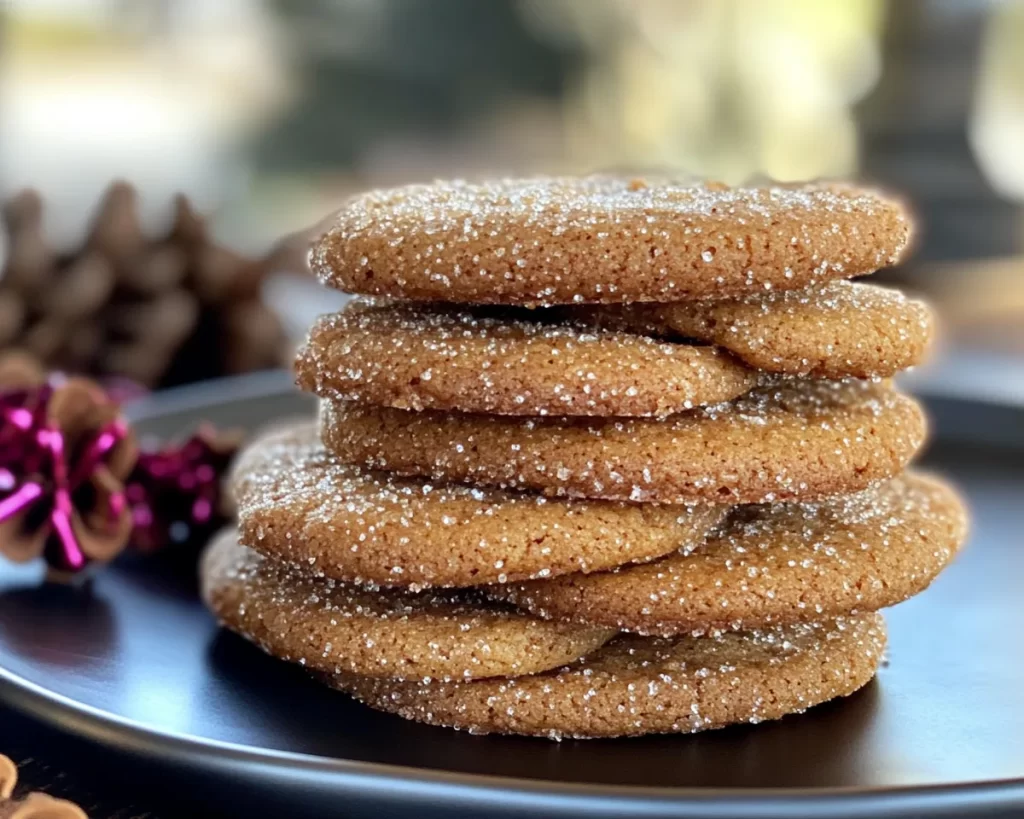
The aroma of fresh-baked cookies wafting through the air can evoke some of the warmest memories from childhood—perhaps gathering around the kitchen table with family during the holidays, or enjoying a sweet treat after school. The classic **Gingerbrave Cookies**, a spiced cookie perfect for any occasion, hold that nostalgic magic! These delightful cookies, reminiscent of traditional gingerbread, are packed with rich, warm spices and an inviting sweetness that makes them irresistible. Whether you’re a busy parent looking to involve your kids in the kitchen, a beginner eager to try your hand at baking, or simply someone looking for a comforting snack, these cookies are the way to go.
In this article, you will learn how to create these delicious treats, explore tips for achieving the best texture and flavor, discover variations to customize the recipe to your taste, and gain insights on how to address common baking mishaps. By the end, you will have all the knowledge you need to make the perfect batch of Gingerbrave Cookies and impress everyone around you!
What Is Gingerbrave Cookies (Spiced Cookie Recipe)?
Gingerbrave Cookies are a delightful rendition of spiced cookies that marry the flavors of **ginger**, **cinnamon**, and **nutmeg** into a delightful treat. Originating from medieval Europe, these cookies reflect rich cultural traditions, often associated with holiday celebrations and festive gatherings. The delightful combination of warm spices and a hint of sweetness creates a texture that’s both chewy and slightly crisp. Perfectly spiced with a hint of molasses, these cookies bring a cozy feel, making them a popular choice for gatherings, gifting, or simply enjoying with a hot cup of tea or coffee.
The key to making these cookies stand out is the balance of **spices** and **sweetness**. They are not overly sweet, which gives them an exquisite depth of flavor. The use of dark brown sugar adds a rich caramel note, while the **ginger** provides a gentle, spicy kick. This recipe not only captures the classic essence of spiced cookies but also transforms them into something magical and sophisticated, perfect for any time of year.
Why You’ll Love This
You will absolutely fall in love with Gingerbrave Cookies for numerous reasons. First and foremost, the **flavors** are utterly divine. A perfect balance between sweet and spicy, they appeal not only to children but also to adults seeking comfort in a familiar treat. The texture is another appealing factor; soft and chewy with a slight crispness around the edges makes these cookies exciting to bite into. Moreover, the recipe is incredibly **easy to follow**, making it accessible even for beginners in the kitchen.
Cost-effective ingredients allow you to whip these cookies up without breaking the bank, making them perfect for quick snacks or thoughtful gifts. They can be easily stored, which means you can have them ready to share with friends or keep them for your family throughout the week. There is a common misconception that creating delicious cookies is a cumbersome process—this recipe alleviates that worry, showing you just how straightforward and rewarding baking can be!
Ingredients You’ll Need
- All-purpose flour: 2 ¾ cups. This serves as the base for the cookies, providing the necessary structure.
- Ground ginger: 1 tablespoon. Central for flavor, giving an aromatic kick that defines the cookies.
- Cinnamon: 1 teaspoon. Adds warmth and sweetness to complement the ginger.
- Nutmeg: ½ teaspoon. Enhances the spice profile with its subtle earthiness.
- Baking soda: 1 teaspoon. A leavening agent that ensures the cookies rise properly.
- Salt: ½ teaspoon. Balances the sweetness and deepens the flavor.
- Dark brown sugar: 1 cup packed. Provides moisture and a caramel-like richness.
- Molasses: ¼ cup. A vital ingredient that adds depth and is essential for that classic ginger cookie taste.
- Butter: ¾ cup, softened. Contributes to the cookie’s rich flavor and chewy texture.
- Egg: 1 large. Acts as a binding agent, helping bring all the ingredients together.
- Vanilla extract: 1 teaspoon. Adds an additional layer of flavor that complements the spices beautifully.
Having these ingredients on hand can help ensure a seamless baking experience. If you find yourself missing an ingredient, substitutes can often be easily made. For instance, if you don’t have brown sugar, you can use white sugar mixed with a little molasses for a similar effect. Make sure to always measure your ingredients to maintain the right consistency!
How to Make
1. **Preheat your oven.** Begin by preheating your oven to 350°F (175°C). This initial step is crucial as it ensures that your cookies bake evenly and reach the desired texture.
2. **Prepare your baking sheets.** Line two baking sheets with parchment paper. This not only prevents sticking but also helps with even baking, allowing the cookies to have a lovely golden edge.
3. **Mix dry ingredients.** In a large bowl, combine the all-purpose flour, ground ginger, cinnamon, nutmeg, baking soda, and salt. Using a whisk or a fork, ensure the ingredients are well incorporated. This step is important to distribute the baking soda evenly and to avoid clumping, leading to cookies that rise beautifully.
4. **Cream butter and sugars.** In another bowl, using a hand mixer or stand mixer, cream together the softened butter, dark brown sugar, and granulated sugar until the mixture is light and fluffy. This should take about 2-3 minutes. The air incorporated in this step will contribute to the cookie’s final texture, making them soft and chewy.
5. **Add eggs and vanilla.** Next, carefully mix in the egg and vanilla extract until fully combined. Take a moment to scrape down the sides of the bowl to ensure everything blends perfectly! This is where those rich flavors start to meld together.
6. **Incorporate dry ingredients.** Gradually add the flour mixture to the butter mixture, stirring until just combined. You may want to switch to a spatula at this point to avoid over-mixing, which can lead to dense cookies.
7. **Chill the dough.** To help shape your cookies and improve the flavors, cover the dough with plastic wrap and let it chill in the refrigerator for at least 30 minutes. Chilling helps prevent the cookies from spreading too much during baking.
8. **Scoop and shape the cookies.** Use a cookie scoop or spoon to portion out the dough, rolling each portion into a ball, then placing them on the prepared baking sheets with enough space (approximately 2 inches apart). This space allows the cookies to expand while baking.
9. **Bake the cookies.** Place the cookie sheets in the preheated oven and bake for 10-12 minutes, or until the edges are set but the centers remain slightly soft. Keep a close eye on them, especially the first time you make this recipe!
10. **Cool and enjoy!** Once out of the oven, allow the cookies to cool on the baking sheets for about 5 minutes before transferring them to a wire rack. This cooling period helps them firm up slightly while retaining that chewy goodness. Once cooled, you’re ready to enjoy!
Variations & Substitutions
Gluten-Free Variation: If you’re looking for a gluten-free option, you can easily substitute the all-purpose flour with a 1:1 gluten-free baking mix. Be sure to choose one that contains xanthan gum to help with the structure of the cookies. This substitution may yield a slightly different texture but will still provide the delicious spiced flavor we love.
Vegan Variation: For a vegan version of these cookies, use **coconut or vegan butter** in place of regular butter. Replace the egg with a flax egg (1 tablespoon ground flaxseed mixed with 2.5 tablespoons water, allowed to sit until thick) or unsweetened applesauce. You may also want to use a plant-based milk to help combine the ingredients smoothly.
Chocolate Chip Gingerbrave Cookies: For a delightful twist, add in a cup of **chocolate chips** to the dough before chilling. The rich chocolate pairs beautifully with the spices, creating a fun and decadent treat. Use semi-sweet, dark, or even white chocolate, depending on your preference.
Spiced Fruit Variation: Incorporate your favorite dried fruits, such as **raisins or cranberries**, for a fruity twist! About ½ cup should suffice. This adds not only sweetness but also a chewy texture that contrasts nicely with the cookie’s base.
Nutty Gingerbrave Cookies: For additional crunch and flavor, add in some chopped nuts like **pecans or walnuts**. About ½ cup will enhance the cookie’s texture and introduce another layer of flavor. Be sure to chop the nuts finely for even distribution throughout the dough.
Common Mistakes to Avoid
One common mistake is **overbaking** the cookies. This can lead to a dry, crumbly texture rather than the soft, chewy consistency we desire. To ensure perfect cookies, always set a timer and check them a minute or two before the recommended bake time. Remember that cookies will continue to cook slightly even after being pulled from the oven.
Another mistake is not properly measuring your flour. Too much flour can result in dry cookies. Use the “spoon and level” method: spoon the flour into your measuring cup and level it off with a knife. This ensures accuracy. Always sift if the recipe specifies, as this aeration helps with texture.
Lastly, be careful with overspicing—while it’s important to capture that traditional flavor, an excess of spices can overpower the cookie. Start with the recommended amounts and adjust according to your palate.
Storage, Freezing & Reheating Tips
Once your Gingerbrave Cookies are baked and cooled, they can be stored in an airtight container at room temperature for up to one week. If you wish to keep them longer, consider freezing them. To do this, place the cookies in a single layer in a sealed freezer bag, separating layers with parchment paper. They can be frozen for up to three months.
To reheat, simply place them in a 350°F (175°C) oven for about 5-7 minutes, or until warmed through. This restores that fresh-baked texture and aroma. Should you find yourself with leftover dough, roll it into balls, freeze them on a baking sheet for a few hours, and then transfer them to a freezer bag. This way, you can bake fresh cookies anytime without the extra work!
Frequently Asked Questions
Can I use fresh ginger instead of ground ginger? Yes, you can use fresh ginger in the recipe! About 1 tablespoon of grated fresh ginger can replace the ground ginger. However, keep in mind that fresh ginger has a more intense and pungent flavor, so adjust to taste based on your preference.
How do I know when my cookies are done baking? To determine if your cookies are ready, look for slightly set edges with a soft center. They will firm up as they cool. If the centers look overly doughy, give them an additional minute or two in the oven, but be careful not to overbake.
Can I make these cookies dairy-free? Absolutely! You can substitute the butter with a plant-based butter alternative, and ensure that your chocolate chips or any mix-ins you choose are dairy-free as well.
How can I prevent my cookies from spreading too much? Chilling the dough helps maintain the shape of the cookies during baking. If you’re still having issues with spreading, you can try adding a bit more flour to stabilize the dough, but only a tablespoon at a time to avoid making them too dry.
Are Gingerbrave Cookies suitable for gifting? Definitely! These cookies are a wonderful gift, especially during the holidays! Package them in a decorative tin or box, and you’ve got a great homemade gift that friends and family will treasure!
Conclusion:
Gingerbrave Cookies encapsulate the warmth and joy of baking with their delightful spicy-sweet flavors and perfect texture. With easy-to-follow instructions and room for creativity in variations, this recipe is perfect for anyone looking to harness the magic of homemade treats. Don’t hesitate to try your hand at this beloved classic, whether you’re indulging yourself or sharing with loved ones. You can customize these cookies to suit every taste, and they are sure to become a cherished favorite in your household. So roll up those sleeves, gather your ingredients, and let’s bake some delicious memories! Happy cooking!