Prep time: 20 minutes
Cook time: 30 minutes
Total time: 50 minutes
Servings: 12 mini tarts
Spring is a season bursting with fresh fruits and vibrant flavors, making it the perfect time to whip up delightful desserts. One of the stars of spring baking is undoubtedly the strawberry, and what better way to showcase this luscious fruit than in a simple yet indulgent dessert? These Mini Strawberry Tarts are not only easy to make but also a fantastic way to impress family and friends. Bursting with flavor and creativity in just five steps, these tarts are an absolute must-try for anyone looking to celebrate the sweeter side of spring.
What Is Spring Desserts: Mini Strawberry Tarts in 5 Steps?
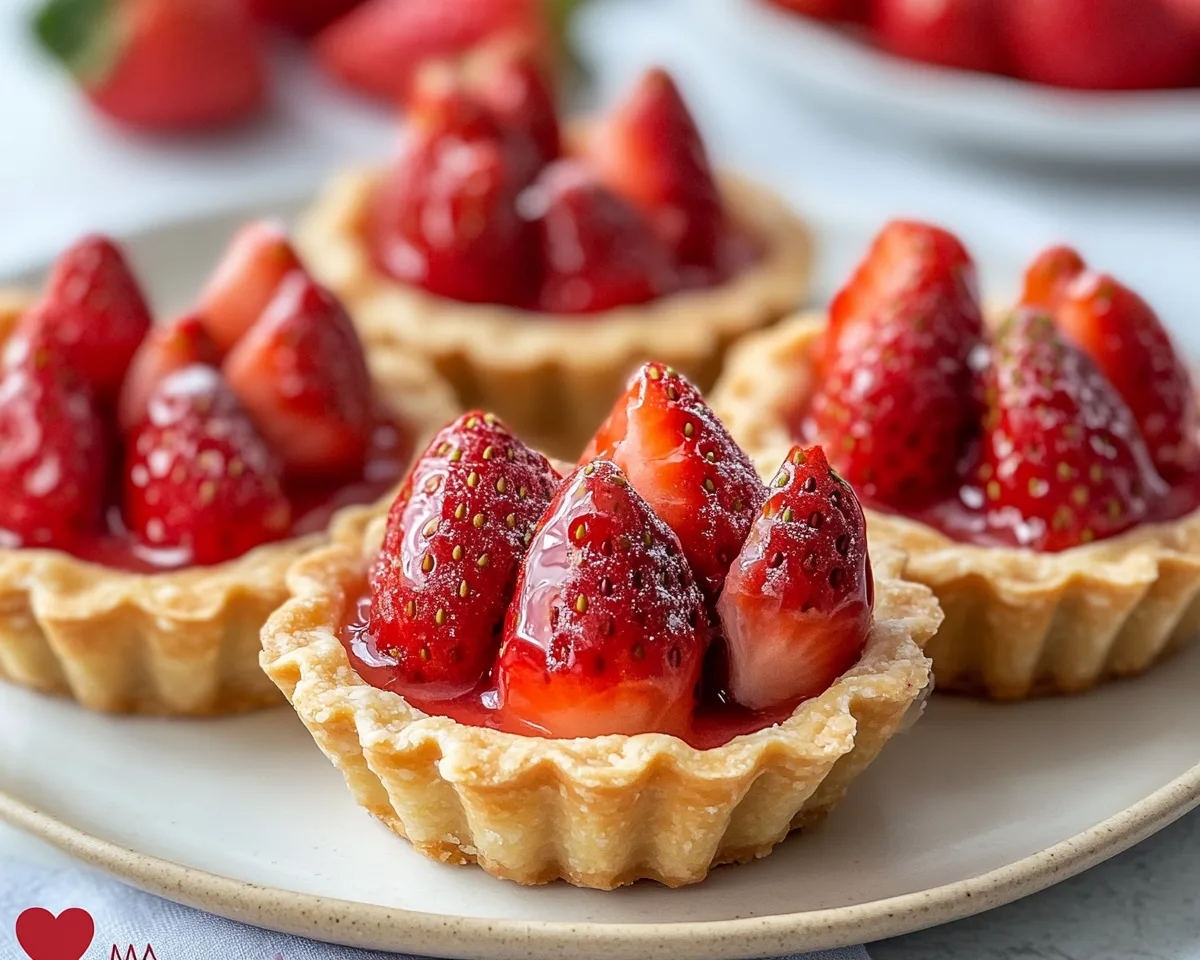
Mini Strawberry Tarts encapsulate the essence of spring. These petite pastries are composed of a buttery tart crust, a creamy filling, and fresh strawberries. The beauty of these tarts lies in their versatility; they can be tailored to suit various dietary preferences, making them a hit at gatherings or just as a delightful treat for yourself. With a crispy crust that holds a smooth and luscious filling, the addition of fresh strawberries on top creates not only a visual feast but a deliciously satisfying experience for your palate.
Why You’ll Love This
There are countless reasons to love Mini Strawberry Tarts. Firstly, they are straightforward to prepare, making them an excellent choice for busy parents and kitchen beginners alike. Unlike complex desserts that require advanced techniques, these tarts are simple enough to reduce the stress of baking while still achieving impressive results. Secondly, they are stunning to serve at get-togethers; guests will admire your culinary flair as they dive into these picturesque pastries. Lastly, strawberries are a great source of vitamin C and antioxidants, so these tarts are not just tasty but also a smarter dessert choice.
Ingredients You’ll Need
- 1 ½ cups all-purpose flour: The base for the tart crust providing structure.
- ½ cup unsalted butter (room temperature): Adds richness and flavor to the crust.
- ¼ cup powdered sugar: Sweetens the crust without adding graininess.
- 1 large egg yolk: Helps bind the ingredients and adds a rich texture.
- 2 cups strawberries (sliced): The main fruit topping that delivers freshness and flavor.
- 1 cup cream cheese: Provides a creamy, tangy filling.
- ½ cup heavy whipping cream: Adds lusciousness to the filling.
- ¾ cup granulated sugar: Sweetens the filling effectively.
- 1 tablespoon vanilla extract: Imparts a wonderful aroma and enhances flavors.
How to Make
- Prepare the Tart Crust: In a mixing bowl, combine the flour and powdered sugar. Add the room temperature butter and mix until the mixture resembles coarse crumbs. Gently blend in the egg yolk, mixing until the dough forms. Be careful not to overwork the dough; it should be soft but not sticky.
- Chill the Dough: Shape the dough into a disk and wrap it in plastic wrap. Place it in the refrigerator for about 30 minutes. This resting time allows the gluten to relax, resulting in a tender crust once baked.
- Bake the Tarts: Preheat your oven to 350°F (175°C). Once chilled, roll out the dough on a floured surface to about 1/8-inch thickness and cut out circles to fit your tart pans. Press the dough into the pans and prick the bottoms with a fork to prevent bubbling. Bake for 15-20 minutes until lightly golden, then allow them to cool completely.
- Make the Cream Cheese Filling: In a bowl, beat the cream cheese until smooth. Gradually add the granulated sugar and continue to mix. Slowly pour in the heavy whipping cream and vanilla extract. Beat the mixture until it becomes light and fluffy; this should take about 5 minutes. The filling should have a rich, creamy texture.
- Assemble the Tarts: Once the tart shells have cooled, fill each with the cream cheese mixture, smoothing the top. Arrange the sliced strawberries on top, creating a beautiful pattern. For an extra touch, you could brush a bit of warmed jam over the strawberries to give them a shiny gloss.
Variations & Substitutions
Berry Mix Variation: If you’re feeling adventurous, try incorporating a mix of berries like blueberries or raspberries alongside the strawberries. This not only adds vibrant colors but also different flavor profiles, making each bite exciting.
Dairy-Free Option: To make this dessert dairy-free, you can replace cream cheese with a dairy-free alternative like almond or coconut cream cheese. Use coconut whipped cream instead of heavy whipping cream for the filling.
Gluten-Free Option: For a gluten-free version of the tart crust, substitute regular all-purpose flour with a gluten-free blend, ensuring it contains xanthan gum for binding.
Chocolate Version: To add a chocolate twist, incorporate melted chocolate into the cream cheese filling or create a rich chocolate tart crust. This decadent change elevates your mini tarts into a more indulgent dessert.
Fruit Compote Topping: Instead of fresh strawberries, you can use fruit compote, which adds a concentrated flavor. Simmer your chosen fruit with sugar until thickened and pour over the cream cheese layer for a delicious change.
Common Mistakes to Avoid
Overworking the Dough: When mixing the crust ingredients, be cautious not to overwork the dough as this can lead to a tough tart shell. Aim for a crumbly texture that just comes together.
Ignoring the Chilling Step: Skipping the chilling process before baking is a common mistake. It’s crucial for firming up the butter, which helps maintain the shape of the tarts while they bake.
Not Measuring Ingredients Properly: Accurate measuring is essential for a balanced crust and filling. Use a kitchen scale or proper measuring cups to ensure you’re using the right amounts.
Storage, Freezing & Reheating Tips
To preserve the delightful texture and taste of your Mini Strawberry Tarts, it’s essential to store them correctly:
– **Refrigerate:** Store any leftovers in an airtight container in the fridge for up to 3 days. This helps maintain the freshness of the strawberries while keeping the filling safe.
– **Freezing:** If you wish to prep in advance, you can freeze the tart shells before adding the filling or toppings. Wrap the shells tightly in plastic wrap, and they can last about one month in the freezer.
– **Thawing:** To defrost frozen tart shells, simply leave them at room temperature for about an hour before filling. Always fill just before serving to avoid a soggy crust.
Frequently Asked Questions
Can I make the tart shells ahead of time?
Yes, you can prepare tart shells in advance. Once baked, they can be stored at room temperature in an airtight container for up to two days or frozen for up to a month. Make sure to fill them with the cream mixture shortly before serving for the best texture.
What can I use instead of strawberries?
You can easily adapt this recipe with other fruits like blueberries, raspberries, or peaches. Just ensure the fruits are fresh and ripe to maintain that vibrant flavor.
How do I prevent my tarts from getting soggy?
To reduce the likelihood of a soggy crust, fill your tarts only just prior to serving. Additionally, consider pre-baking the crust until it’s golden brown and firm.
Can I use pre-made tart shells?
Certainly! If you’re short on time, you can opt for pre-made tart shells found at the grocery store. Just ensure they are of good quality for a satisfying result.
How do I enhance the flavor of the filling?
You can amp up the flavor of the filling by adding a pinch of citrus zest or a splash of liqueur such as Grand Marnier. Both options elevate the creaminess and create a more complex flavor profile.
Conclusion: These Mini Strawberry Tarts are not only a delight to taste but also a joy to create. With their ease of preparation and versatility in flavors, they can be a showstopper at any event or a delightful treat for your family on a weekday. Grab your ingredients, follow the steps, and enjoy these scrumptious pastries that celebrate the best of spring. Happy baking!