Prep time: 15 minutes
Cook time: 0 minutes
Total time: 15 minutes
Servings: 4
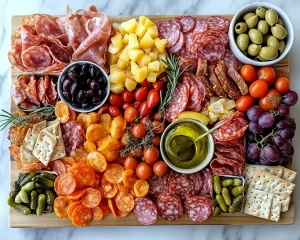
Creating a **Mini Individual Antipasto Charcuterie Box** is a delightful way to bring together flavors in a compact, visually appealing package. Whether for a gathering, picnic, or a simple family dinner, these easy-to-assemble boxes can cater to diverse tastes and dietary preferences. With just a little creativity and some delicious ingredients, you can whip up these charming boxes in just **15 minutes**.
What Is Charcuterie Board: Mini Individual Antipasto Charcuterie Boxes in 15 Minutes?
Mini individual antipasto charcuterie boxes are a modern twist on the traditional charcuterie board. Instead of a communal platter, each person gets their own neatly arranged selection of meats, cheeses, olives, and other delicious nibbles. This presentation not only enhances the visual appeal but also adds an element of convenience, especially during events where personal servings are more hygienic or preferred.
These boxes typically include a variety of textures and flavors, combining savory and sweet treats that make every bite an adventure. They are perfect for a casual gathering or even as a refined solution for a special event, providing an opportunity for creativity in both presentation and combination.
Why You’ll Love This
There are plenty of reasons to love these mini antipasto boxes:
- Convenience: Perfect for busy parents or kitchen beginners, these boxes require little prep time and no cooking.
- Customization: Tailor each box to suit individual tastes and dietary needs, accommodating everything from meat lovers to vegetarians.
- Visual Appeal: With vibrant colors and varied textures, these boxes are as pleasing to the eye as they are to the palate.
- Healthy Options: Incorporate fresh fruits, vegetables, nuts, and cheeses for a wholesome, balanced snack.
Ingredients You’ll Need
To create these delightful boxes, gather the following ingredients:
- Charcuterie Meats (e.g., prosciutto, salami, and chorizo): The foundation of any antipasto box, offering a rich, savory flavor.
- Cheeses (e.g., mozzarella, cheddar, and goat cheese): Enhance the taste profile with creamy, crumbly, and sharp varieties.
- Olives (e.g., green and black): Add a briny touch that balances the richness of the meats and cheeses.
- Fresh Veggies (e.g., bell peppers, cherry tomatoes, and cucumber slices): Brighten up the box with crunch and freshness.
- Dried Fruits (e.g., figs, apricots, or cranberries): For a sweet contrast to the savory flavors.
- Nuts (e.g., almonds, walnuts, or pistachios): Provide a satisfying crunch and healthy fats.
- Crackers or Breadsticks: Serve as a base for your meats and cheeses, adding texture and substance.
- Spreads (e.g., hummus or pesto): For an added layer of flavor and creaminess.

How to Make
1. **Prepare Your Ingredients:**
Begin by gathering all the ingredients on a clean cutting board. Ensure everything is washed and prepped. Slice the vegetables and cheeses into bite-sized pieces for easy assembly. Creating variety in sizes adds a fun visual element.
2. **Choose Your Base:**
Select a suitable container for each individual box, such as small bento boxes, trays, or even small plates. Arrange your bases on a countertop for easy accessibility.
3. **Arrange the Charcuterie Meats:**
Take a few slices of meats and fold or roll them to create height and dimension. Begin placing them along one side of the box. Generally, it’s visually appealing to have a mix of types and colors.
4. **Add Your Cheeses:**
Following the meats, add the cheeses. You may opt for chunks, slices, or even small balls. Consider placing different varieties next to one another to complement the meats visually and flavor-wise.
5. **Incorporate Fresh Veggies:**
Add your fresh vegetables next. Place cucumber slices, cherry tomatoes, and bell pepper strips in an organized fashion. This will not only provide a pop of color but also crunchy freshness to contrast the meats and cheeses.
6. **Include Olives and Dried Fruits:**
Scatter a handful of olives and dried fruits around the box, balancing the look. These additions enhance flavor while ensuring that every bite is different.
7. **Finish with Nuts and Crackers:**
Lastly, tuck in a handful of nuts for crunch and a selection of crackers or breadsticks. Arrange these elements in a way that each section appears full but not overcrowded.
8. **Add Spreads:**
If including dips like hummus or pesto, place them in small containers with lids. Tuck them into the box or set them beside it, ensuring they are easily accessible.
9. **Cover and Serve:**
Once assembled, cover the boxes if not serving immediately. Ensure to keep everything chilled until serving time, particularly if using perishable items.
Variations & Substitutions
Vegetarian Option: For a vegetarian antipasto box, swap out the meats for additional vegetables, such as roasted red peppers or artichoke hearts. Incorporate plant-based cheeses or hummus instead of dairy cheeses. This variation offers a delightful and colorful array of flavors still in line with the antipasto style.
Gourmet Touch: Elevate your mini boxes by including specialty cheeses or exotic spreads such as fig jam or truffle oil-infused items. Incorporating gourmet elements can impress guests during special gatherings or elevate a simple meal into something memorable.
Kid-Friendly Version: Adjust the flavors and textures for children by offering milder cheeses and familiar snacks. Include fun shapes of veggies or colorful fruit skewers to make the boxes more appealing. Ideal for busy families, this variation allows healthy eating to be fun and engaging.
Common Mistakes to Avoid
When preparing your mini antipasto boxes, be wary of overloading them. Too much variety can overwhelm the palate rather than provide a satisfying balance. Aim for a minimum of three types of meat and cheese, supplemented by a range of colors and textures through vegetables and fruits.
Additionally, do not forget about food safety. Be cautious of keeping everything chilled, especially when serving items that can spoil. Maintaining ideal temperatures ensures a delightful experience without compromising health.
Finally, be mindful of portion sizes. While you want to provide variety, ensure each box contains enough for a satisfying snack without excess waste.
Storage, Freezing & Reheating Tips
For any leftovers, store your mini antipasto boxes in airtight containers to maintain freshness. Depending on the ingredients used, many components can last in the refrigerator for up to three days. When storing, keep any dips or spreads separate to prevent sogginess.
If you wish to prepare these boxes ahead of time, assemble without the dips and bread. This way, items will last longer, and you can add the last-minute elements just before serving for ultimate freshness. Unfortunately, freezing is not recommended due to the quality of fresh ingredients, which may become mushy upon thawing.
When reheating any remaining items, it generally isn’t necessary, but if nuts or crackers have become stale, refresh them in an oven for a few minutes to regain their crunch.
Frequently Asked Questions
Can I make these boxes ahead of time?
Absolutely! You can prepare your boxes a few hours in advance. Just be sure to keep them in the refrigerator until serving time, particularly for dairy and meat items to ensure they stay cool and fresh.
What types of cheese work best?
The best cheeses for antipasto boxes include those with varying textures and flavors. Soft cheeses like brie or goat cheese provide creaminess, while hard cheeses like cheddar or parmigiano offer a satisfying bite.
Are there kid-friendly options for these charcuterie boxes?
Certainly! To create a kid-friendly version, use mild cheeses, and incorporate fruits like grapes or apple slices. Fun shapes of fresh veggies can also add visual appeal to engage younger palates.
How can I ensure the ingredients are budget-friendly?
To make these boxes more affordable, consider seasonal produce and local markets for meats and cheeses. You can even opt for store-brand products, which can offer quality at lower prices.
What’s a good way to present the boxes at a party?
Elevate your presentation by using wooden boards for a rustic touch or elegant trays for a more polished look. You can also personalize each box with labels or toppings for a special touch.
Conclusion:
Creating these **Mini Individual Antipasto Charcuterie Boxes** is not only quick but also customizable to suit any palate or occasion. With a bit of creativity and some simple ingredients, you can impress your family or guests with a delightful arrangement that celebrates flavors and textures. Enjoy the process of assembling and delight in the reactions as everyone enjoys their personal box of deliciousness!