Oh my goodness, if you’re looking for a dessert that will have your friends and family begging for seconds (and possibly thirds!), then let me introduce you to my favorite No-Bake Oreo Cheesecake. This delightful treat is not only incredibly easy to whip up, but it also manages to bring back all those nostalgic flavors of childhood! I remember the first time I made this for a potluck dinner. I was a bit hesitant, thinking maybe no one would notice my effort. Well, wrong! It disappeared faster than I could grab a slice for myself, and I was left with nothing but a plate of crumbs!
What makes this cheesecake so amazing is the balance of creamy filling and the crunchy Oreo crust. It’s rich and indulgent but without the fuss of baking (who wants to deal with an oven when you can simply chill your dessert?). Trust me, this is a dessert that will leave a lasting impression — perfect for any gathering, holiday, or just a sweet end to a normal day!
What’s in No-Bake Oreo Cheesecake?
Oreo Cookies: The star of the show! Not just for snacking, these chocolatey cookies form the base of our cheesecake crust. I usually go for the classic Oreos, but feel free to experiment with different flavors if you’re feeling adventurous!
Butter: This is used to bind the crushed Oreo crumbs together. I prefer unsalted butter to keep control over the sweetness of the cheesecake.
Cream Cheese: The creamy base of our cheesecake filling! Make sure you use full-fat cream cheese for that rich, decadent texture.
Sugar: A bit of sweetness to balance the tanginess of the cream cheese. I use granulated sugar, but powdered sugar can work if you want a smoother finish.
Vanilla Extract: This adds a lovely depth of flavor to the filling. I always opt for pure vanilla extract because it brings out the best taste!
Heavy Cream: Whipping this up creates that luscious, fluffy texture. It’s what makes the cheesecake feel so indulgent and airy at the same time.
Is No-Bake Oreo Cheesecake Good for You?
Now, let’s be honest. While this cheesecake is one scrumptious treat, it’s not exactly a superfood! But it does have its highlights.
Oreo Cookies: While they may not have the healthiest reputation, Oreos can bring a bit of joy into your life—sometimes you just need a little sweetness! Plus, they can satisfy that chocolate craving.
Cream Cheese: It does provide some calcium and protein, all in that creamy goodness. Just keep in mind that it’s high in fat, so moderation is key.
Heavy Cream: While this adds richness, it’s also high in calories and saturated fat, so again, enjoy in moderation!
So while this dessert may not win any health awards, it’s meant to be enjoyed and shared, bringing about those happy, delightful moments that food can create.
Ingredients List
– 30 Oreo cookies (for crust)
– 1/4 cup unsalted butter, melted
– 16 oz cream cheese, softened
– 3/4 cup granulated sugar
– 1 tsp vanilla extract
– 2 cups heavy cream
– 6-8 crushed Oreo cookies (for topping)
Serves: 8-10 generous slices
How to Make No-Bake Oreo Cheesecake?
1. **Prepare the Crust:** Start by crushing the 30 Oreo cookies in a food processor until they resemble fine crumbs. If you don’t have a processor, just place them in a zip-top bag and crush them with a rolling pin!
2. **Mix with Butter:** In a medium bowl, combine the crushed Oreo cookies with the melted butter. Stir until all crumbs are evenly coated. Press this mixture firmly into the bottom of a 9-inch springform pan to form an even crust. Set aside.
3. **Make the Filling:** In a large bowl, using an electric mixer, beat the softened cream cheese until smooth and creamy. Gradually add in the granulated sugar and vanilla extract, mixing until well blended.
4. **Whip the Heavy Cream:** In another bowl, whip the heavy cream until stiff peaks form. This is the fun part! Just watch that fluffy goodness develop.
5. **Combine:** Gently fold the whipped cream into the cream cheese mixture until no streaks remain. Be careful not to deflate the mixture—this cheesecake needs to be fluffy!
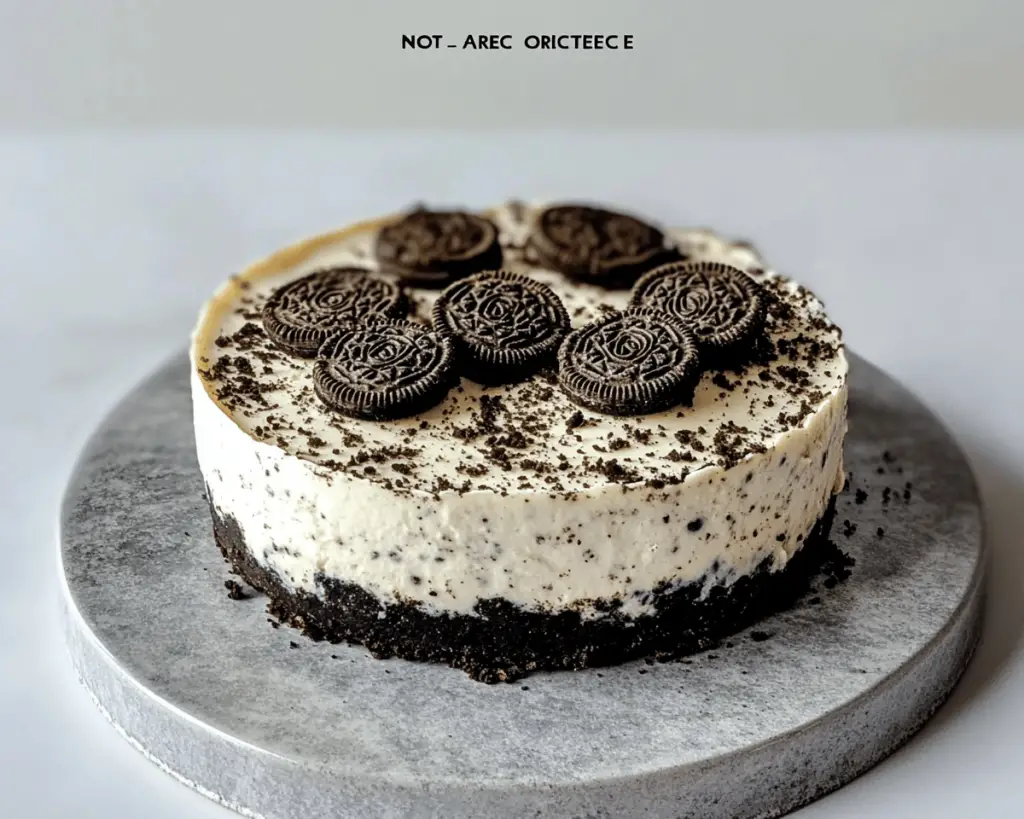
6. **Assemble:** Pour the cheesecake filling over the Oreo crust, smoothing the top with a spatula. Sprinkle the top with the crushed Oreo cookies for an added crunch.
7. **Chill:** Cover and refrigerate the cheesecake for at least 4 hours, or if you can resist, overnight is even better to let those flavors meld beautifully.
8. **Serve & Enjoy:** Once set, run a knife around the edge of the springform pan before releasing it. Slice, serve, and watch your guests’ faces light up with joy!
Sweet Suggestions for Serving
If you want to impress even more, serve each slice with a dollop of whipped cream on top and maybe a few mini Oreo cookies for decoration. A drizzle of chocolate sauce or a sprinkle of crushed Oreos can elevate it to gourmet status!
Remember, there are endless variations with this base recipe. You could add a layer of chocolate ganache, mix in some peanut butter for a richer flavor, or even fold in some mint for a refreshing twist. Get creative!
So, what are you waiting for? Grab those Oreos and let’s get mixing! You’ll find that this dessert not only brings a smile to your face but also creates delightful memories around the table. I’d love to hear how yours turns out! Enjoy!


