Let’s Get Real
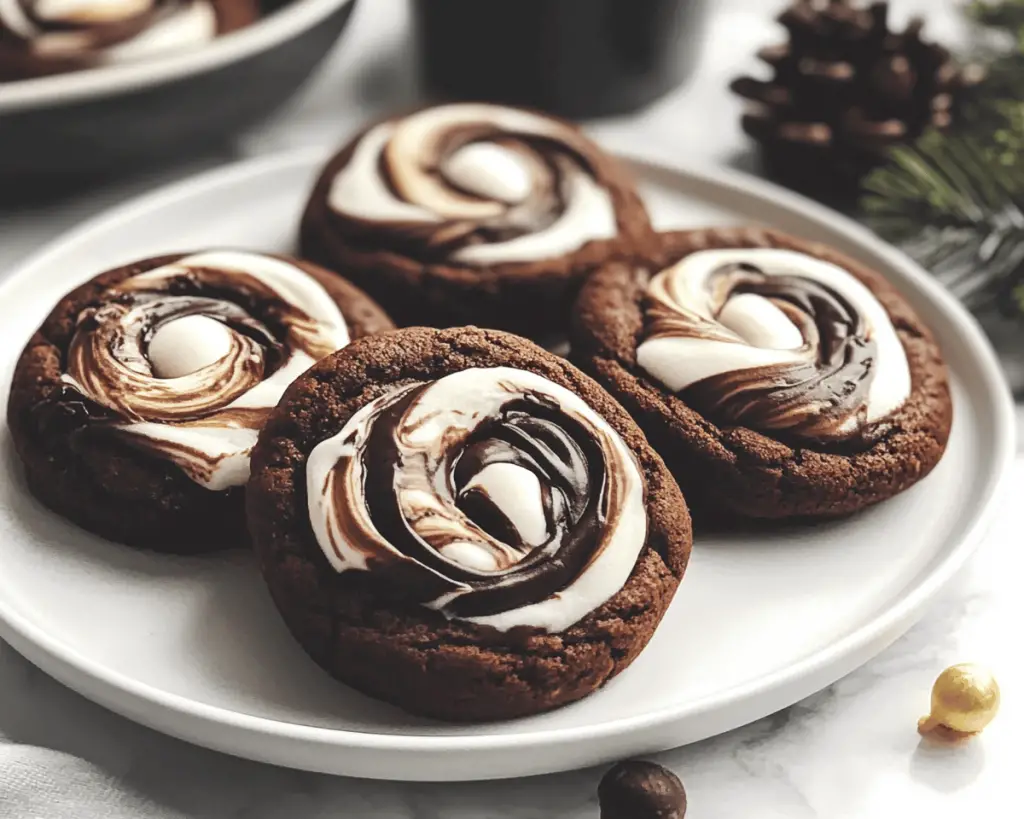
Here I am, sitting on yet another gloomy afternoon that’s straighter than a straightened hair after a rebellious perm. It’s that kind of weather that makes one crave a good old-fashioned comfort snack. And what, might you ask, fits the bill better than warm, gooey, and utterly luscious Handmade Chocolate Marshmallow Swirl Cookies? Yes, you heard that right! Those delightful morsels that remind us of a childhood spent blissfully biting into warm cookies, complete with all the gooeyness our hearts desired.
Do you remember the days when you were a kid and you’d horrifically declare a hatred for marshmallows? I was that kid. I thought marshmallows were the epitome of betrayal in the cookie world. I even went so far as to avoid s’mores at summer camp because I simply couldn’t trust a cookie with something as fluffy and squishy as a marshmallow. Fast-forward to adulthood, where I’ve since reconsidered that ill-fated stance; now, I’m swimming in the gloriously sticky embrace of these cookies like a kid in a candy store. As an adult, I’ve realized that marshmallows are kinda fantastic, especially when they’re melting into gooey swirls amongst a devilishly rich chocolate cookie base. Call me a convert, folks!
Ingredients, Unfiltered
Here’s where we get into the nitty-gritty of our superstar ingredient list. Buckle up, this is where I get opinionated!
What’s Really in Handmade Chocolate Marshmallow Swirl Cookies
– All-Purpose Flour: The backbone of any good cookie. I prefer the all-purpose kind because I’m not trying to reinvent the wheel here—just give me consistency, please. Also, I always buy the big bag because those tiny ones seem to disappear.
– Cocoa Powder: Use the good stuff! None of that wannabe stuff that tastes like cardboard. Look for high-quality unsweetened cocoa powder. This is where your cookie gets its rich depth and color. Seriously, you want your cookies to look like they just stepped off a runway—dark and sultry!
– Baking Powder: Because, well, you want these cookies to rise like my hopes of someday becoming a professional cookie taster. Just a teaspoon will do!
– Salt: Yes, even cookies need a little seasoning. It’s like a supportive friend cheering for your dessert to shine. Using sea salt? You fancy!
– Unsalted Butter: I cannot stress enough how important it is to use unsalted butter so you can control the saltiness of the cookie. Melted or softened, just get that butter in there.
– Brown Sugar: The real MVP. This makes the cookies stay moist and chewy and adds that caramel note which sings to your soul like a Broadway musical!
– Granulated Sugar: A little bit of sweetness to balance all of that buttery goodness. Don’t skimp on it unless you want sad cookies!
– Eggs: One large egg for binding and a little magic! No egg substitutes needed unless disaster strikes and you’re out of them (don’t look at me—I stockpile eggs like they’re going out of style).
– Pure Vanilla Extract: Never, and I mean NEVER, fall for that artificial stuff. Treat yourself to the real deal. You’ll thank me later when your cookies taste like a dream.
– Marshmallow Fluff: My fellow marshmallow-hating friends, hear me out! This little jar of white fluffiness will turn your cookie game upside down. You can go all out with this or use a homemade marshmallow recipe… if you’re feeling ambitious.
– Chocolate Chips: More chocolate, obviously! Go for semi-sweet or dark chocolate chips; I’m not judging. Mix it up if you want a wild ride!
Let’s Talk Health (or Not)
Is This Even Healthy? Let’s Discuss
Let’s be real for a hot second: these cookies aren’t winning any health awards. If you are looking for kale chips, then this is not the place for you. Sure, there’s butter and sugar—and honey, I sleep just fine at night knowing I savored those ingredients.
I mean, have you ever seen a happy person munching on a celery stick? Didn’t think so. These cookies are a celebration of dietary rebellion; they’re here for a good time, not a long time. Five chocolate chips? I think not! We should be going for at least two or three handfuls when tossing them into our batter. Life is about balance, and that balance means: eat the cookies!
Your Grocery List
Here’s What You’ll Need
– 2 cups all-purpose flour
– ¾ cup cocoa powder
– 1 teaspoon baking powder
– ½ teaspoon salt
– ½ cup unsalted butter, melted
– ½ cup brown sugar
– ½ cup granulated sugar
– 1 large egg
– 2 teaspoons pure vanilla extract
– 1 cup marshmallow fluff
– 1 cup chocolate chips
This recipe will yield about 20 cookies, or, if you’re anything like me, about 10 that you take a fiery herculean effort not to eat all at once.
The Actual Cooking Part
Okay, Let’s Make This
Now that we’ve gotten all of our necessary contents together and I’ve successfully led you to believe that life is all about sugar and butter, let’s enter the wild world that is cookie-baking!
1. **Preheat your oven:** First off, set your oven to 350°F (175°C). This bad boy needs to be warm and welcoming. Nothing worse than cold cookie batter – or so I’m told!
2. **Wet ingredients meet dry ingredients:** In a large bowl, whisk together the flour, cocoa powder, baking powder, and salt. In a separate bowl, combine the melted butter, brown sugar, granulated sugar, egg, and vanilla extract. Give them a good mix until well-blended and looking all creamy and inviting.
3. **Marry the mixtures:** Slowly pour your wet ingredients into the dry mixture. Seriously, take your time here, we don’t need any flour explosions. Mix until just combined, and you can start to see the chocolate goodness come to life.
4. **Calling in the chocolate chips:** Now’s the time to fold in those beautiful chocolate chips. Don’t be shy; make it a chocolatey love affair by adding extra chocolate if your heart desires.
5. **Marshmallow love:** Here comes the fun part! Mix in the marshmallow fluff gently. You want swirls, not a homogenous mix—this is your chance to get artistic! Don’t panic if it looks messy — it’s supposed to.
6. **Dollop and swirl:** Using a cookie scoop, dollop the batter onto a baking sheet lined with parchment paper. These little hunks of joy should be about 2 inches apart because they will spread. Yes, this is where the magic happens.
7. **Bake:** Slide those lovelies into the oven for about 10-12 minutes. They should look slightly undercooked for that soft, chewy texture we crave and love. If you waited for them to dry out, you’d regret it.
8. **Cool down:** Once you’ve taken them out of the oven, let them cool on the baking sheet for a couple of minutes to let the cookies set. Then transfer them to a wire rack for the ultimate air circulation.
Side Notes & Sassy Hacks
Bonus Tips You Didn’t Ask For
– **Make it gluten-free:** Swap out the all-purpose flour for a 1:1 gluten-free flour alternative. Trust me; it works wonders!
– **Cookie craze:** If you want to take this up another notch, press a few extra chocolate chips on the top of each cookie when they’re still warm. A few extra chocolate chips never hurt anybody!
– **Chill time:** Got time on your hands? Chill the dough for at least 30 minutes before baking. This ensures your cookies hold their shape even better.
– **Fight the fluff:** If you don’t have marshmallow fluff, try using mini marshmallows instead! Just remember they won’t create the same swirl effect since they tend to just float in the cookie.
– **Presentation prowess:** Want to wow your friends? Drizzle some melted chocolate on top of the cooled cookies and sprinkle a pinch of flaky sea salt. They’ll think you spent hours crafting these gems!
Final Words of (Culinary) Wisdom
And there you have it, my cookie-loving comrades! Just deliciousness waiting to happen, all thanks to a few choice ingredients and a lot of love (and maybe some chaotic mess). If you try the Handmade Chocolate Marshmallow Swirl Cookies and love them as much as I do, tag me! Or just send me a virtual high-five through the screen; I’m down with that too. Here’s to many baking adventures that may or may not send us into a sugar coma. Enjoy!


