Let’s Get Real
Hey there, fellow food lovers! Let me just start by saying that if you’ve ever experienced one of those gloomy, rainy days where all you want to do is curl up with a blanket and a cup of tea while binge-watching your favorite show, then I feel you. Recently, we’ve been having some crazy weather here (I mean, we’re talking torrential downpours, folks), and I found myself in the kitchen, contemplating the weather through the rain-streaked window.
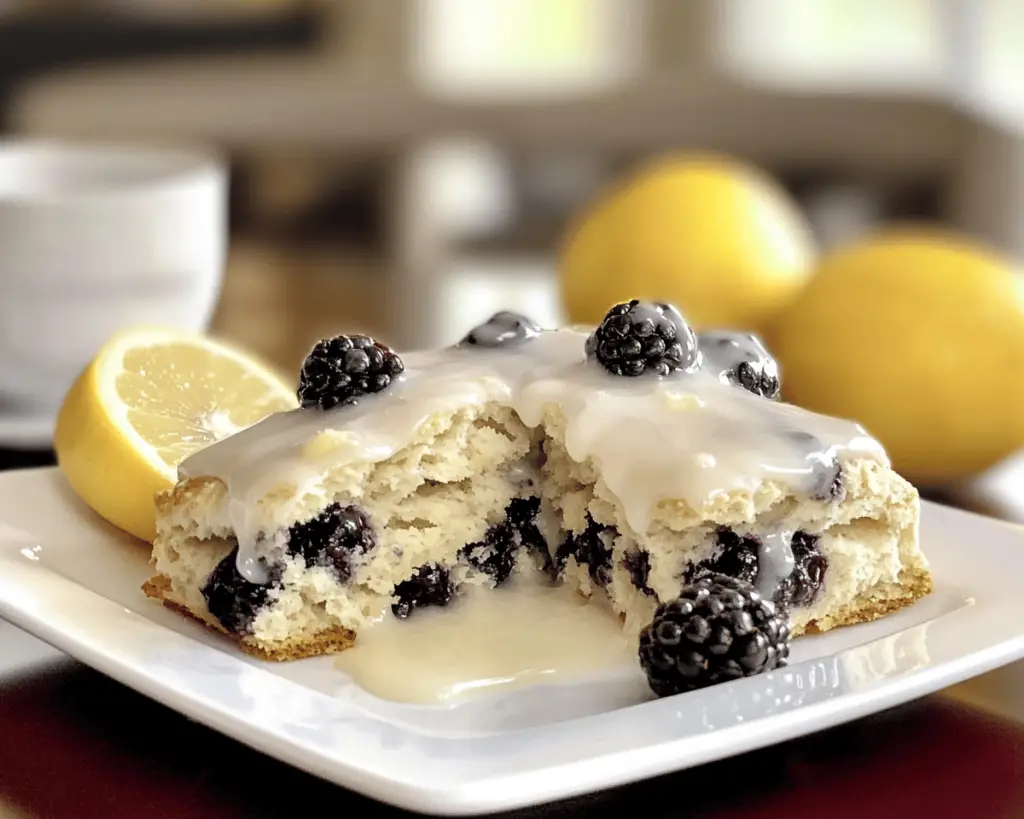
Now, scones were never really top of my mind growing up. Honestly? I thought they were these dry, crumby things that were the result of some ancient civilization’s experiment with baked goods. I mean, why not just call them “butt-rocks?” But here’s the twist: I recently had a revelation that changed my life! Earl Grey Blackberry Scones with Lemon Glaze became my absolute obsession. Seriously, I whipped them up once, and suddenly, I was a scone-snob. Who knew I could create something so light, fluffy, and utterly charming?
So here I am, in this moment, confessing my former scone-hating ways, while enthusiastically declaring my newfound role as an Earl Grey Scone evangelist. Join me as we dive into this delightful recipe that’ll turn even the most stubborn scone skeptic into a believer!
Ingredients, Unfiltered
Let’s break this down, because we all know that knowing the ingredients is as important as knowing who your best friends are (and whether or not they eat your leftovers). Here’s the scoop on what’s going into these dreamy scones.
What’s Really in Earl Grey Blackberry Scones with Lemon Glaze
– All-Purpose Flour: Ah, the classic. It’s the foundation of any good scone. I go for the standard stuff because I’m not trying to get all fancy-pants. No need for cake flour unless I’m just trying to show off!
– Baking Powder: This little levelling agent is the reason your scones actually puff up instead of transforming into flat discs of disappointment. Don’t skimp here; stale baking powder is basically a crime against scone-hood!
– Baking Soda: You may think it’s just the sidekick to the baking powder, but they together create some serious magic! It’s like Batman and Robin, but less superhero-y and more baked goods-y.
– Salt: A pinch of the good stuff is absolutely necessary. It brings out all the flavors. Plus, what kind of person would I be if I didn’t add a sprinkle of salt? A bit of flavor without the salt would be a tragedy.
– Butter: Ah, rich, glorious butter. I always go for unsalted because I’m the one who decides how salty my life gets. And I prefer my scones to be drowning in buttery goodness. If you’re feeling bold, sneak in some cold cream cheese for extra richness; I won’t tell a soul!
– Sugar: Just a little to sweeten the pot, preferably granulated sugar. I mean, this isn’t a cake, so no need to go overboard. But let’s not pretend that a touch of sugar doesn’t make the world a better place—especially when paired with those delectable blackberries!
– Blackberries: These are the star of the show! I always use fresh blackberries when I can find them; they’re bursting with sweet-tart flavor. But in a pinch, frozen’ll do. Just don’t defrost them unless you want purple scones—although some folks might consider that a fun twist.
– Earl Grey Tea: I’m a little obsessed with this tea. A few bags steeped and then poured into the batter is what gives these scones their enchanting flavor. Honestly, if someone could bottle up the smell of Earl Grey, I’d wear it as a perfume.
– Lemon Zest: I add this to enhance the flavors and create that “zing” we didn’t know we needed in life. Fresh zest is where it’s at. Dried just won’t cut it.
– Heavy Cream: This addition is the secret to making the scones tender and rich. Use that glorious cream like it’s your bestest friend at a party (and treat it right!).
– Lemon Juice: We’ll use it for our dreamy glaze because who doesn’t love a sweet-tart finish? It’s the proverbial cherry on top, or in this case, lemon zest.
Let’s Talk Health (or Not)
Is This Even Healthy? Let’s Discuss
Okay, let’s get down to brass tacks. No, these scones aren’t health food. They have all the deliciousness going for them: flour, butter, cream, sugar, and they’re packaged with our beloved berries. Sure, they may not be a green smoothie, and I’m not going to write a nutrition label that delves into “calorie counts.”
But let’s be real here: life is about balance. If you can prioritize fresh blackberries (which are, let’s admit, essentially nature’s candy), I’d argue you’re doing okay. Plus, the glowing benefits of Earl Grey tea have been unsettled in discussions for centuries—antioxidants, calmness, etc. I’d say that equals a wash. I’m ready to serve up some real talk right now: Scones are for joy and connection, not for debates about “keto” or “vegan.” So grab your butter and throw caution to the wind!
Your Grocery List
Here’s What You’ll Need
– 2 cups all-purpose flour
– 1 tablespoon baking powder
– 1 teaspoon baking soda
– ½ teaspoon salt
– ½ cup unsalted butter, cold and cubed
– ½ cup granulated sugar
– 1 cup fresh blackberries (or frozen if it’s an emergency)
– 1 teaspoon Earl Grey tea leaves, tightly packed (equivalent to about 2 tea bags)
– 1 tablespoon lemon zest (from a fresh lemon, please!)
– ¾ cup heavy cream
– For the glaze:
– 1 cup powdered sugar
– 2 tablespoons lemon juice (freshly squeezed, you know the drill!)
This recipe makes about 8 delicious scones, which is sometimes more than I want. But is there really such a thing as leftovers when it comes to freshly baked pastries? I think not!
The Actual Cooking Part
Okay, Let’s Make This
Are you ready to create some culinary magic? Let’s do this!
1. **Preheat the Oven**: First step—cue the mood music and crank that oven to 400°F (200°C). You want it nice and hot, just like my coffee when I forget it on the counter for an hour.
2. **Mix Your Dry Ingredients**: In a large bowl, combine the flour, baking powder, baking soda, and salt. Whisk them together like they’re auditioning for a dance ensemble. The goal here is to combine all the dry goodness so they can mingle and get friendly.
3. **Butter Up**: Now comes one of my favorite parts—adding the butter! Toss those cold, cubed butter pieces into the flour mixture. Using your fingers or a pastry cutter, work it until it resembles coarse crumbs. You want it to be a little bit lumpy like me after a weekend of indulgences—absolutely imperfect.
4. **Add Sugar and Tea**: Next, stir in the sugar and the loose Earl Grey tea leaves. If you use tea bags, just go ahead and empty out the fragrant goodness. Stir until everything is combined, and try not to eat your ingredients. That’s a no-no.
5. **Add in Blackberries and Zest**: Gently fold in those luscious blackberries and zesty lemon like you’re cradling baby birds. You’re going to want to preserve their shape—nobody wants smashed berry mush! Instead, we’re aiming for delightful bursts of blackberry at every bite.
6. **In Goes the Cream**: Now, add the heavy cream and mix until it forms a dough. This part can get a little sticky and messy, but don’t panic if it looks like a bunch of goo. Trust me; this is where the magic happens.
7. **Shape the Dough**: Lightly flour your countertop (and your hands) and turn out that glorious dough. Pat it down into an about 1-inch thick circle. Then, cut it into wedges (like you’re slicing a pizza) or use a biscuit cutter for that cute, classic shape. I usually just go rogue and use a knife.
8. **Bake It Up!**: Place your formed scones onto a lined baking sheet (give them space to expand, no one likes a crowded scone scene). Brush the tops with a bit more heavy cream for that golden-brown finish, and then pop ‘em in the oven. You’re looking for about 15-20 minutes. My secret? I hover like a hawk during this time. More than once, I set off the smoke alarm because I forgot the timer. Oops!
9. **Make the Glaze**: While the scones are baking, let’s whip up the glaze. In a small bowl, combine the powdered sugar and lemon juice. It should end up thick but pourable. If it’s too thin? Add more powdered sugar. Too thick? A splash of water will save the day!
10. **Cool and Glaze**: Once your scones are baked to perfection, take them out and let them cool for about five minutes. After they’ve had a little chill time, drizzle (or slather) the lovely lemon glaze over them like you have all the time in the world.
11. **Serve it Up!**: At this point, the smell in your kitchen should be heavenly. Serve them warm with a nice cup of tea or coffee and prepare to dazzle yourself and anyone lucky enough to be around you.
Side Notes & Sassy Hacks
Bonus Tips You Didn’t Ask For
– **Substitutions**: Don’t have blackberries? Try blueberries, raspberries, or heck, even chopped strawberries if that’s your jam (pun intended).
– **You Can Freeze ‘Em**: If you have scone dough left over, flash freeze the shapes before baking. Once frozen, you can throw them in a bag and store them for later. When you’re ready for that fresh-baked goodness, just bake them straight from frozen, adding a couple of extra minutes to the cooking time, and voilà—hot scones at your fingertips!
– **Fancy Flavor Twist**: Feeling adventurous? Throw in some chopped dark chocolate and call it a chocolate-berry scone. Or add some nuts for a crunchy contrast—yeah, I’m looking at you, toasted walnuts.
– **Plating Perfection**: Serve them on a lovely cake stand, or toss them into a cute basket lined with a cloth napkin. It’s all about aesthetics, dear friends. Your scones deserve to feel *special*.
– **Culinary Chaos**: I once made these on a day when I could have sworn the universe was conspiring against me. I forgot the baking powder (horrors!) and added in a whole cup of cream instead. Look, I can’t say it was my culinary finest hour, but we all have off days, right? Spoiler alert: the scones were a dense, buttery disaster!
Final Words of (Culinary) Wisdom
So there you have it, folks! I can’t tell you how much joy these Earl Grey Blackberry Scones with Lemon Glaze have brought into my life. They may have started as a humble kitchen experiment during a dreary day, but they’ve blossomed into my newfound obsession. If you give them a shot, I want to hear all about it! Tag me in your scone adventures or send me a virtual high-five—however you want to celebrate, I’m here for it!
Happy baking, my fellow kitchen warriors! May your scones always rise, your glazes always shine, and your flavor game never falter. Until next time!


