Let’s Get Real
Alright, folks, gather ‘round because we’re about to dive into the delicious drama of the Perfect Red Velvet Cake Pops! Now, let’s set the scene: it’s a dreary Tuesday afternoon, the kind of day where even your coffee looks like it might not solve any of your life’s problems. My mood? Let’s just say it’s as flat as yesterday’s soda. So, what’s a gal to do? You guessed it! Bake my woes away with some cake pops that are as vibrant as my personality (trust me, that’s a compliment).
Once upon a time, in a land of my childhood (which sounds way more delightful than it actually was), I hated red velvet cake. I mean, seriously, who decided that a cake colored like it has been lovingly touched by a paintbrush should taste like half-baked dreams? But here I am, eating my words like they embody a delicious frosting. Cake pops have come to my rescue, disguising that cake I so passionately rejected all those years ago, and now I can’t get enough. It’s almost like I’m a character in a romantic comedy, navigating through layers of icing and dough, finally discovering the love of my life beneath the deception.
So, ready or not, we’re turning those worries into sweet little round bites. And if you thought I’d make it easy, Think Again. Embrace the chaos, because baking isn’t just a science; sometimes it’s an art form shoved within a deeply misunderstood realm of flour and sprinkles. But just like that time I forgot to add the eggs and somehow ended up with a surprisingly decent pancake-like creation, I promise you that you can handle whatever culinary chaos comes your way.
Ingredients, Unfiltered
What’s Really in Perfect Red Velvet Cake Pops
Let’s break it down and give a shout-out to the heavy hitters of this cake pop extravaganza. I’ll give you the 411 on each ingredient, and trust me, my opinions are strong and unapologetic.
Red Velvet Cake Mix: Yes, Maria, I will admit, I am using a mix. Sometimes, the world requires ease, and my patience is thinner than icing when I’m not fully caffeinated. But if you want to make the cake from scratch, go for it! Just be prepared to throw on some battle gear because baking from scratch can sometimes feel like a wrestling match with oddly behaving baking soda.
Cream Cheese Frosting: Can we take a moment to appreciate how this frosting is basically a dairy miracle? It’s tangy and sweet, which is like the cake pop equivalent of a party in your mouth. I would literally spread it on everything if social norms allowed. It’s as versatile as your best friend at 2 AM when you want tacos suddenly, but they’re up for anything.
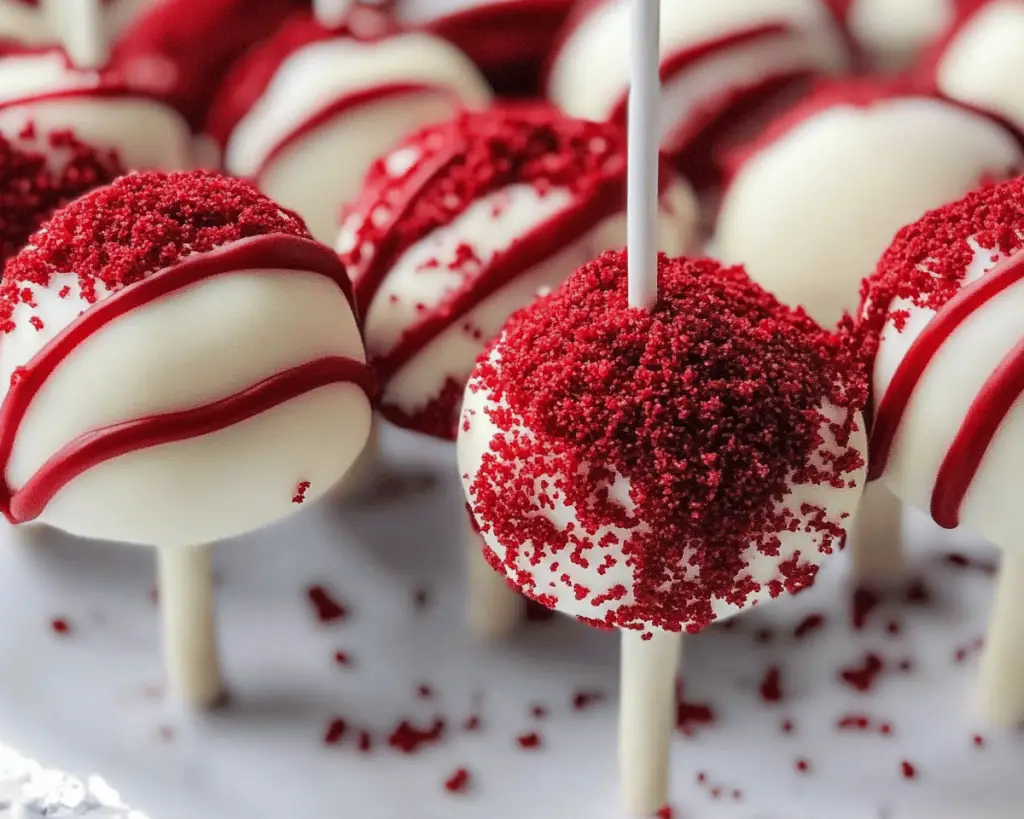
Candy Melts: I must admit I have a love-hate relationship with these colorful little discs. They melt beautifully but can turn clumpy faster than a toddler in a bathtub. I usually opt for the bright red ones to stay in theme. Yes, it screams “look at me!” but sometimes bold is what we need in a world full of beige. And by the way, I stocked up for this occasion, and there’s absolutely no shame in that.
Sprinkles: You don’t even need sprinkles for these pops, but honestly, who doesn’t love a little extra bling? They make everything look cuter! Just like a pair of heels can transform a basic outfit into “Wow, look at you!” And definitely, no judgment if you toss on some gold sparkles — I’m here for it!
Wooden or Plastic Sticks: Just to get real for a second, these are not only for aesthetics. They grant you cake-pop-lifting power, and you need that in your life. But seriously, if all else fails, just use a fork. A fork is always there for you.
Let’s Talk Health (or Not)
Is This Even Healthy? Let’s Discuss
You might be glancing at this beautiful pile of sugar-coated heaven and wondering, “Is this really healthy?” Well, gather ‘round, my friends, because I’m here to break a few hearts and perhaps offer a slice of reality.
The main ingredient here is cake mix, which means it’s going to be about as nutritious as a unicorn riding a rainbow. But I will tell you this: life is too short to deny yourself the joys of cake pops. Sure, there’s cream cheese frosting, and yes, I could go on and on about calories like I’m a walking nutrition label. But honey, you have to decide what’s essential. A balanced diet is a cookie in each hand, so let’s opt for moderation rather than abstinence. You’ll be happier (and so will those around you).
Just remember, in the grand scheme of life, if a couple of cake pops are your biggest problem right now, then I’d say you’re winning. So go ahead; indulge a little! Just swipe that frosting-mustache off your upper lip before your Zoom call, and you’ll be good to go.
Your Grocery List
Here’s What You’ll Need
– 1 box of Red Velvet Cake Mix (plus the ingredients specified on the box — usually oil, eggs, and water)
– 1 small container of Cream Cheese Frosting
– 1 cup of Candy Melts (red or whatever makes you happy)
– Sprinkles (optional, but like I said, they are the cherry on top of this rollercoster)
– Wooden or Plastic Sticks (or just a fork, we’re not judging)
– Optional: Food coloring if you want to jazz it up further or endure a brief existential crisis
Feel free to adjust based on how many cake pops you want. You could probably feed a small army or just yourself — both are valid options here.
The Actual Cooking Part
Okay, Let’s Make This
So, we’ve gathered our troops, and it’s time to dive into the enchanting world of cake pops. Brace yourself for some messy joy because this is where the magic happens!
1. **Preheat the Oven**: You know the drill — let’s set that oven to 350°F (175°C). It’s like getting your party outfit on before the guests arrive.
2. **Prepare the Cake Mix**: Now, follow the directions on the red velvet cake mix box. Mix together the cake mix, eggs, water, and oil just like the instructions say. Although, let’s be real, it’s usually just a “dump everything in, mix, and hope for the best” situation.
3. **Bake the Cake**: Once it’s all mixed, pour the batter into a greased cake pan and pop it into the oven. Set your timer as specified — just not for too long because I once got distracted and turned my cake into a piece of charcoal! Who knew it was possible to screw up cake? The universe can be cruel like that.
4. **Cool Down Your Cake**: When the timer dings, let your cake cool completely. This part is crucial because hot cake will simply fall apart; it’s as temperamental as your high school crush. Once cool, go ahead and demolish that cake into a fine crumbly state. The messier, the better; embrace the chaos!
5. **Mingle with Frosting**: Honestly, the frosting is the hero we didn’t know we needed. Add about one-third of the cream cheese frosting into the crumbled cake, and mix it like you mean it. Get your hands in there! It’s a little like playdough but tastier, and please refrain from eating all of it (trust me, it’s a slippery slope).
6. **Form Into Balls**: Now, you’ll want to roll the mixture into balls about the size of a golf ball — or a significant snack-sized portion if you’re feeling rebellious. Feel free to channel your inner sculptor, but instead of clay, you’re using cake crumbs. Once rolled, place them on a parchment-lined baking sheet (let’s keep it somewhat tidy because Pinterest is watching).
7. **Chill Time**: Pop those cake balls in the fridge for about 30 minutes, or if you’re impatient like me, 10 minutes in the freezer works too. This lets everything firm up and keeps the cake pops from being a total mess when you start dipping. And believe me, you do not want a melty mess.
8. **Melt the Candy Melts**: In your most adorable microwave-safe bowl, melt the candy melts according to the package instructions. But do it slowly, like your chances of keeping the kitchen clean after this. You might want to dab a little of the melted candy to the sticks before inserting them into the chilled cake balls. This acts as a glue, securing that beautiful pop together.
9. **Dip Time!**: Now, dip those cake pops into the melted candy, swirling them around until fully coated. This is where the fun part begins, I promise! Let the excess drip off, and if you miss a spot, it’s okay. We’re not looking for perfection, just deliciousness. You can then stick them into a styrofoam block or even a piece of cardboard if you must — just improvise!
10. **Sprinkle Away**: Before the candy shell hardens, toss on those sprinkles like you mean it! This is your chance to get wild.
11. **Chill Again**: Put your decorated cake pops back in the fridge to let the candy coating harden. It’s like setting your masterpiece for its big reveal, and trust me, this suspense is worth it.
12. **Enjoy the Sweetness**: Pull them out, gather your friends who aren’t judging your new hobby of cake pop making, and indulge! Watch their delight as they pop one in their mouth and simultaneously wonder how something so cute can taste so divine.
Side Notes & Sassy Hacks
Bonus Tips You Didn’t Ask For
– If you do happen to have leftover cake or frosting (which, let’s face it, is improbable given how delicious these are), you could consider making cake truffles or using them as a reward for surviving the week.
– Want to get ultra fancy? Drizzle some contrasting chocolate (think white chocolate on red pops) over the top. It’s the culinary equivalent of getting all dolled up for a night out.
– If you’re short on time, it’s perfectly acceptable to mix and match flavors. Chocolate cake with cream cheese frosting? I could swoon all day.
– If you don’t feel like cleaning up all the sprinkles that will inevitably end up on your floor, make sure you do this in a space where no one will judge you. Or just announce that you’re starting a new trend: “Cake pop confetti.”
– And if your cake pop looks a little wonky, embrace it! Think of it as an abstract piece, inspired by your kitchen chaos.
Final Words of (Culinary) Wisdom
So there you have it — your guide to the Perfect Red Velvet Cake Pops that will not only bring a smile to your face, but also a bit of color into your otherwise drab life (especially if you’re having a day that could use a little pick-me-up). If you try them out (which I highly suggest), please tag me, shoot me a DM, or even send me a mental high-five! I thrive on community, and watching you succeed in making these sweet, round bites of happiness is essentially the icing on my cake (pun totally intended).
And remember: Life isn’t about avoiding the mess; it’s figuring out how to cook in the chaos and come out with something delicious. Happy baking, my lovelies!


