Let me take you back to a warm summer afternoon when the air was charged with laughter and the smell of something fragrant wafted through the house. I was about ten years old, full of energy and this quirky obsession with all things crispy. My mom, bless her heart, was about to introduce me to the most magical trio of ingredients that would forever change the way I viewed chicken—we were making 3 Ingredients Easy Chicken Tenders.
Now, I know what you might be thinking: “Chicken tenders? Really?” But hold on a second! These aren’t your run-of-the-mill tenders, and there’s not an ounce of pretentiousness here. It was just that summer that the golden sunlight seemed to wrap around moments like a warm embrace, and our kitchen was so alive, full of messy counters, music blasting in the background, and the sounds of sizzling while my mom orchestrated a kitchen symphony. It was delightful chaos, and honestly, I never wanted it to end.
The simplicity of this recipe, with its just three ingredients, is what has stuck with me through the years. You see, life didn’t always allow for complicated dishes, but when I could whip these up, even my pickiest friends were impressed. That’s the beauty of it; it’s a little treasure chest of comfort, easy enough for any novice cook, yet satisfying and delicious enough to bring out the glee in your taste buds. I’ve made these countless times, for family dinners, parties, and, trust me, they’ve never failed to impress.
So, here’s why I adore this recipe—it’s the nostalgia, the memories of bonding over food, and the way these tenders automatically bring a smile to your face. It’s not just food; it’s a little piece of my childhood wrapped in a crispy exterior.
Let me take you on this crispy journey!
What Goes Into 3 Ingredients Easy Chicken Tenders?
Let’s break down the magic behind these tenders, shall we? With just three superstar ingredients, you’ll be amazed at how something so simple can yield such delightful results.
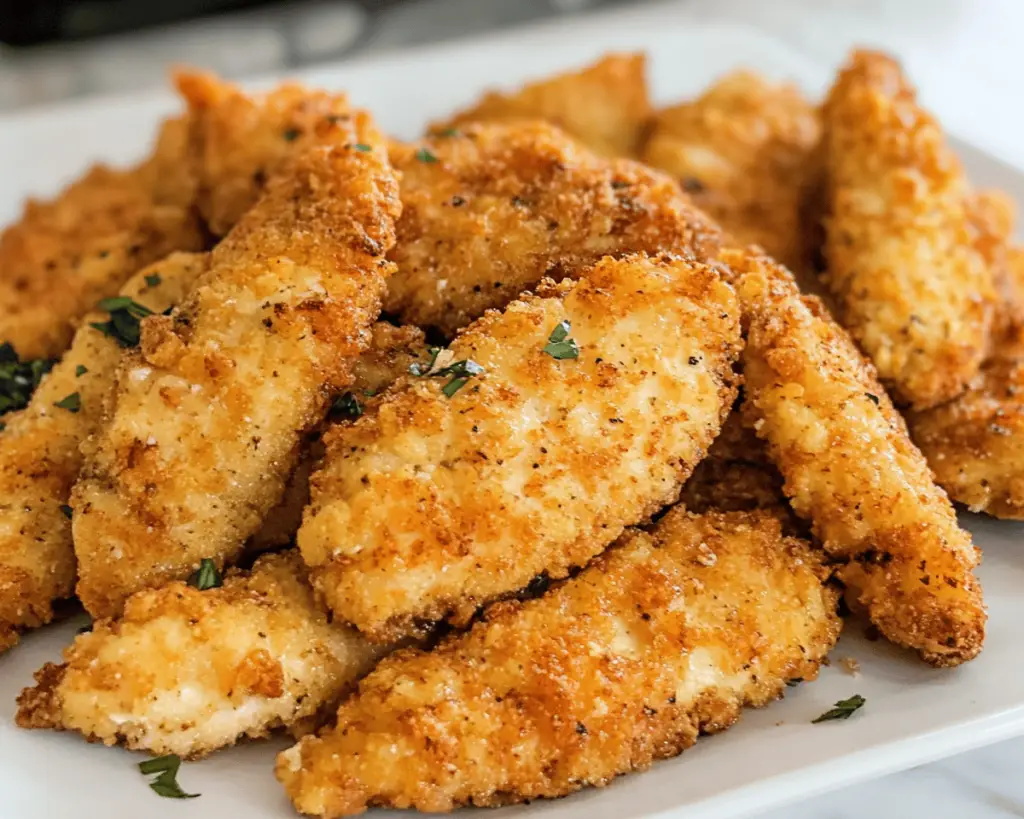
Chicken Breast: Now, this is the core of our dish. I usually prefer boneless and skinless chicken breasts for this recipe. Make sure you cut them into even strips, about 1 inch wide—think of it like cutting ribbons. It’s amazing how the way you cut your chicken can affect the cooking time and final texture. I sometimes get a little wild and marinate the chicken in some seasoning beforehand, you know, just to add a bit of flair. But if you’re in a hurry, plain works just as great!
Flour: This is the unsung hero—it’s like the stage where the chicken performs its crispy act! I’ve used all sorts of flours over the years: all-purpose works best in my eyes since it’s got that perfect ability to create a crunchy exterior. I remember the first time I made these; it was a little daunting to think about breading. But here’s the thing: once you get the hang of it, you’ll feel like a pro. And a little tip: don’t be shy with the flour—coating the chicken thoroughly ensures a crispiness that you’ll be proud of!
Oil: Literally, the glue that binds this tender masterpiece together. I always opt for vegetable oil; it has a higher smoke point, which means crispy chicken without the burnt taste. Sometimes I’ll throw in a little olive oil if I’m feeling fancy. I remember my Aunt Lila shaking her head at the thought of frying in anything but peanut oil—she was passionate about her oil choices, let me tell you. But whatever you choose, trust your gut—it’s hard to go wrong with frying!
Is 3 Ingredients Easy Chicken Tenders Actually Good for You?
Alright, let’s keep it real here. While these tenders can definitely make your heart sing, they aren’t exactly the healthiest dish on the block. I mean, they’re fried and probably not a great choice if you’re counting calories. But here’s the thing—life is about balance! Sometimes, you just need a plate of crispy love, don’t you?
Let’s unpack it a bit more: the chicken is a lean protein, which is a solid pick health-wise, and as for the flour—well, yes, it adds carbs, but you could always switch to whole wheat flour if you want a little healthier spin. And guess what? Frying can be done with less oil than you’d think if you’re careful. So enjoy these tenders guilt-free on occasion, and maybe pair them with a side salad or some roasted veggies just to do your health-conscious self a solid.
Here’s What You’ll Need
– 1 pound of boneless skinless chicken breasts
– 1 cup of all-purpose flour
– Oil for frying (enough to fill your pan to about half an inch deep)
– Optional: salt, pepper, and any spices to taste (Garlic powder, paprika, or even a pinch of cayenne for a kick!)
How to Make 3 Ingredients Easy Chicken Tenders Step-by-Step
Now that you’re all set with the ingredients, let’s dive into the nitty-gritty. I promise you’ll find it fun!
1. **Prep Your Chicken:** Start by cutting your chicken breasts into strips. When I cut them, sometimes I think about how I want each piece to be golden and delectable, and I cut each strip with love. Something special about cooking with your heart, don’t you think?
2. **Season the Flour (optional):** If you want a little extra flavor, pour the flour into a bowl and give it a sprinkle of salt, pepper, and whichever spices speak to you. This is where you can get creative!
3. **Coat the Chicken:** Grab each chicken piece and coat it well in the flour. This part can get a little messy—flour will fly, and soon you might feel like you’re part of a baking show gone rogue. Make sure it’s coated enough to stick; it’s got to wear that flour coat, after all!
4. **Heat the Oil:** In a large skillet, pour enough oil to cover the bottom by about half an inch. Now, honestly, I sometimes get impatient and throw it on high heat. But here’s where I learned my lesson—the oil should be medium to medium-high heat. I use a few drops of water to check if it’s hot enough. If it sizzles, it’s ready!
5. **Fry the Chicken:** Place the coated chicken strips into the hot oil carefully so as not to overcrowd the pan. You might need to do this in batches depending on your skillet size. I get anxious seeing them all pile up together, but you really want space for them to fry evenly. Fry for about 4-5 minutes on each side until they’re golden brown. (Pro tip: If you start hearing too much popping and fizzing, you might want to lower the heat a bit. We want crispy, not calamity!)
6. **Drain and Serve:** Once golden and delicious, transfer your tenders to a plate lined with paper towels to soak up that extra oil. This part makes me a little giddy—the moment I get to taste-test one fresh off the pan.
And there you go! Serve them with your favorite condiment, whether it be ketchup, ranch dressing, or, my personal favorite, a zingy honey mustard. You could even throw them onto a salad for a quick and satisfying meal!
Little Extras I’ve Learned Along the Way
Now that you’re on the road to making these delicious tenders, let me share a couple of my favorite tips and variations.
– **Try Different Breading:** If you’re feeling adventurous, try swapping out the plain flour for some seasoned breadcrumbs or panko for that extra crunch. Honestly, every time I do it, I feel like a culinary genius. It gives a lovely texture and crunch that I can’t resist.
– **Herb Infusion:** I sometimes toss in fresh herbs like thyme or rosemary in the oil while it’s heating up—reducing it to infuse that herby aroma into the chicken. It’s not necessary but oh-so-worth it for that fragrant twist!
– **Baked Tenders:** In the spirit of healthiness, you could bake these tenders instead! Preheat your oven to 400°F, place the breaded strips on a lined baking sheet, spray them with a bit of oil, and bake for about 20-25 minutes. They won’t be as crisp as frying, but hey, it’s a solid alternative when you want something a little lighter.
– **Cousin Chuck’s Must-Try Variation:** My cousin Chuck loves to make them spicy by adding a teaspoon of chili powder to his flour mixture. These babies come out with a little kick, and man, it’s hard to stop at just a few!
– **Make some Sliders:** Feeling cheeky? Slice the cooked tenders and pop them into mini rolls with some slaw and spicy mayo. Instant fun finger food for a get-together!
The beauty of this recipe is that it’s like a canvas; you can bend and stretch it however you like.
This one means a lot to me. It holds warm memories and a touch of nostalgia that I’m so grateful for. I would love for you to try making them too. Dive into these crispy delights and share your twists—hopefully they’ll become as charmingly messy and wonderful for you as they are for me! Let me know how it goes, because I can’t wait to hear your stories!


