Let’s Get Real
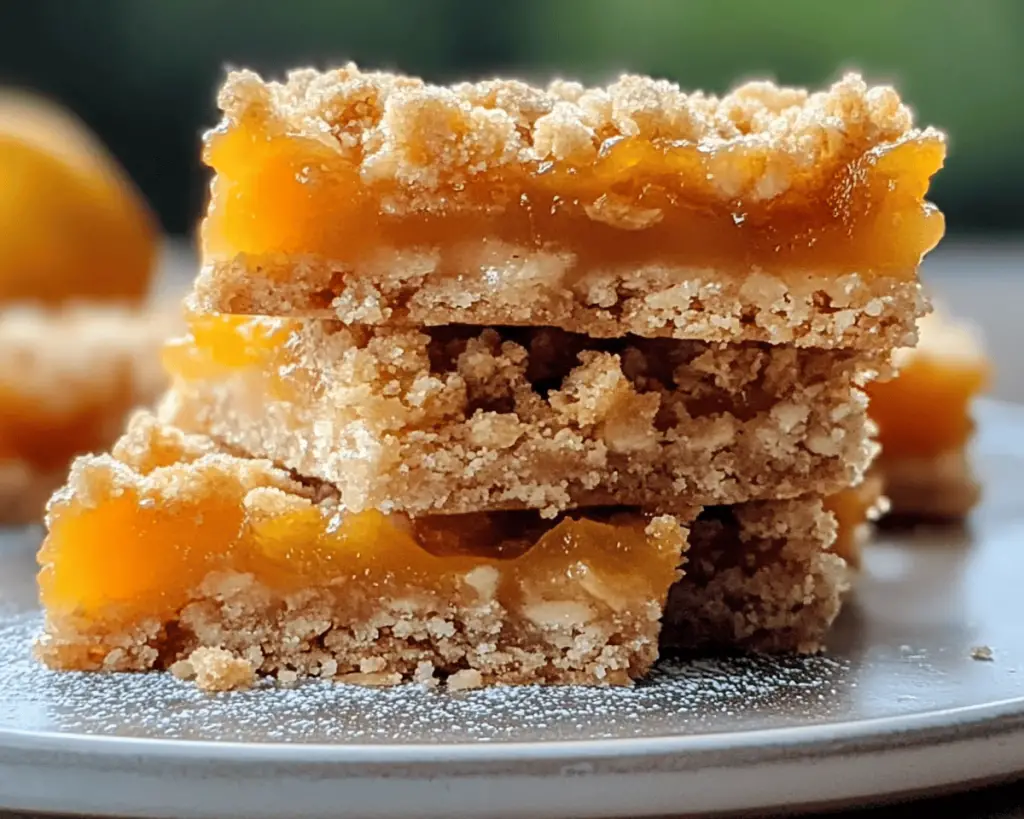
Okay, let’s get straight to the point: the weather is equally confusing and infuriating right now. One moment, I’m sweating like I’ve just completed a marathon, and the next, I’m scrunching my toes in chilly socks. This can only mean one thing: it’s the perfect time for a comforting dessert that has all the best summer vibes while also being cozy enough for sweater weather. Enter the one and only Easy Apricot Crisp Bars—my current obsession. I mean, who can resist that delightful contrast of tart apricots nestled in a buttery, crumbly crust that practically whispers sweet nothings to your taste buds?
Confession time: I kinda hated apricots as a kid. If it wasn’t chocolate or cookies, I was out. But after a decade of maybe-hate or maybe-just-not-trying, I had a perfectly ripe apricot and realized I’d been missing out. The way the fruit oozes yummy tartness and sweetness? Magic. This recipe has transformed into my go-to, not only because it showcases this oft-overlooked fruit but also because it’s so easy that even I—with my chaotic cooking history—can whip these up without burning my kitchen down.
Trust me when I say that once you make these Easy Apricot Crisp Bars, you won’t look at apricots—or baking— the same way again. Let’s dive in and get cooking, shall we?
Ingredients, Unfiltered
What’s Really in Easy Apricot Crisp Bars
Now here’s the tea on the ingredients. You might think, “Oh, it’s just a few simple things,” but I promise, each one packs a punch. Time to break it down like a bad dance move at a wedding:
Apricots: You knew this one was coming. Fresh, ripe apricots are the star here, but if you can’t find fresh ones that don’t cost your left kidney, don’t shy away from a can. Just drain them well, and we’ll make it work. Because the world doesn’t end when you don’t have perfect fruit for your perfect dessert.
Oats: The backbone of this recipe! We’re going for old-fashioned oats here, not those quick-cooking nonsense ones. You need that hearty, chewy texture to balance all the sweet and sticky goodness. Plus, who doesn’t love pretending that a dessert is a little bit health-friendly?
Brown Sugar: This is where the magic starts. Brown sugar brings that deep, caramel flavor, and combined with everything else, it creates a cozy warmth. Trust me; you want to use this instead of boring white sugar. It gives the bars that “I’m a fancy baker” vibe while you secretly know it’s just simple.
Flour: Regular all-purpose flour does the trick. Nothing crazy here. It binds everything beautifully and gives the bars their crumby base and topping. Easy peasy!
Butter: Ah yes, the golden elixir of all things delicious. I’m talking about unsalted butter, because we want to control the salt levels like it’s our day job. Melt it down; let it get all dreamy and silky, and you’ll be amazed at how everything just comes together.
Vanilla Extract: Do I really need to explain this one? A splash of vanilla makes everything better. It’s like a hug in liquid form. Use real vanilla extract if you can—it’s worth the splurge.
Cinnamon: If cinnamon isn’t in your life, then we need to rectify that. Just a hint goes a long way, rounding out all the flavors and giving it that homey touch. You’ll feel like you’re in a quaint little bakery reminiscing about your childhood.
Salt: Yep, just a pinch. Salt is like the DJ of the dessert world—bringing all the flavors to life and making sure everything dances harmoniously.
Let’s Talk Health (or Not)
Is This Even Healthy? Let’s Discuss
Alright, let’s be real. We’re talking bars that are sugary, buttery, and absolutely lush. So yes, there’s an abundance of butter and sugar, and while it might not win any health awards, we’re also not living in a health-nut dystopia here. Moderation, people! These bars are for when you want a little comfort and indulgence.
Sure, you could swap half the butter for coconut oil and use a sugar alternative, but honestly? Why would you? This is dessert we’re talking about! There’s no way I’m ruining these crispy, sweet, buttery delights by trying to make them healthier. Let’s just enjoy this ride together. And who knows? Maybe you’ll even share a piece with a friend to balance the scales a bit.
Your Grocery List
Here’s What You’ll Need
– 1 pound of fresh apricots (or one can if you’re feeling lazy)
– 1 cup old-fashioned oats
– ¾ cup packed brown sugar
– 1 cup all-purpose flour
– ½ cup unsalted butter (melted)
– 1 teaspoon vanilla extract
– 1 teaspoon ground cinnamon
– A pinch of salt
This recipe makes about 12 generous bars, which means plenty to share (or hoard for yourself). Do what you want; I’m not judging.
The Actual Cooking Part
Okay, Let’s Make This
Step 1: Preheat your oven to 350°F (175°C). Get those vibes going before you even begin. There’s something magical about the smell of preheating oven air—like a cozy embrace straight from your kitchen.
Step 2: Grab your apricots and start slicing them. I like to cut them into small chunks—think bite-sized goodness. If you’re using canned apricots, just drain and chop them up. This is where I got a little overzealous once, and let’s just say, I ended up with a fruit-fueled explosion. Trust me: control your excitement when slicing!
Step 3: In a large mixing bowl, combine the oats, brown sugar, flour, melted butter, vanilla, cinnamon, and salt. You’ll want to use a sturdy spatula or even your hands, because this is where you get to bring it all together. Make sure it’s crumbly but still sticks together when pressed. Imagine you’re making a patty for a burger, but a dessert version.
Step 4: Take about half the oat mixture and press it into the bottom of a greased 9×9-inch baking pan. It should create a nice base for your apricot filling. Don’t worry if it looks a bit rough; it’s not a beauty contest.
Step 5: Spread the apricot pieces over your crust. I find tossing them a little in cinnamon gives them an edge—like, “Hey, I’m fancy.”
Step 6: Now sprinkle the remaining oat mixture over the top of the apricots. We want it to be generous, but don’t stress if it’s not perfect. I promise it’ll all work out in the oven.
Step 7: Slide that beautiful pan into the oven and bake for about 30-35 minutes, or until the top looks golden and crisp. Don’t panic if this looks messy — it’s supposed to! Sometimes the best things in life come from chaos.
Step 8: Once done, let it cool for a bit. I know, I know—it’s the hardest part of the process, but resist the urge to dive in face-first. Letting it cool helps everything set beautifully.
Step 9: Cut into bars and serve, preferably with a dollop of whipped cream or a scoop of vanilla ice cream if you really want to live life on the edge. Your taste buds will thank you.
Side Notes & Sassy Hacks
Bonus Tips You Didn’t Ask For
– You can swap apricots for peaches, cherries, or even mixed berries! Get a little wild and adventurous; mix fruit flavors like a DJ spins records.
– If you want to up your game and make this extra fancy, consider adding slivered almonds or chopped walnuts to the oat mixture. It’s like giving your crispy bars a posh makeover without the fuss.
– Storage life hacks: These bars can be stored in an airtight container for about a week. But let’s be real—good luck keeping them around for that long. They’re that good!
– Want to freeze them? Sure! Wrap them up in plastic wrap and stick them in a freezer-safe container. When you’re ready for your next sweet fix, thaw ’em and enjoy. It’s like unearthing treasure.
Final Words of (Culinary) Wisdom
So there you have it—Easy Apricot Crisp Bars that will have you chomping down faster than you can say “Yum.” They’re effortless, delicious, and can put a cherry (or apricot!) on a dreary day. Remember, food is happiness in a dish and can cheer you up even when the weather is playing tricks on you.
If you try making these bars, please tag me in your creations. I’d love to see your kitchen chaos, whatever state it may be. Or you can just send me a mental high-five, and we’ll pretend we’re sharing dessert from across the world. Happy baking!


