Let’s Get Real
Alright, let’s just address the elephant in the room. It’s seriously hot. Like, melt-into-a-puddle-on-the-kitchen floor hot. I know summer is supposed to be about sunshine, barbecues, and iced teas, but all I feel is that unyielding, stuffy heat that is basically begging me to stay inside with my air conditioner blasting. So, what do I do when the weather turns me into a sweaty mess? I get creative with dessert. Because, why not? This is the perfect excuse to whip up some Strawberry Cheesecake Danishes.
Now, before you roll your eyes and mutter about how impossible homemade pastries are, let me clarify something for you: they are *not* impossible. Yes, there are about a million steps, and half of those involve flour hitting the countertop like a cartoon explosion. But trust me, when these deliciously warm and flaky danishes come out of the oven, your taste buds will slap you with a well-deserved culinary high-five. Not to mention, they give you the giant dessert hug you’ve been seeking all summer long.
I can still remember the first time I tried a danish. I was a kid, and we had an impromptu family trip to a local bakery. I was drooling over the display case, eyes wide like a kid in a candy store. One whiff of the sweet cream cheese filling mixed with buttery pastry was enough to seal the deal. Growing up, I often indulged in these delightful treats, but the thought of making them? Oh boy, I always held to the idea it was strictly for professional pastry chefs or a baking contest on TV. Then I decided to toss that notion out the window and jumped into the delicious chaos that is making Strawberry Cheesecake Danishes.
Ready to dive into the flaky goodness with me? Buckle up, my friends. The adventure to pastry land is about to begin.
Ingredients, Unfiltered
Let’s break down the ingredients you need for these delectable strawberry cheesecake danishes, shall we? Don’t worry, I promise to keep my rants somewhat organized. So grab a snack, settle in, and let’s get to it.
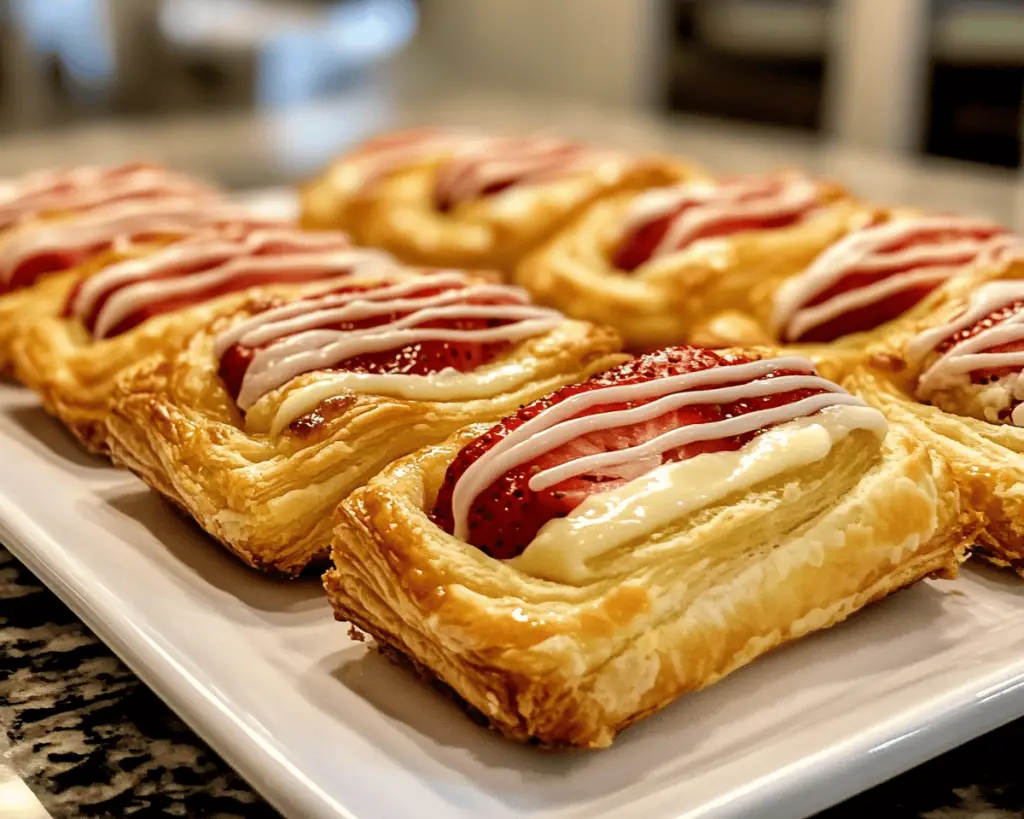
What’s Really in Strawberry Cheesecake Danishes
Frozen or Fresh Puff Pastry: I could obviously wax poetic about the joys of homemade pastry, but honestly, who has that kind of time? Just grab a box of store-bought puff pastry, and we’ll masquerade as a pastry chef. I like the Pepperidge Farm brand because their sheets are the perfect thickness. It’s also safe and significantly less dramatic than having a meltdown in the kitchen over flour percentages that are *clearly* designed for culinary masters.
Strawberries: Fresh is best! If you can snag some juicy, ripe strawberries, do it! They will burst with flavor and make your danishes feel like a summer vacation for your taste buds. I sometimes manage to eat half of them before they even hit the filling. They’re just that good. But if you’re in a crunch, frozen strawberries will do in a pinch. Just make sure to drain them well so they don’t turn your danishes into a soggy mess.
Sugar: Not going to lie, sugar is my best friend. Here’s the deal: I use a bit of granulated sugar for both the filling and the strawberries. It’s essential for balancing out that tartness; otherwise, you’ll be tasting the sweet summer sadness, which no one wants.
Cream Cheese: This is where the real magic accurs. Cream cheese is fulfilling, luscious, and decadent without being over the top. You simply can’t make a cheesecake filling without this creamy delight. I prefer the original stuff because low-fat cream cheese simply doesn’t give you that rich texture we’re going for.
Vanilla Extract: Let’s just say this stuff is a must-have in any baking endeavor. It perfectly enhances flavors and makes everything taste like a warm hug. I always go for pure vanilla extract—save the imitation stuff for desperate measures at the *only* corner store open at 1 AM.
Egg:** An egg is your binding agent, turning this filling into a creamy dream. I usually crack one large egg in because I’m not even touching up on the debate of the egg sizes (seriously, I can’t keep count). Plus, it gives your danishes that lovely golden color when they bake.
Powdered Sugar: This is for the glaze. Because what’s dessert without a sprinkle of sweetness and a touch of decadence? Just say yes to the glaze with a bit of powdered sugar on top. It elevates the entire experience, and we all want a little drama when we bite into our pastries—right?
Let’s Talk Health (or Not)
Is This Even Healthy? Let’s Discuss
So, here’s the burning question (and I mean burning because this recipe involves an oven, and I just realized I have it preheating to 400°F). Is this even healthy? The short answer? Well, no, not really.
I mean, we’ve got cream cheese slathered all over the place, buttery puff pastry, and sugar galore. But listen, if you’re going to live life calculating calories in everything you eat, you’re going to miss out on a whole lot of joy. This isn’t a “health food” blog; it’s a “satisfy-your-sweet-tooth” blog.
Sure, there’s butter, sugar, and cream cheese, and yes, I sleep just fine at night—preferably after two of these danishes. But food is about balance, my friends. It’s about those moments when you take a deep breath, close your eyes, and indulge in something that swaps out your emotional baggage for pure delicious happiness.
Your Grocery List
Here’s What You’ll Need
– 1 package of frozen puff pastry (2 sheets)
– 1 cup fresh strawberries, roughly chopped (or 1 cup frozen strawberries, thawed and drained)
– 1/4 cup granulated sugar (split for strawberries and cream cheese filling)
– 8 oz cream cheese, softened
– 1 tsp vanilla extract
– 1 large egg (plus one for egg wash)
– 1/2 cup powdered sugar (for the glaze)
These amounts should comfortably feed around 6-8 people, but let’s be honest, you might want to double that if you’re anything like me and love to hoard sweets.
The Actual Cooking Part
Okay, Let’s Make This
Alright, folks, it’s showtime!
1. **Prep Your Pastry**: Take your frozen puff pastry out of the freezer and place it in the fridge for about 30 minutes before you start working. Trust me; this is essential for rolling it out successfully without it becoming a sticky mess. This is also the perfect time to chop up your strawberries and soak up all that glorious summer flavor.
2. **Prepare the Strawberry Filling**: In a medium bowl, mix those lovely strawberry pieces with 1 tablespoon of sugar. Set it aside so they can get all juicy and flavorful while you hang out with the cream cheese filling.
3. **Make the Cream Cheese Filling**: In a separate bowl, blend the softened cream cheese, 3 tablespoons of sugar, vanilla extract, and the egg till it’s light and creamy. Look, if you’re feeling fancy, you can use a hand mixer, but I often use a fork and muscle through it like a champ.
4. **Roll Out the Pastry**: Once your puff pastry is nice and pliable, sprinkle some flour on your counter and roll out each sheet to about 1/8 inch thick. If you think it’s looking a bit messy, don’t panic! It’s supposed to look somewhat haphazard anyway. Cut each sheet into squares of about 4-6 inches.
5. **Fill ‘Em Up**: Now, time to assemble! Take one square and press down the middle a bit to create a little well for your filling. Spoon in about a tablespoon of the cream cheese mixture and top it with a tablespoon of the strawberry filling.
6. **Crimp and Seal**: Now take the edges of your square and fold them towards the center, creating folds that overlap slightly—a bit like a floral arrangement but with more strawberries and less responsibility. Make sure they’re sealed tightly! Beat your extra egg and brush it over the exposed dough for that golden color we all love.
7. **Bake the Danishes**: Line a baking sheet with parchment paper and lay those beauties out. Bake them in your preheated oven for about 15-20 minutes until they’re golden brown. The smell coming from your oven will make you reconsider your life choices—good choices, mind you.
8. **Prepare the Glaze**: While the danishes cool down, mix the powdered sugar with 1-2 tablespoons of milk until smooth. Drizzle this sweet goodness over your cooled pastries.
9. **Indulge**: Continue to stare at the danishes as if you’d never seen such beauty before. Finally, dig in! Grab a cup of coffee (or your drink of choice—I won’t judge), plop yourself down, and enjoy every flaky, creamy, and fruity bite.
Side Notes & Sassy Hacks
Bonus Tips You Didn’t Ask For
– **Make Ahead Magic**: You can totally prepare these danishes a day in advance. Store the filled pastries in the fridge before baking—just make sure to cover them to prevent drying out. Bake the next day and enjoy the freshness without the fuss!
– **Berry Options**: If strawberries aren’t your groove or if you see a great deal on blueberries, raspberries, or peaches, go for it! Mix and match based on your fruit crush of the moment. I swear peach danishes are like a margarita on a hot day—pure bliss.
– **Freezing for Later**: If you’re feeling generous (or overwhelmed with danish production), freeze the assembled danishes, unbaked. When you’ve got that sudden urge for something sweet, just pop them in the oven from the freezer and bake; they will be life-saving!
– **Fancy Plating**: Serve your danishes on a pretty plate, drizzle a little more glaze for that Instagram magic, and add a fresh strawberry or mint leaf on top for garnish—because presentation matters! You want people to be convinced you’ve got your life together.
– **Real-Life Confessions**: Last week, I forgot to add sugar to the cream cheese filling and only realized it *after* I’d already filled my danishes. Safe to say, they had a certain… uniqueness to them. Let’s just say this was a shame-induced baking experience, but you can learn from my mistakes. Just remember: You can never have too much sugar!
Final Words of (Culinary) Wisdom
There you have it, my baking comrades! You’ve successfully navigated the highs and lows of making Strawberry Cheesecake Danishes, and I promise you’re about to feel like a kitchen magician! Everyone will be bowing before your impressive pastry prowess and asking for your secrets—which will just be you giving them a wink and an innocent smile.
So, if you try these beautiful creations, I absolutely want to see. Tag me on social media or just send me all the mental high-fives in the world. I’m seriously curious to see how they turn out—or even if you’ve gone rogue with a different filling. Either way, happy baking! Now excuse me while I indulge in one of these danishes, because frankly, I’ve earned it. Cheers!


