Let’s Get Real
Alright, let me set the scene here: it’s fall, the leaves are starting to turn this beautiful, vibrant array of reds and oranges, but for some reason, I’m still sweating like a sinner in church. It’s like Mother Nature can’t make up her mind. But in my kitchen, there’s another type of transformation happening: I’m diving headfirst into Halloween-mode by whipping up some Jack Skellington Oreo Pops. Seriously, folks, these little delights are so cute and delicious that your heart may just start doing the Monster Mash!
I have a confession, though—growing up, I never liked Oreos. Shocking, I know! But after a cascade of poor choices in high school, including a regrettable phase involving way too many *Insert Pretend Supermarket Brand Here* cookies, I learned my lesson. Oreos became my longstanding love affair. And now, these Jack Skellington Pops have absolutely entered my life as a match made in heaven. So, grab your candy melts, buckle up, and let’s moonwalk into this recipe!
Ingredients, Unfiltered
What’s Really in Jack Skellington Oreo Pops
Let’s break this down, shall we? No half-measures in the world of Oreo pops.
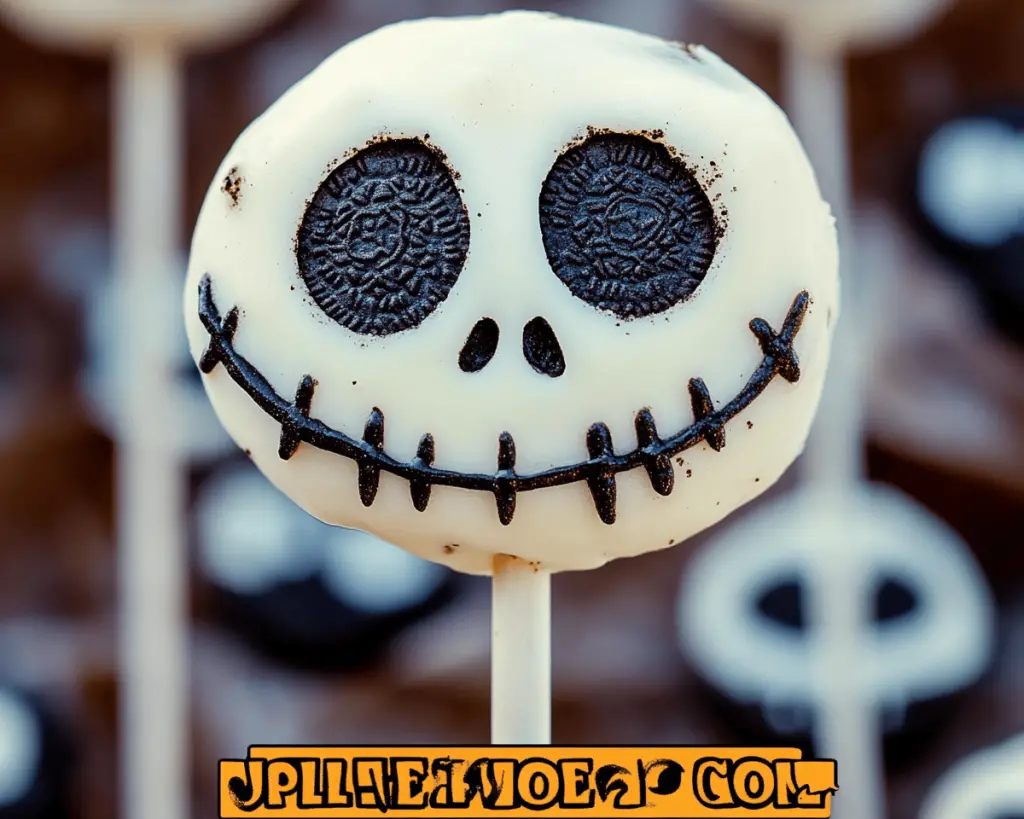
Oreo Cookies: The star of the show! There’s something about that chocolate-sandwich magic that just hits different, right? I mean, come on—how could you not love them? Regular Oreos? 5 stars. Double Stuff? Higher than a kite in a windstorm! Make sure you smash ‘em good for that perfect crust on our pops.
Candy Melts: I recommend using white chocolate candy melts to get that eerie ghostly visage of Jack Skellington. They melt down perfectly, give you that smooth coating you crave, and bonus: they make you feel like a fancy chocolatier before you burn the roof of your mouth three minutes later trying to taste-test—so be careful!
Black Food Coloring: Not all food colorings are created equal. You want the gel-based variety for this. Liquid food coloring will ruin your pops faster than a bad hair day, trust me. Save those liquid ones for your gin cocktails, folks!
Decorative Eyes: You can either get these pre-made or feel free to use white chocolate and a little more black food coloring if you have snafus finding the perfect eyeball decorations. A little DIY never hurt anyone, am I right? Plus, it gives you that added homemade touch!
Sprinkles (Optional): Who doesn’t love sprinkles? They kinda make everything better. Like icing on the cake… or popcorn under the movie night blanket! You can use them for added flair and pop of color.
Let’s Talk Health (or Not)
Is This Even Healthy? Let’s Discuss
Look, I appreciate a good green juice as much as the next person, but I’m here to tell you that these Oreo pops aren’t winning any health awards. There’s cream filling, candy melts, and that glorious sugar rush that hits you faster than your ex’s “I miss you” text on a Saturday night. But guess what? I have the audacity to say that it’s okay! Sometimes, we need sugar highs to make room for all the chaos this crazy world throws our way.
So, is this recipe healthy? Pfft! No. But it’s all about balance, people. Sure, there’s butter. And yes, I sleep just fine at night knowing I’ve indulged in some wickedly cute desserts. Live a little!
Your Grocery List
Here’s What You’ll Need
– 1 package of Oreo Cookies (I use the standard size, about 15.35 ounces)
– 2 cups of white chocolate candy melts
– Black gel food coloring
– Edible eyes (or white chocolate and more gel food coloring, whichever is easier)
– Candy sticks or lollipop sticks (where else will you put your pops?!)
– Optional: festive sprinkles
The Actual Cooking Part
Okay, Let’s Make This
Step 1: *Crush those Cookies*
Grab your Oreos and, using a food processor or a good old-fashioned plastic baggie and rolling pin, break them into fine crumbs. Don’t go wild; we’re making pops here, not powder! Go ahead and feel a little satisfaction slamming that bag against your counter—they bring out some hidden rage while you think about what Netflix show to binge next.
Step 2: *Open the Candy Melts*
Don’t be selfish! You’ll want to melt down those white chocolate candy melts until they’re smooth. You can do this in a microwave-safe bowl for 30-second increments while giving it a nice stir in between. Pro tip: don’t overheat them or it can become a hot, gooey disaster faster than you can say “Jack Skellington.” Aim for a silky, shiny consistency!
Step 3: *Combine and Form the Pops*
Oh boy, here’s where the fun starts! Stir about a quarter of the melted candy into the crushed Oreos. I know, I know—I said it would be a *little* messy. It will be totally worth it! It’s basically a glorious, sweet mess in a bowl. Pinch some of the mixture in your hands and form balls. This is where the magic happens, and let me tell you, there’s a high chance you’ll eat a few mini “bakers” just to taste test.
Step 4: *Stick-em Up*
Grab those candy sticks and dip them into the remaining melted candy for a few seconds before inserting them into each Oreo ball. This extra layer creates a stronger bond, meaning fewer “oops” moments during the eating process. Put them in the fridge for about 15 minutes to set—just enough time to batch you an 8 p.m. cup of tea or catch up on your Instagram. (I won’t tell anyone if you glaze over TikTok or ten!)
Step 5: *Coat like a Pro*
With your Oreo balls now cooled, it’s time to take the plunge! Dip each pop into the melted white chocolate. Don’t panic if this looks messy—it’s supposed to! Just make sure each pop is generously coated. You want it to have a nice, even layer of that sweet candy melt magic. No one wants pops with patches of naked Oreo.
Step 6: *Add Some Character*
At this point, you can go wild! Using the black gel food coloring, create Jack’s well-known face. Pull out your edible eyes or your white chocolate and black gel for fun DIY eyeballs—whatever you have on hand will work. If your artistic talent is reminiscent of a toddler with finger paint, fret not! The charm of Jack Skellington is that he’s a bit quirky.
Step 7: *Sprinkle Some Festive Vibes*
If you have sprinkles, grab some and sprinkle them on top before the candy coating sets. Why? Because your pops need some festive flair that says, “I’m fun and I’m ready for Halloween!” Let them set completely, which takes about 30 minutes. Then, there’s nothing standing between you and dessert heaven!
Step 8: *Taste Test*
You’ve made it, my friend. The time has come to devour Jack Skellington Oreo Pops. Is there a better way to celebrate the fall than with these sweet, spooky treats? I think not! Regardless of how they look (perfect or a little odd), they will taste like a sugar rush wrapped up in nostalgia and Halloween delight.
Side Notes & Sassy Hacks
Bonus Tips You Didn’t Ask For
– If you’re feeling a bit extra (who me?), place the pops in a fun pumpkin-themed dish or wrap them in clear bags tied with colorful ribbons for an extra touch. They’ll make the perfect edible favors for your Halloween party!
– Not into sticks? No problem! Just skip the lollipop rods and enjoy them as chocolate-covered Oreo balls.
– If you’re lazy (like me some days), you can buy pre-made cake pops from a store and just decorate them for your spooky party! Less effort, same fun—who says you have to be Martha Stewart?
– I love using white chocolate as a base for these pops, but you can totally flavor the melts for something spooktacular—try adding crushed peppermint or pumpkin spice for a unique twist!
– These pops can be made in advance and stored in the fridge for up to a week. Just sayin’—great for pre-Halloween prepping!
Final Words of (Culinary) Wisdom
And there you have it, friends! Delicious Jack Skellington Oreo Pops that bring together spooky vibes and sweet indulgence. If you try this recipe, remember to tag me with your creations—I love seeing your culinary chaos unfold and sharing in the fun. Or just send me a mental high-five if it all feels like too much. Trust me, it’s all about enjoying the process (and demolishing those treats at the end). Happy Halloween, and may your s’mores always be toasted to perfection!


