**Meta Title:** Cute Pumpkin Patch Dirt Cups Recipe
**Meta Description:** Discover how to make adorable pumpkin patch dirt cups, perfect for Halloween! Spooky, delicious treats for kids and adults alike.
You know that delightful feeling when you’re strolling through a pumpkin patch, surrounded by soft orange globes of perfection, crunching leaves underfoot, and that sweet, spicy scent of autumn in the air? Those memories conjure images of fun and creativity, and nothing embraces that spirit quite like Cute Pumpkin Patch Dirt Cups. These whimsical treats are not just a feast for the eyes; they deliver a punch of flavor that’s sure to please young and old alike. They can be whipped up in under 30 minutes and are perfect for parties, school functions, and even cozy family movie nights.
This irresistible dessert combines creamy chocolate pudding, crushed cookies, and vibrant Halloween-themed decorations to create the ultimate spooky snack. It’s a hands-on, creative endeavor that lets you engage the kids while bringing the magic of the pumpkin patch indoors. So, grab your aprons, and let’s dive into this delightful recipe together!
What Are Cute Pumpkin Patch Dirt Cups?
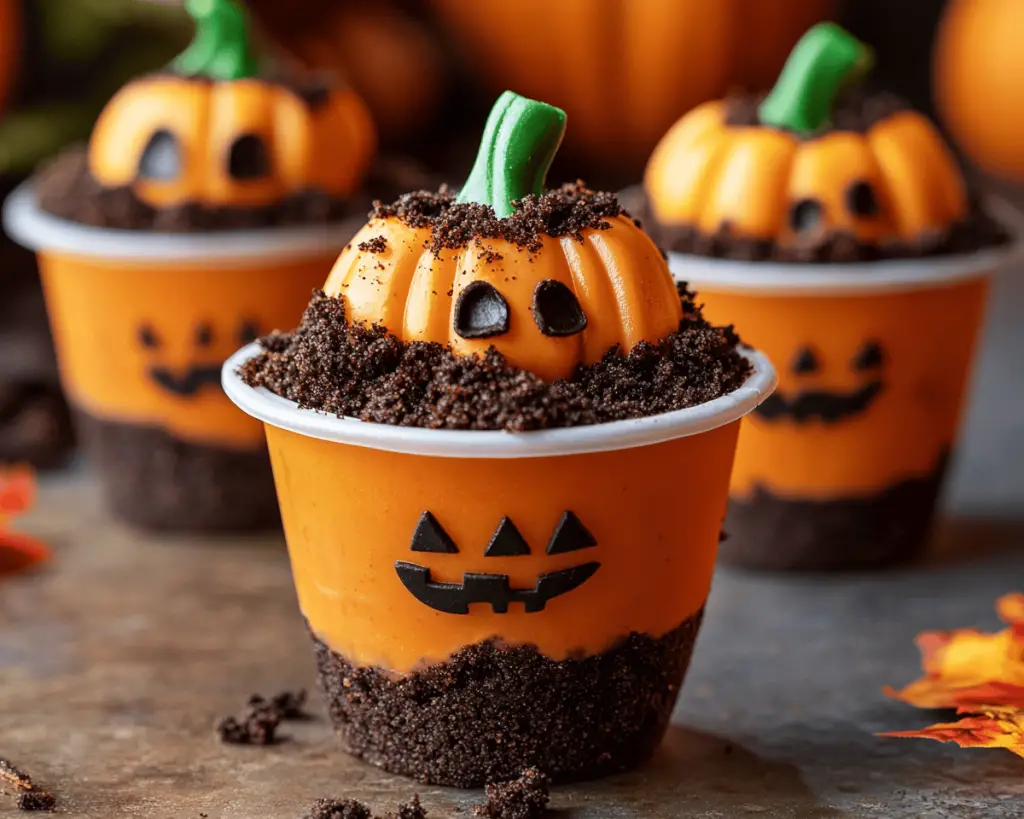
Cute Pumpkin Patch Dirt Cups are a playful twist on the traditional dessert known as “dirt cups” or “dirt pudding.” The base generally consists of layers of rich, creamy **chocolate pudding**, luscious **whipped cream**, and crumbled **chocolate sandwich cookies** that mimic the look of dirt, hence the name. For our version, we take creativity to a new level by adding **gummy worms**, **mini pumpkins**, and edible grass to create an imaginative pumpkin patch right in your cup!
This kid-friendly dessert is as visually appealing as it is delicious, combining a variety of textures—from the smooth, velvety pudding to the crunchy cookie crumbles. Each spoonful delivers a burst of flavor, with chocolate and vanilla mingling for a sweet, satisfying treat. As Halloween approaches, these dirt cups become an exciting way to incorporate seasonal fun into your festivities.
Why You’ll Love This Cute Pumpkin Patch Dirt Cups Recipe
You might wonder what makes this recipe stand out among other Halloween treats. The answer lies in its versatility and playfulness. To begin with, you can prepare it in just around 30 minutes, making it a fantastic last-minute treat for parties or family gatherings. You can easily make these cute cups gluten-free or dairy-free by opting for sugar-free pudding, vegan whipped toppings, and gluten-free cookies.
Moreover, they offer a fantastic opportunity for kids to get involved in the kitchen. You can let them decorate their own cups with gummy worms or add spooky sprinkles, making it not just a dessert, but an exciting hands-on project. The visual appeal and rich flavors will certainly captivate your guests, and kids will adore the festivity of digging into their very own pumpkin patch!
Ingredients You’ll Need
To bring your Cute Pumpkin Patch Dirt Cups to life, gather the following ingredients:
– **Chocolate Pudding Mix (3.9 oz)**: This will form the creamy, rich base of your dirt cups. Use instant pudding for a quick mix, or you can opt for a homemade custard if you have more time to invest.
– **Milk (2 cups)**: Use whole milk for a richer flavor, or choose almond milk or oat milk for a dairy-free alternative.
– **Whipped Topping (8 oz)**: This adds a fluffy texture to balance with the smoothness of the pudding. Opt for cool whip or homemade whipped cream if desired.
– **Chocolate Sandwich Cookies (12-15 cookies)**: These crushed cookies will create the “dirt.” Look for high-quality brands; the cream filling adds extra flavor.
– **Gummy Worms (1 package)**: No dirt cup is complete without them! These little creatures add a fun touch that kids will love. Choose a variety of colors for added whimsy.
– **Candy Pumpkins (1 cup)**: These adorable mini pumpkins perfectly represent the theme and add a festive touch. You can find them easily during the Halloween season.
– **Green Sprinkles (for decoration)**: These emulate grass and add a cute pop of color. You can also use shredded coconut tinted green with food coloring for a more natural touch.
How to Make Cute Pumpkin Patch Dirt Cups
Follow this step-by-step guide to create your own Cute Pumpkin Patch Dirt Cups, allowing the sweet aroma of chocolate to envelop your kitchen!
1. **Prepare the Pudding**: In a medium mixing bowl, whisk together the chocolate pudding mix and milk until well combined. The mixture should thicken up within a few minutes. Beat it until smooth, ensuring there are no lumps. Taste this rich indulgence, and let the sweet, velvety flavors conquer your senses.
2. **Fold in the Whipped Topping**: Once the pudding is ready, gently fold in the whipped topping. Use a spatula and a light hand to keep the mixture airy. The combination of pudding and whipped cream creates a silky-smooth texture that makes each bite heavenly.
3. **Crush the Cookies**: Place the chocolate sandwich cookies in a resealable plastic bag. Using a rolling pin or your hands, crush them into small pieces. You want a fine crumb that resembles loose dirt, so don’t fret if some bits are larger—it adds character. The chocolate aroma that wafts from the crushed cookies is divine.
4. **Layer the Ingredients**: Begin layering your cups! Start with a generous spoonful of the chocolate pudding mixture at the bottom of each cup—this will be the base of your pumpkin patch. Follow with a layer of crushed cookies, resembling the “dirt.” Continue this process until your cups are filled to the brim. Don’t worry about having layers that are perfectly neat; a bit of spontaneity only adds to the charm!
5. **Add the Toppings**: Once you have assembled the pumpkin patch foundation, it’s time for the fun part! Decorate the top layer with more crushed cookies to create a rich dirt layer. Place gummy worms crawling out from the layers and strategically add the candy pumpkins for that festive touch. Sprinkle the green sprinkles on top for a vibrant finish—it’s like grass and adds a delightful contrast!
6. **Chill and Serve**: It’s always a good idea to chill your dirt cups in the fridge for at least 30 minutes before serving. This allows the flavors to combine and the pudding to firm up ever so slightly. Once chilled, gather your family or guests and watch as their eyes light up with joy at these adorable pumpkin patches.
Tips, Tricks & Variations
– **Storage**: Keep your dirt cups tightly covered in the refrigerator. They can be stored for up to 2 days when properly sealed. However, I recommend adding gummy worms and decorations just before serving to keep them fresh.
– **Make it Gluten-Free**: Swap the chocolate sandwich cookies for gluten-free alternatives or crushed chocolate cereal for a gluten-free option.
– **Vegan Option**: Substitute the chocolate pudding with a vegan pudding mix and use coconut whipped cream. This way, everyone can join in the Halloween fun!
– **Ingredient Swaps**: Feel free to get creative with your toppings! Consider adding crushed nuts for extra crunch or using colorful sprinkles to match a party theme.
– **Plating Ideas**: For a beautiful presentation, consider using clear glasses or mason jars. This will allow you to showcase the layers that build up to the cute pumpkin patch effect.
What to Serve With Cute Pumpkin Patch Dirt Cups
These sweet, whimsical treats are perfect for any Halloween-themed party, but they shine even more when paired with treats that complement their flavors and themes. Picture serving them alongside:
– **Apple Slices with Caramel Dip**: The crisp, sweet apples pair beautifully with the rich chocolate, offering a refreshing contrast.
– **Miniature Pumpkin Muffins**: These muffins carry the essence of fall, with warm spices that echo the pumpkin candy theme of your dirt cups.
– **Hot Chocolate or Pumpkin Spice Lattes**: Elevate the experience with warm, cozy beverages to keep those fall vibes going strong.
Don’t forget about presentation! A beautifully arranged table with straw bales or mini pumpkins can enhance the entire dining experience as you serve your guests these adorable dirt cups.
Nutrition & Health Benefits
While Cute Pumpkin Patch Dirt Cups are undoubtedly a treat, they also offer some nutritional benefits! Using **chocolate pudding** ensures you’re getting some calcium and vitamin D from the milk used in the recipe. Additionally, whole milk offers healthy fats necessary for growing bodies.
These cups bring joy and delight, but moderation is key. A single serving contains around 240 calories, primarily derived from sugar and carbohydrates, depending on the pudding and cookies you choose. For healthier options, consider sugar-free pudding mixes available in many grocery stores—this can reduce the calorie count and sugar content significantly. For more information on balanced nutrition, you can check credible sources like [Healthline](https://www.healthline.com/nutrition) or [USDA](https://www.usda.gov/topics/food-nutrition).
Frequently Asked Questions
**1. Can I make these cups ahead of time?**
Yes! You can make the pudding and layer the cups up to 24 hours before your event. Keep them covered in the fridge to maintain freshness. Hold off on adding the gummy worms and decorations until just before serving for a fresh look.
**2. What if I can’t find candy pumpkins?**
No worries! You can substitute candy pumpkins with other themed candies such as chocolate-covered almonds or even marshmallows. You can also craft little pumpkin decorations using fondant or clay if you’re feeling creative!
**3. How can I make these without dairy?**
For a dairy-free option, you can use almond milk or coconut milk in the pudding and substitute with coconut cream for the whipped topping. Ensure that all other ingredients are dairy-free as well, including cookies.
**4. How long will they last in the fridge?**
When stored properly in an airtight container, your dirt cups can last up to 2 days in the fridge. However, it’s best to consume them sooner for optimal flavor and texture, especially before the cookies become soggy.
**5. Can I customize the flavor?**
Absolutely! You can switch the chocolate pudding for vanilla or even butterscotch for a unique twist. Note that this might change your overall color scheme and flavor profile, offering a fresh alternative to the traditional dirt cup.
In conclusion, Cute Pumpkin Patch Dirt Cups are not only a delicious way to celebrate Halloween, but they also invite creativity and joy into your kitchen. They encapsulate the spirit of the season and will surely bring smiles to faces young and old. As you dig into the creamy layers, don’t forget to enjoy every bite and the nostalgia they spark. So gather your ingredients, get a little messy, and let your pumpkin patch dreams come to life! If you loved this recipe, please leave a comment or tag me on Instagram, and happy Halloween baking!


