**Meta Title:** Raspberry Cheesecake Bars – Creamy and Dreamy Delight!
**Meta Description:** Indulge in these creamy, tangy Raspberry Cheesecake Bars! Easy recipe for a delicious dessert that everyone will love.
—
You know that feeling when you crave something sweet yet slightly tart? Something that dances on your tongue and provides that little spark of joy after a long day? That’s exactly how I felt when I first devised this recipe for Raspberry Cheesecake Bars. With every luscious bite, these bars deliver not just the satisfaction of a rich cheesecake but also the vivacity of fresh raspberries. Trust me, no one can resist the vibrating combination of creaminess and tanginess that these bars provide. Perfect for family gatherings, potlucks, or just a cozy night in with a good movie, these raspberry cheesecake bars are bound to become your new favorite!
### What are Raspberry Cheesecake Bars?
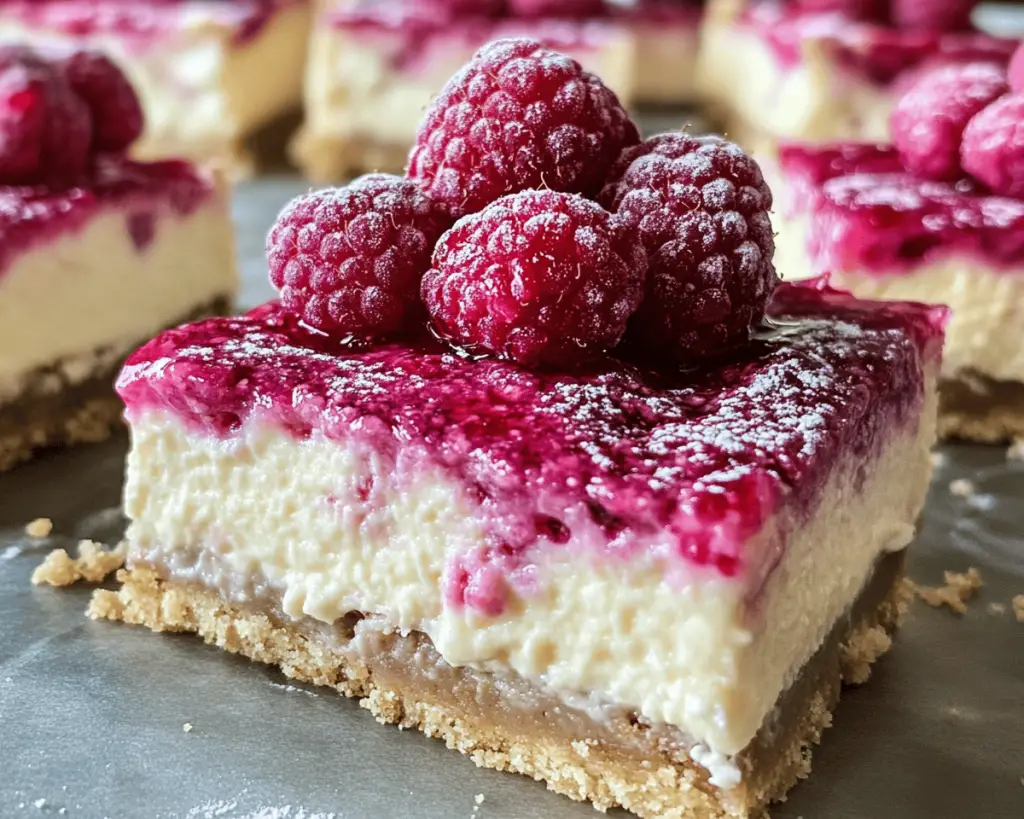
Raspberry Cheesecake Bars are the perfect union of a classic cheesecake and the convenience of handheld treats. Originating from cheesecake recipes that celebrate simple ingredients but deliver complex flavors, these bars are a delightful interpretation made with **cream cheese**, **sugar**, **eggs**, and, most importantly, **fresh raspberries**. Imagine a velvety filling that melts in your mouth, a graham cracker crust that provides the right amount of crunch, and a tart berry sauce that adds a refreshing zing to every bite. The aesthetics are nothing short of breathtaking — with that beautiful pink hue accentuated by swirls of raspberry, they are as elegant as they are delicious.
### Why You’ll Love This Raspberry Cheesecake Bars Recipe
There is a multitude of reasons why you’re going to fall head over heels for these Raspberry Cheesecake Bars! First and foremost, the balance of flavors is divine — the honeyed sweetness of the cheesecake filling harmonizes wonderfully with the tartness of the raspberries, creating a dessert that feels indulgent yet is vibrantly fresh.
Additionally, this recipe is family-friendly and nests well in a busy schedule. You can whip it up in under an hour (excluding cooling time), making it a fantastic choice for last-minute delights or spontaneous gatherings. The texture is a dream! The cheesecake is creamy, while the crust adds a satisfying crunch, and the fresh raspberry sauce brings a tantalizing burst of juiciness with each bite.
Finally, these bars are easy to store and travel well! Cut them into squares, place them in a container, and you’ll be the star of the picnic, potluck, or dessert table wherever you go—because everyone is craving a slice!
### Ingredients You’ll Need
To achieve these creamy, tangy Raspberry Cheesecake Bars, gather these ingredients:
1. **Graham Crackers (1 ½ cups)**: The base layer adds structure and crunch. Look for whole-grain versions for added flavor and nutrients.
2. **Sugar (½ cup)**: This sweetener balances the tanginess of the cheesecake and enhances the crust’s flavor.
3. **Butter (½ cup, melted)**: Adds richness and binds the crust. Use unsalted butter to control the salt content.
4. **Cream Cheese (16 oz, softened)**: The star of our bars, bringing that delightful **creaminess** and a slight tang. Rooms temp cream cheese blends smoothly without lumps.
5. **Sour Cream (1 cup)**: Enhances the creaminess and contributes to the tangy flavor profile. Greek yogurt makes for a great substitution!
6. **Eggs (2 large)**: Essential for setting the cheesecake bars. Make sure they are at room temperature for uniform mixing.
7. **Fresh Raspberries (1 ½ cups)**: These gems infuse the bars with color and a bright flavor. Use fresh, juicy raspberries for the best results; frozen can work but should be well-drained to avoid excess moisture.
8. **Lemon Juice (2 tablespoons)**: Brightens the flavor and balances sweetness. Fresh-squeezed lemon juice is always preferable!
9. **Vanilla Extract (1 teaspoon)**: Adds a fragrant depth to the cheesecake filling.
### How to Make Raspberry Cheesecake Bars
Let’s dive into the deliciousness! Follow these steps for a perfect batch of Raspberry Cheesecake Bars:
1. **Prepare the Oven and Pan:** Preheat your oven to 325°F (160°C). Line a 9×9-inch baking pan with parchment paper, allowing it to hang over the sides for easy removal later. This makes cutting and serving a breeze!
2. **Make the Crust:** In a medium bowl, combine 1 ½ cups of crushed graham crackers, ½ cup of sugar, and ½ cup of melted butter. Stir until everything is well combined and resembles damp sand. Press this mixture into the bottom of the prepared baking pan evenly. Bake for 10 minutes or until golden and fragrant.
3. **Prepare the Cheesecake Filling:** While the crust cools, whip the softened cream cheese in a large mixing bowl until it becomes smooth and creamy. Gradually add in ½ cup of sugar, and continue to mix until fully incorporated. Make sure to scrape down the sides to mix thoroughly.
4. **Add Sour Cream and Eggs:** Mix in the 1 cup of sour cream, 2 tablespoons of freshly squeezed lemon juice, and 1 teaspoon of vanilla extract. Add the eggs one at a time, ensuring each is fully blended before adding the next. Take care not to over-mix; just blend until smooth.
5. **Prepare the Raspberry Swirl:** Using a separate bowl, gently mash 1 ½ cups of fresh raspberries with a fork, just enough to break them down while keeping some texture. You can also reserve a few whole raspberries for garnishing later if you’d like!
6. **Combine the Layers:** Pour the cheesecake mixture over the cooled crust, smoothing it out with a spatula. Drop spoonfuls of the raspberry mixture over the cheesecake, then gently swirl with a knife or toothpick to create a marbled effect. Avoid over-mixing to ensure the beautiful swirls remain visible.
7. **Bake the Cheesecake Bars:** Place the pan in the preheated oven and bake for about 45-50 minutes, or until the edges are set, and the center is slightly jiggly. Remember to rotate the pan halfway for even baking. The bars will firm up as they cool.
8. **Cool and Chill:** Once done, remove from the oven and allow the bars to cool at room temperature for about an hour. Then, refrigerate for at least 3 hours or until fully chilled. This step is essential for the perfect texture!
9. **Serve:** When ready to serve, lift the cheesecake out of the pan using the parchment paper. Cut into squares and garnish with fresh raspberries, if desired. Enjoy the praise from family and friends as they indulge in these delightful bars!
### Tips, Tricks & Variations
1. **Storage:** Store leftover bars in an airtight container in the refrigerator for up to one week. They can be frozen for up to 2 months — perfect for meal prep!
2. **Reheating Tips:** If serving a chilled version, allow the bars to come to room temperature for about 15 minutes for a more luscious experience, or enjoy them straight from the fridge for a refreshing treat.
3. **Spice It Up:** Try adding a teaspoon of almond extract instead of vanilla for a subtle twist, or add a pinch of cinnamon to the crust for a warm flavor.
4. **Vegan Version:** Substitute cream cheese with a vegan cream cheese and the eggs with ground flaxseed or chia seeds mixed with water to create a flax egg.
5. **Plating Ideas:** For an elevated presentation, drizzle extra raspberry sauce or a dusting of powdered sugar before serving. This not only enhances the visual appeal but adds a delightful touch of sweetness.
### What to Serve With Raspberry Cheesecake Bars
Enhance your dessert experience by pairing these Raspberry Cheesecake Bars with various accompaniments! A dollop of **whipped cream** on top creates a wonderful creaminess that juxtaposes the tartness of the bars beautifully. Fresh mint leaves can add a refreshing touch, balancing out richness. For drinks, consider pairing with a light **sparkling rosé** or a refreshing **lemonade**, which carries that necessary acidity to cut through the creaminess, perfect for a summer gathering.
### Nutrition & Health Benefits
These Raspberry Cheesecake Bars make for an indulgent dessert while providing nutritional benefits from the raspberries! Each serving packs antioxidants, vitamins, and minerals. The creamy filling contains protein from the cream cheese and eggs, making these bars more satiating compared to typical sugary sweets. A general serving size of these bars comes in under 250 calories, fitting well into a balanced diet of occasional treats. For more health-related insights, check out this resource on fruit benefits from [Healthline](https://www.healthline.com/nutrition/raspberry-benefits).
### Frequently Asked Questions
1. **Can I use frozen raspberries?**
– Yes, you can use frozen raspberries, but ensure they are well-drained to avoid excess moisture. Fresh raspberries will provide the best flavor and texture, but frozen can be a convenient alternative.
2. **How long do these cheesecake bars last?**
– These bars can last up to a week in the refrigerator when stored in an airtight container. For longer storage, you can freeze them for up to two months. Just make sure to thaw in the refrigerator before serving.
3. **Can I substitute ingredients?**
– Absolutely! You can swap out the cream cheese for a dairy-free variety, use Greek yogurt instead of sour cream, or opt for a gluten-free graham cracker crust. Be creative with substitutions based on dietary needs!
4. **What’s the best way to cut cheesecake bars?**
– For neat cuts, use a large, sharp knife, and wipe it with a damp cloth between cuts to maintain clean lines. It can help to cool the bars completely in the fridge before cutting.
5. **How do I know when they’re done baking?**
– The bars are done when the edges are set, and the center still has a slight jiggle (it will firm up upon cooling). Overbaking can lead to a dry texture, so keep an eye on it!
### Conclusion
In summary, these Raspberry Cheesecake Bars are an absolute must-try! They combine the tacky richness of cheesecake with the fresh tang of raspberries, creating a treat that’s visually stunning and downright delectable. The easy preparation makes them perfect for any gathering or as a sweet weeknight indulgence. I can already picture you enjoying each blissful bite! If you decide to whip up this recipe, don’t forget to share your results — I’d love to hear how they turned out. Happy baking!


