**Meta Title:** Fruity Pebbles Bread: Colorful & Fun Recipe!
**Meta Description:** Dive into this Fruity Pebbles Bread recipe, a colorful, sweet loaf bursting with cereal crunch. Perfect for breakfast or a snack!
You know that irresistible feeling when you walk past the cereal aisle, and a box of your favorite colorful childhood treat calls your name? For many of us, that treat is none other than Fruity Pebbles. The vibrant hues and sweet, fruity flavors evoke such nostalgia—it’s a treat that transcends the boundaries of age. Today, I’ll be sharing a delightful recipe that infuses this nostalgic cereal into a moist, flavorful bread that’s perfect for breakfast, snack time, or any moment you need a little pick-me-up.
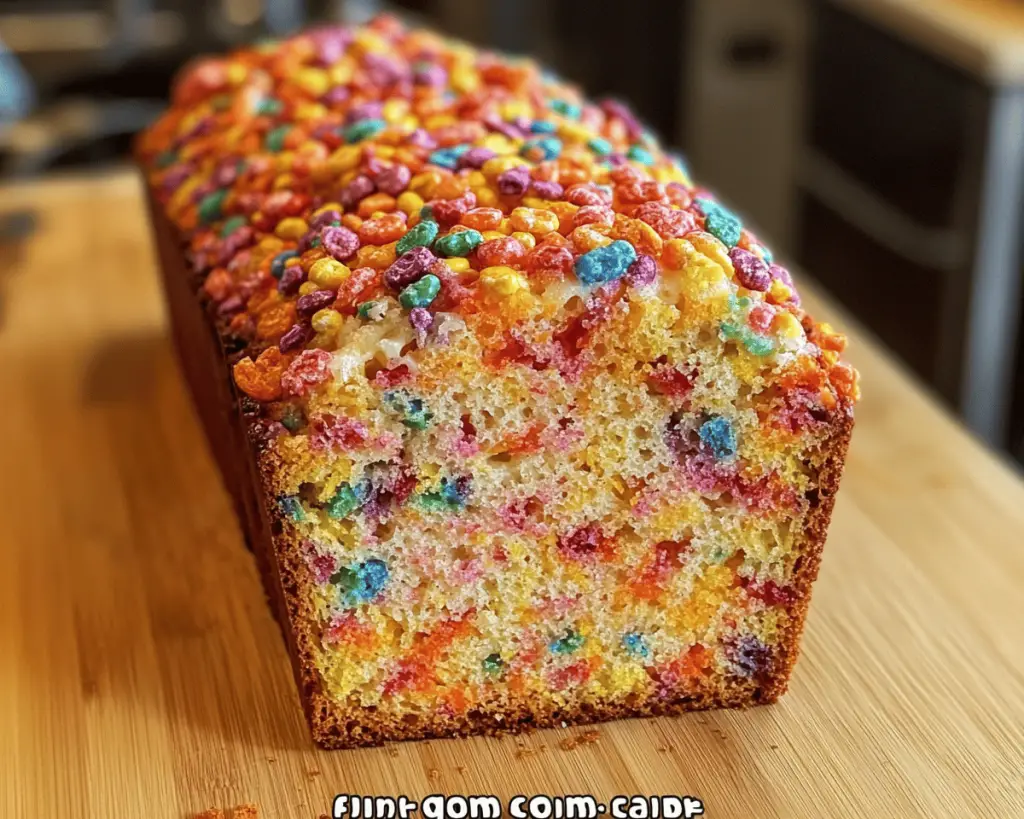
Imagine slicing into a warm loaf that greets you with golden-brown crust and a soft, inviting interior, sprinkled throughout with crunchy bits of Fruity Pebbles. This is not just bread; it’s an experience! In this article, you’ll discover how to make this eye-popping dessert bread, packed with flavor and an irrefutable sense of fun.
What is Fruity Pebbles Bread?
Fruity Pebbles Bread is a unique spin on traditional sweet bread, featuring the beloved breakfast cereal in its core. Originating from the trend of putting cereal into baked goods, it celebrates the joyous flavors and textures of Fruity Pebbles while maintaining the essence of a soft bread loaf. It captures the delightfully sweet taste of fruit while offering that satisfying crunch that we all adore from the cereal.
Each bite is an explosion of flavor, the way that nostalgic cereal instantly transports you back to carefree mornings. With its bright colors and sweet aroma filling your kitchen, it brings a smile on your face from the moment it comes out of the oven. This sweet bread makes for a fantastic centerpiece at a brunch gathering or a colorful treat to serve with coffee—that vibrant touch perfect for any occasion.
Why You’ll Love This Fruity Pebbles Bread
Fruity Pebbles Bread stands out for several reasons. First and foremost, it’s a feast for the eyes with its rainbow colors. But beyond looks, the combination of sweet, fluffy bread and crunchy cereal creates a delightful texture contrast that is genuinely satisfying.
Here are just a few reasons to whip up this recipe:
– **Simple Ingredients:** This bread comes together with basic pantry staples, making it accessible for any baker, whether you’re a newbie or a pro.
– **Family-Friendly:** Getting the kids involved in baking is a wonderful way to make memories. Mixing the batter and sprinkling in the Fruity Pebbles will inevitably lead to giggles and smiles.
– **Versatile Enjoyment:** Enjoy it plain, slathered with butter, or even as a foundation for a delectable breakfast toast topped with cream cheese and fresh fruit.
– **Perfect for Leftovers:** If you manage to have any leftovers, it can be toasted the next morning for a quick breakfast. Imagine spreading a bit of cream cheese or almond butter—what a delightful way to start your day!
Ingredients You’ll Need
Before diving into the baking process, let’s gather our ingredients. Here’s what you will need:
1. **All-Purpose Flour** – The foundation of our bread, providing structure and texture. Make sure it’s fresh for the best results.
2. **Sugar** – Adds sweetness and helps with the browning process. Feel free to adjust the amount based on your sweetness preference.
3. **Baking Powder** – A key leavening agent that will help the bread rise and give it a fluffy texture.
4. **Salt** – Just a pinch to enhance all the flavors.
5. **Butter** – Adds richness and a tender crumb. Use unsalted butter so you can control the salt in your bread.
6. **Eggs** – Provides moisture and acts as a binding agent. For a vegan option, you can use flax eggs or a commercial egg replacer.
7. **Milk** – Contributes to the bread’s softness; you can use whole milk or substitutes like almond or oat milk.
8. **Fruity Pebbles** – The star ingredient! Look for fresh cereal for the best crunch and color. You can also experiment with other breakfast cereals if desired.
How to Make Fruity Pebbles Bread
Ready to create your very own Fruity Pebbles Bread? Here’s a step-by-step guide to ensure your creation turns out as delightful as you envision.
**Step 1: Preheat Your Oven**
Begin by preheating your oven to 350°F (175°C). This will ensure that the bread bakes evenly and rises nicely once you place it inside.
**Step 2: Prepare Your Baking Pan**
Grease a 9×5 inch loaf pan with butter or line it with parchment paper for easy removal. This step is crucial; nobody wants to lose precious bread to a sticking pan!
**Step 3: Combine Dry Ingredients**
In a large mixing bowl, whisk together 2 cups of all-purpose flour, 1 cup of sugar, 2 teaspoons of baking powder, and 1/2 teaspoon of salt. Make sure everything is well-mixed to avoid clumping later on. This mix will establish the structure of your bread.
**Step 4: Mix Wet Ingredients**
In another bowl, melt 1/2 cup of unsalted butter and allow it to cool slightly. Then, add 2 eggs and 1 cup of milk to the melted butter and whisk vigorously until smooth and combined. The melted butter adds richness, while the eggs and milk contribute to moisture.
**Step 5: Combine Wet and Dry Mixtures**
Pour the wet ingredients into the dry ingredients and gently stir until just combined—be careful not to overmix! The batter should be slightly lumpy, ensuring your bread remains moist and fluffy.
**Step 6: Fold in Fruity Pebbles**
Carefully fold in 1 cup of Fruity Pebbles. This is where the magic happens! As you fold, try not to crush the cereal too much. You want those delightful little bursts of color and crunch to remain intact.
**Step 7: Pour Batter into the Pan**
Transfer the batter into your prepared loaf pan, smoothing the top with a spatula. To make it look extra enticing, sprinkle an additional 1/4 cup of Fruity Pebbles on top.
**Step 8: Bake to Perfection**
Place the loaf pan in your preheated oven and bake for 50-60 minutes. You’ll know your bread is done when it turns golden-brown on top and a toothpick inserted in the center comes out clean. The aroma will fill your kitchen, making it almost impossible to resist peeking!
**Step 9: Cool and Slice**
Once baked, take the bread out of the oven and allow it to cool in the pan for about 10 minutes. Then, carefully transfer it to a wire rack to cool completely. Once it’s cool, slice into this colorful loaf and enjoy!
Tips, Tricks & Variations
– **Storage:** Keep your Fruity Pebbles Bread in an airtight container at room temperature for up to 3 days. If you want to keep it longer, you can freeze it for up to a month, wrapped in plastic wrap and then aluminum foil.
– **Reheating:** To enjoy leftover bread, pop a slice in the toaster or oven to refresh its delightful texture.
– **Flavors:** Add 1/2 teaspoon of vanilla extract or almond extract for an extra layer of flavor—it’s a lovely touch that complements the sweetness.
– **Toppings:** Consider glazing the top with a simple icing made from powdered sugar and milk for a sweeter treat. Drizzle it over the warm loaf for a visually stunning finish.
– **Cereal Substitutions:** Try adding other cereals like Cocoa Pebbles or even a mix of your favorites for a unique twist!
What to Serve With Fruity Pebbles Bread
Fruity Pebbles Bread is delicious on its own, but to elevate your experience, consider pairing it with complementary flavors.
– **Cream Cheese Spread:** Whip some cream cheese with a bit of powdered sugar and a splash of vanilla; it enhances the sweetness and adds a creamy texture.
– **Fresh Fruits:** Slices of strawberries, bananas, or blueberries add a fresh twist. They provide a burst of color and brightness to your plate.
– **Coffee or Milk:** A comforting cup of coffee or a cold glass of milk complements the sweetness perfectly, making for a nostalgic breakfast or snack.
Nutrition & Health Benefits
While Fruity Pebbles Bread is undoubtedly a treat, it’s also important to consider its nutritional content. A slice contains approximately 200 calories, with a decent balance of carbohydrates and fats, thanks to the butter. You’ll also benefit from some protein from the eggs and milk used in the recipe.
For more detailed nutritional information, it’s always a good idea to refer to trusted sources such as [Healthline](https://www.healthline.com) or [USDA](https://fdc.nal.usda.gov/).
Frequently Asked Questions
**1. Can I use whole wheat flour instead of all-purpose flour?**
Yes, you can use whole wheat flour, but it will create a denser texture for your bread. I suggest substituting half of the all-purpose flour with whole wheat flour for a better balance.
**2. Can I make this bread ahead of time?**
Absolutely! You can prepare the batter a day in advance and store it in the fridge until you’re ready to bake it. However, it’s best to bake it within 24 hours for optimal freshness.
**3. Is this recipe suitable for vegetarians or vegans?**
While the original recipe contains dairy and eggs, you can easily adapt it by using almond milk and replacing eggs with flax mees or a commercial egg substitute classed as vegan.
**4. How do I know when my bread is done baking?**
A toothpick inserted into the center of the loaf should come out clean, and the top should be golden-brown. If the top browns too quickly, you can loosely cover it with aluminum foil halfway through baking.
**5. Can I customize the flavors with different cereals?**
Absolutely! This recipe is quite versatile. You can experiment with different flavors and textures by mixing in cereals like Cocoa Krispies for a chocolate twist or even using granola for added crunch.
Conclusion
As you take that first bite of your homemade Fruity Pebbles Bread, breathe in the sweet aroma and marvel at the color—it’s impossible not to feel a rush of joy. The crunchiness of the cereal alongside the soft, pillowy crumb is more than just food; it’s a flavorful journey back to carefree mornings.
So, gather your ingredients, ignite that oven, and treat yourself to this fun, sweet adventure. Don’t forget to share your creations on social media; tag me so I can see your colorful masterpieces! If you loved this recipe, leave a comment or let me know your favorite cereal combinations. Happy baking!


