# Decadent Butterfinger Peanut Butter Pie Recipe
**Meta Title**: Indulgent Butterfinger Peanut Butter Pie Recipe
**Meta Description**: Discover this decadent Butterfinger peanut butter pie recipe that combines creamy texture with crunchy bites. Perfect for special occasions!
—
You know that moment when you’re strolling through the candy aisle, your eyes landing on those nostalgic orange-and-brown wrapped Butterfingers? It’s impossible not to crave that sweet and salty crunch. Now, imagine transforming that childhood treat into an impossibly decadent dessert—the Butterfinger peanut butter pie! This creamy, indulgent pie layered with crisp Butterfinger crumbles and rich peanut butter will have you and your guests swooning. Whether it’s a birthday celebration, a potluck, or a simple weeknight treat, this recipe is your golden ticket to dessert bliss.
In this article, you’ll discover the steps to create this glorious pie, learn about its backstory and flavor profile, and gather tips to make it shine. Grab your apron, and let’s dive into the world of Butterfinger magic!
What is Butterfinger Peanut Butter Pie?
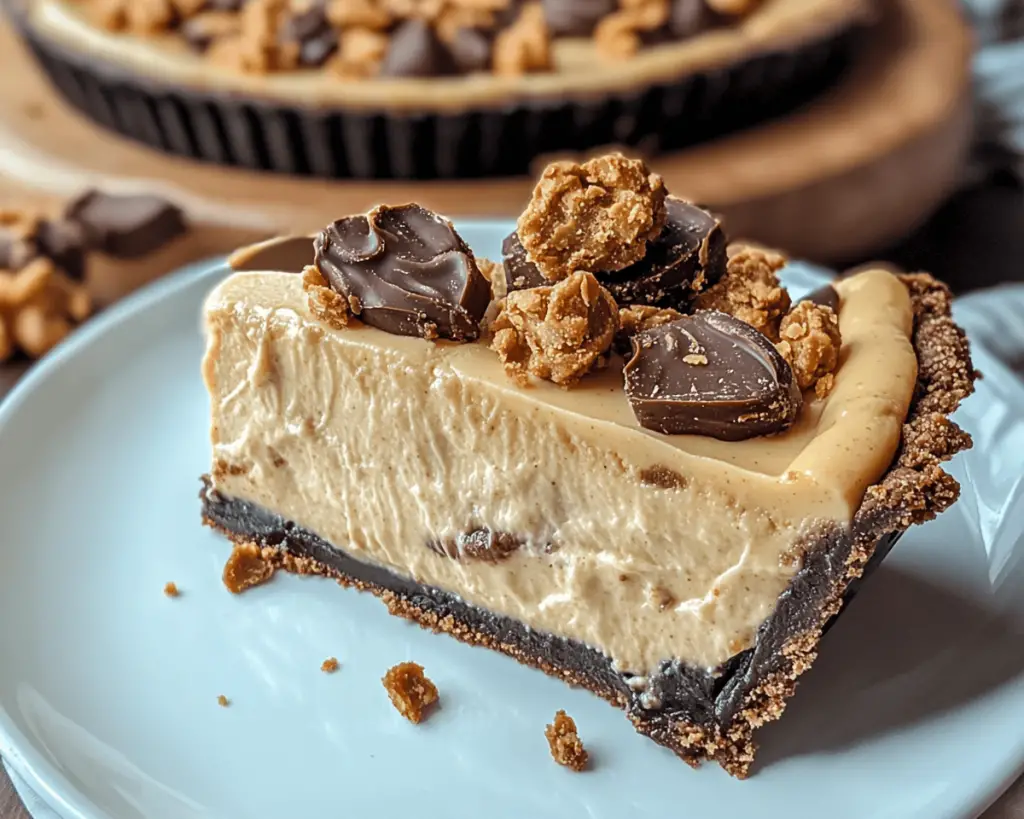
Butterfinger peanut butter pie is a no-bake dessert featuring a luscious peanut butter filling enveloped in a buttery graham cracker crust, topped with creamy whipped topping and crunchy Butterfinger pieces. A beautiful harmony of *smooth* and *crunchy* that hits all the right notes, it’s a dream of flavors for anyone with a sweet tooth! The origin of this pie, like many beloved desserts, springs from the heart of home baking—where simple ingredients transform into joyful treats.
With its golden, flaky crust, rich peanut butter filling, and decadent topping, this pie offers a delightful balance between creamy and crispy. Each bite is a celebration of nostalgic flavors that blend the classic chocolate and peanut butter combination we all cherish.
Why You’ll Love This Butterfinger Peanut Butter Pie
This Butterfinger peanut butter pie stands out for a multitude of reasons. First and foremost, it’s incredibly easy to make, requiring no baking and minimal preparation time. This means you can whip up a stunning dessert quickly, even on busy evenings.
Moreover, this pie is perfect for sharing! Its creamy, indulgent filling is pleasing to both kids and adults alike, making it a hit at birthday parties and family gatherings. And let’s not forget the *budget-friendly* nature of this recipe—the ingredients are accessible, so creating this luscious dessert won’t break the bank.
You’ll also adore how it keeps well in the fridge. Make it a day in advance, and let it chill; the flavors intensify, and it’s ready to impress your guests with deliciousness that lingers. You’ll be known as the *dessert diva* in no time!
Ingredients You’ll Need
To prepare this delightful Butterfinger peanut butter pie, you’ll need the following ingredients:
– **Graham cracker crumbs (1 ½ cups)**: These form the base of the pie. Aim for finely crushed crumbs for a smooth texture. If you want a gluten-free option, you can substitute with gluten-free graham crackers.
– **Unsalted butter (½ cup)**: Melted butter binds the crumbs together. It adds richness without an overly salty taste. You can also use coconut oil for a dairy-free option.
– **Cream cheese (8 oz.)**: Softened cream cheese creates that ultra-smooth, creamy filling. Ensure it’s softened to avoid lumps.
– **Creamy peanut butter (1 cup)**: The star ingredient! Choose a sweetened variety for a sweeter pie or natural peanut butter for a more wholesome flavor.
– **Powdered sugar (½ cup)**: This adds sweetness and helps with the texture of the filling. Sift it if necessary to eliminate any clumps.
– **Cool Whip (8 oz.)**: For a light and airy topping, Cool Whip works wonders. It’s the secret to achieving that fluffy texture. If you prefer homemade, whipped heavy cream can be used instead.
– **Butterfinger candy bars (3-4, chopped)**: These add the perfect crunch and nostalgic flavor. Feel free to adjust the amount based on your preference.
With these ingredients, you’re ready to create pie perfection.
How to Make Butterfinger Peanut Butter Pie
**Step 1**: **Prepare the crust**
In a large mixing bowl, combine the *graham cracker crumbs* with *melted butter*. Use a fork to mix until evenly moistened. Then, press the mixture firmly into the bottom and up the sides of a 9-inch pie dish. Aim for an even layer, about ¼ inch thick. Bake in a preheated oven at 350°F (175°C) for 8-10 minutes, until golden brown. Allow it to cool completely before proceeding.
**Step 2**: **Make the peanut butter filling**
In a medium bowl, beat softened *cream cheese* until smooth. This should take about 2 minutes with an electric mixer. Next, add the *creamy peanut butter* and *powdered sugar*, mixing until fully combined and creamy. The texture should be velvety with no lumps. Fold in half of the *Cool Whip*, incorporating it gently to maintain the airy texture.
**Step 3**: **Assemble the pie**
Once your filling is ready, spoon it into the cooled graham cracker crust. Spread it evenly, smoothing the top with a spatula. This pie can easily get messy, but don’t fret—the deliciousness will make up for it!
**Step 4**: **Top with whipped topping and Butterfingers**
Spread the remaining *Cool Whip* on top of the peanut butter filling. This layer adds a lightness and contrast to the richer filling. Next, sprinkle the chopped *Butterfinger* candy bars generously over the top, gently pressing them down to ensure they adhere.
**Step 5**: **Chill and serve**
Cover the assembled pie tightly with plastic wrap and chill it in the refrigerator for at least 4 hours, or preferably overnight. This step is crucial for allowing the flavors to meld together and for the pie to set properly. When ready to serve, slice and enjoy this delicious indulgence!
Tips, Tricks & Variations
1. **Storage**: Store leftovers in the refrigerator, covered, for up to 4 days. The pie may soften slightly but will still be delicious!
2. **Variations**: You can substitute the *Butterfinger* candy bars with your favorite chocolate candies—Reese’s Pieces or Snickers work nicely too!
3. **Make it nut-free**: Substitute peanut butter with sunflower seed butter or a seed-based alternative to make this pie nut-free, accommodating various dietary needs.
4. **Presentation**: For a decorative touch, drizzle chocolate sauce over the top and add a few whole Butterfinger bars as garnishes before serving.
5. **Freezing**: This pie can be frozen before adding the topping for up to 2 months. Thaw it in the refrigerator for a few hours before serving.
What to Serve With Butterfinger Peanut Butter Pie
This pie is a dessert stand-alone, but it pairs beautifully with ice cream! Choose vanilla or caramel ice cream to complement the rich peanut butter filling without overpowering it. A dollop of whipped cream on the side enhances the lightness of each slice. If you’re feeling adventurous, serve it with a warm chocolate sauce—a perfect contrast to the cold pie.
For beverages, consider pairing this dessert with a chilled glass of milk (how classic!) or perhaps a coffee for an added flavor kick. A glass of dessert wine can also elevate your experience, creating a sophisticated finish to the evening.
Nutrition & Health Benefits
While this pie is undeniably indulgent, it does bring some nutritional benefits, especially from the peanut butter, which is rich in protein and healthy fats. Each slice is approximately 280 calories, depending on portion size. Peanut butter is known for its satiating properties, helping you feel full longer while providing essential nutrients such as Vitamin E, magnesium, and phosphorus .
For more health-related insights, check out resources like [Healthline](https://www.healthline.com/nutrition/benefits-of-peanut-butter) and [USDA](https://fdc.nal.usda.gov/) to understand the nutritional aspects of your favorite ingredients!
Frequently Asked Questions
**1. Can I make this pie ahead of time?**
Absolutely! Making it a day in advance is actually preferable as it allows the flavors to meld beautifully in the fridge. Just ensure it’s covered well to prevent any odors from seeping in!
**2. Can I use natural peanut butter instead of processed?**
Yes! Natural peanut butter can be used, but it may make the pie slightly less sweet. Adjust the *powdered sugar* to taste if you prefer a sweeter flavor.
**3. How can I make this pie gluten-free?**
Swap out regular graham crackers with gluten-free ones. There are many great options available that mimic the flavor and texture beautifully.
**4. Can I freeze leftovers?**
Yes, this pie can be frozen. Just be sure to do this before adding the whipped topping. Wrap it tightly and store it for up to 2 months. Thaw it in the fridge before adding the topping and serving!
**5. What if I don’t like Butterfinger?**
That’s no problem! You can replace the Butterfinger with other candies like crushed Oreos, Reese’s cups, or even chocolate chips for a different flavor profile.
—
Indulging in this Butterfinger peanut butter pie is a sweet reminder of the little joys in life—those delightful moments spent with family and friends, where laughter lingers in the air and every bite brings a smile. I encourage you to try making this pie tonight and share your results with me! If you loved it, leave a comment or tag me on Instagram—you might just inspire someone else to dive into the world of decadently simple desserts!


