# No-Bake Butterfinger Caramel Bars That Taste Amazing
## Meta Title
No-Bake Butterfinger Caramel Bars Recipe
## Meta Description
Delight in these easy No-Bake Butterfinger Caramel Bars. Sweet, crunchy, and utterly delicious, this recipe requires no baking and is a family favorite!
## Introduction
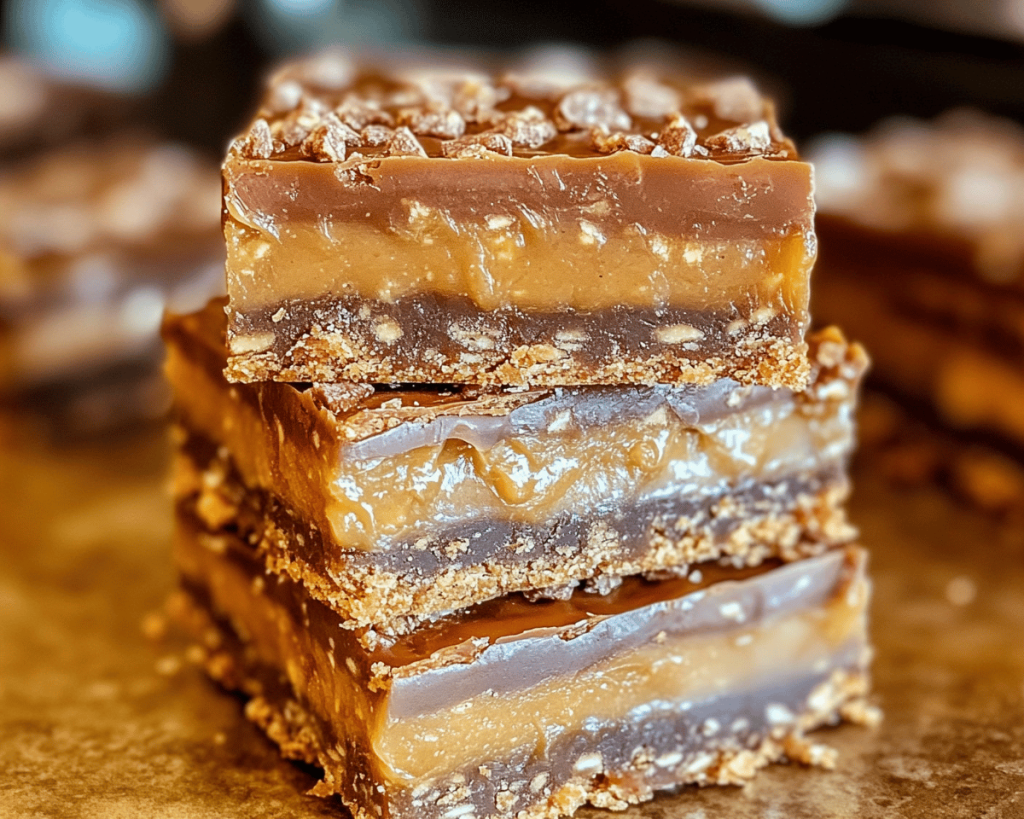
Imagine sinking your teeth into a luscious, NO-BAKE BUTTERFINGER CARAMEL BAR, where the creamy, nutty flavors mingle with hints of chocolate and caramel. You’ll hear the satisfying crunch of Toffee as you bite through layers of sweetness, leading to the delightful richness that makes this dessert irresistible. As the bar melts in your mouth, you’ll experience a medley of textures—smooth, crunchy, and chewy—that dances on your palate and ignites joy.
No baking is required, making these bars an ideal treat for gatherings, celebrations, or simply satisfying your cravings at home. With just a few simple ingredients, you’ll learn how to create a confection that will leave friends and family speechless. Get ready to follow this engaging guide that takes you step-by-step through making these extraordinary No-Bake Butterfinger Caramel Bars!
—
## What Are No-Bake Butterfinger Caramel Bars?
NO-BAKE BUTTERFINGER CARAMEL BARS bring together flavors and textures that make them a distinctive treat in the world of desserts. Drawing inspiration from the classic Butterfinger candy, these bars capture the essence of the candy with a twist. They combine the crunchy texture of crushed Butterfinger bars with a smooth caramel base, all enveloped in a chocolate topping.
### Culinary Background
The origins of this dessert can be linked to the American penchant for combining flavors like chocolate, peanut butter, and caramel. Butterfinger candy bars have been a beloved sweet snack since their introduction in the 1920s, and the no-bake bar variations have gained traction for their simplicity and deliciousness.
### Cultural Significance
This dessert represents comfort and nostalgia, often evoking memories of childhood treats. Perfect for sharing on special occasions or enjoyed solo during a cozy movie night, they resonate warmth and familiarity.
### Key Flavors
Thanks to the blend of BUTTERFINGER candy, creamy caramel, and rich chocolate, these bars offer a delightful sensory experience. The robust sweetness of the caramel pairs beautifully with the subtle saltiness in the Butterfinger, creating a balanced treat.
### Texture and Sensory Profile
The bars feature layers of crispy crunch from the Butterfinger, a lush chewiness from the caramel, and a velvety finish from the chocolate. When you bring it all together, you have a dessert that delivers in both flavor and texture.
### Why It’s Beloved or Unique
What makes NO-BAKE BUTTERFINGER CARAMEL BARS so special is the no-bake aspect, making them accessible and easy to prepare. The simplicity does not sacrifice flavor, ensuring a palate-pleasing experience every time.
**Bonus Tip:** If you want to enhance flavors further, consider adding a sprinkle of sea salt on top before the chocolate sets!
—
## Why You Will Love This No-Bake Butterfinger Caramel Bar
– **Quick and Easy**: With just a few ingredients, you can whip these up in under 30 minutes.
– **No Baking Required**: Perfect for hot days or those moments when you want a sweet indulgence without heating up the oven.
– **Crowd-Pleaser**: These bars are guaranteed to impress family and friends, making them suitable for gatherings and parties.
– **Customizable**: Feel free to add your favorite sweet toppings or even mix in additional ingredients for a personalized twist.
– **Store-Bought Convenience**: Using store-bought ingredients means less hassle without compromising on taste!
– **Kids Can Help**: This is a fun recipe that kids can assist with, making it a delightful family activity.
– **Transportable**: Once prepared, they’re easy to pack up and take to share with others.
**Extra Idea:** Add a layer of chopped nuts for a delightful crunch and additional flavor!
—
## Ingredients You Will Need
To make these delicious NO-BAKE BUTTERFINGER CARAMEL BARS, gather the following ingredients:
– **1 cup BUTTERFINGER candy, crushed**
– Choose fresh Butterfinger bars for the best flavor and texture.
– **1 cup graham cracker crumbs**
– Look for plain graham crackers to avoid an excess of sweetness.
– **1/2 cup unsalted butter, melted**
– Ensure this is unsalted to keep a balanced flavor profile.
– **1 cup caramel sauce**
– Store-bought caramel sauce works beautifully; look for a high-quality brand for richer taste.
– **1 cup semisweet chocolate chips**
– These provide the perfect rich and sweet complement.
– **1/4 cup heavy cream**
– Room temperature cream helps in giving a smooth chocolate ganache texture.
Here’s a small comparison of ingredient alternatives:
| Ingredient | Original Choice | Alternative |
|————————–|——————————————|——————————|
| BUTTERFINGER candy | Crushed snack-sized bars | Chopped peanut brittle |
| Graham cracker crumbs | Plain graham crackers | Ground oats or almond flour |
| Unsalted butter | Regular unsalted butter | Coconut oil (for a lighter option)|
| Caramel sauce | Store-bought caramel | Homemade caramel |
| Semisweet chocolate chips | Regular chocolate chips | Dark chocolate or white chocolate chips |
| Heavy cream | Regular cream | Milk or coconut cream |
—
## How to Make No-Bake Butterfinger Caramel Bars Step by Step
1. **Prepare Your Pan**:
Start by lining an 8-inch square baking dish with parchment paper, ensuring to leave some overhang on the sides for easy removal later. This will assist in getting a perfect slice of the bars.
*Pro Tip*: Use non-stick spray on the parchment to ensure maximum ease when peeling off the bars later.
2. **Mix Base Ingredients**:
In a large bowl, combine the crushed BUTTERFINGER candy with graham cracker crumbs. Gradually pour in the melted butter while mixing until all dry ingredients are combined and moist.
*Pro Tip*: The mixture should resemble damp sand; it should hold together when squeezed in your hand.
3. **Form the Base Layer**:
Transfer the crumb mixture into the prepared baking dish, pressing it firmly into an even layer using the back of a spatula or your hands. Make sure it is tightly packed to help the bars maintain their shape when set.
*Pro Tip*: If you find it difficult to keep the mixture in place, lightly dampen your hands to make pressing easier.
4. **Layer with Caramel**:
Pour the caramel sauce evenly over the graham cracker and Butterfinger base. Use a spatula to spread it out uniformly across the surface.
*Pro Tip*: You can gently heat the caramel sauce in a microwave for a few seconds to make spreading even easier.
5. **Prepare the Chocolate Topping**:
In a separate microwave-safe bowl, combine the chocolate chips and heavy cream. Microwave in 30-second intervals, stirring in between until smooth and melted.
*Pro Tip*: Be careful not to overheat the chocolate; it can seize up. Stir until completely melted and glossy.
6. **Spread the Chocolate**:
Pour the chocolate mixture over the caramel layer, using a spatula to spread it evenly. Gently tap the dish on the countertop so that the chocolate layer settles and eliminates air bubbles.
*Pro Tip*: If you want, sprinkle extra crushed Butterfinger or a pinch of sea salt on top before the chocolate fully sets for added texture and taste.
7. **Chill the Bars**:
Cover the baking dish with plastic wrap and place it in the refrigerator for at least 2 hours or until the chocolate is completely set and the bars are firm enough to cut.
*Pro Tip*: For faster setting, you can place the dish in the freezer for about 30 minutes, but monitor closely.
8. **Slice and Serve**:
Once set, use the parchment overhang to lift the bars from the dish. Transfer them to a cutting board and slice into uniform squares or rectangles based on your desired serving size.
*Pro Tip*: Warm your knife slightly for cleaner cuts!
**Advanced Technique:** For a touch of elegance, consider drizzling some melted white chocolate over the top once the bars are set and cut!
—
## Chef Tips, Variations, and Substitutions
– **Vegan Variations**: Substitute the chocolate chips for dairy-free chocolate and the butter with coconut oil for an entirely plant-based treat without compromising on taste.
– **Gluten-Free Adaptations**: Use gluten-free graham crackers or blend your favorite gluten-free cereal into crumbs for a delicious gluten-free alternative.
– **Flavor Additions**: Feel free to incorporate a teaspoon of vanilla extract into the base layer or mix in some mini marshmallows for a s’mores twist!
– **Texture Improvements**: For a chewier texture, consider making your own caramel instead of store-bought. This can give depth to the flavor profile.
– **Time-Saving Strategies**: Look for pre-made crumbled graham cracker crusts in the baking aisle for a quick and easy base.
– **Custom Fillings**: Explore unique mix-ins such as miniature pretzels or crushed nuts to varying textures throughout the bars.
**Extra Variation:** For a festive twist, try adding peppermint extract to the chocolate layer during the holiday season.
—
## What to Serve With No-Bake Butterfinger Caramel Bars
– **Coffee or Espresso**: The rich flavors and sweetness of these bars pair beautifully with a good cup of coffee or an espresso, creating a delightful afternoon indulgence.
– **Vanilla Ice Cream**: The creamy texture and coolness of vanilla ice cream complement the bars, balancing the sweetness perfectly.
– **Milkshakes**: A rich milkshake offers a fun and indulgent beverage to accompany these bars, creating a fun dessert duo.
– **Fresh Fruit**: Serve alongside berries or sliced apples for a refreshing contrast to the sweetness of the bars.
**More Inspiration:** Pair with a tray of assorted cookies for a cookie platter at your next gathering!
—
## Storage and Meal Prep Tips
– **Refrigeration Times**: Store bars in an airtight container in the fridge for up to 1 week.
– **Freezing Methods**: Individually wrap bars in plastic wrap and place them in a freezer-safe container for up to 3 months.
– **Reheating Instructions**: If frozen, let the bars thaw in the refrigerator overnight before serving for a softer texture.
– **Best Containers**: Use a glass container to aid in visual appeal. Opt for parchment paper or wax paper between layers for easy separation.
– **Make-Ahead Strategies**: Make these bars up to two days ahead of time to allow for flavors to meld beautifully.
– **How Texture and Flavor Evolve Over Time**: The bars will soften slightly as they sit, leading to a more fudge-like consistency which many find delightful.
**Meal Prep Bonus:** These bars are perfect for making ahead and enjoying throughout the week when a sweet craving hits!
—
## Nutrition Highlights
Here’s a look at the nutritional benefits you can get from the ingredients used in these NO-BAKE BUTTERFINGER CARAMEL BARS:
– **Protein**: The chocolate and Butterfinger contribute a small amount of protein, making it a treat overall, but not a major source of protein.
– **Fiber**: Nutritious ingredients add some dietary fiber, making each bar a little more wholesome.
– **Vitamins**: Contains trace amounts of vitamins from nut and chocolate sources.
– **Minerals**: Provides minerals including calcium (from chocolate) and magnesium (from various nuts).
– **Antioxidants**: Dark chocolate offers antioxidants that are beneficial for health.
This recipe fits well into indulgent dessert cravings, but be sure to enjoy it mindfully as part of a balanced diet. Both Healthline and the USDA indicate the benefits of moderation in sweet treats, especially when made with quality ingredients.
**Nutrition Insight:** Always remain aware of serving sizes to manage intake of sugars and calories effectively.
—
## Frequently Asked Questions
**1. Can I use another type of candy besides Butterfinger?**
Definitely! Many fans of homemade bars enjoy substituting Butterfinger with similar candies like Snickers or Twix. Both add contrasting textures and flavors, while still enhancing that delicious blend of chocolate and caramel.
**2. How can I make these bars more crunchy?**
Adding crispy rice cereal to the base mixture adds an additional crunch! About one to two cups will do the trick, blending well with the other ingredients without overpowering flavors.
**3. What’s the best way to store these bars?**
The best storage method is in an airtight container in the refrigerator. This method keeps them fresh, while also maintaining their delicious texture.
**4. Can I make these bars gluten-free?**
Absolutely! Use gluten-free graham crackers or a combination of gluten-free cereals. Many people have successfully used crushed gluten-free cookies to achieve a similar base.
**5. What if I want to cut these bars into unique shapes?**
That’s a fun idea! Once solidified, you can use cookie cutters to create themed shapes — great for parties or holidays!
—
## Variants Section
Explore these variations for your NO-BAKE BUTTERFINGER CARAMEL BARS:
– **Peanut Butter Adds**: Drizzle melted peanut butter over the chocolate layer for an added richness.
– **Chocolate Variations**: Use dark, milk, or even white chocolate to change the flavor profile entirely.
– **Seasonal Adaptation**: During the holidays, try adding spices like cinnamon or nutmeg for a festive element.
– **Nutty Delight**: Toss in crushed walnuts or pecans to the base layer for added heartiness and flavor.
– **Dairy-Free Option**: Opt for almond milk and dairy-free chocolates to keep your bars vegan-friendly.
– **Decoration Ideas**: Top with edible glitter or colorful sprinkles for a festive touch.
– **Nut Butter Swirl**: Create a marbled effect by swirling almond or cashew butter into the chocolate layer for playful presentations.
—
## Conclusion
These NO-BAKE BUTTERFINGER CARAMEL BARS promise a delightful experience filled with flavor and texture. The ease of preparation, combined with the classic flavors everyone loves, makes this dessert a standout for any occasion. Whether you’re indulging at home or sharing with loved ones, you can feel confident that these bars will be met with rave reviews.
Try this No-Bake Butterfinger Caramel Bars tonight — your kitchen will smell amazing, and everyone will ask for seconds.