Prep time: 20 minutes
Cook time: 10 minutes
Total time: 30 minutes
Servings: 12 sandwich cookies
Valentine’s Day is a time for love, joy, and sweet indulgences, and what better way to celebrate than with some delightful Red Velvet Sandwich Cookies? These treats are not only visually stunning with their deep red hue but also pack a flavor punch that will be a hit among family and friends. Each cookie is soft, chewy, and has a luscious cream cheese filling that balances out the flavors beautifully. Whether you’re making these cookies for a romantic dinner, a gathering with friends, or simply to satisfy your sweet tooth, they are sure to bring smiles and happiness.
In this guide, I’m excited to share how to make Red Velvet Sandwich Cookies from scratch. You will learn about the necessary ingredients, step-by-step instructions, variations to try, and even tips for storage. By the end, you’ll not only be able to whip up these cookies but also impress everyone with your baking prowess!
What Are Red Velvet Sandwich Cookies?
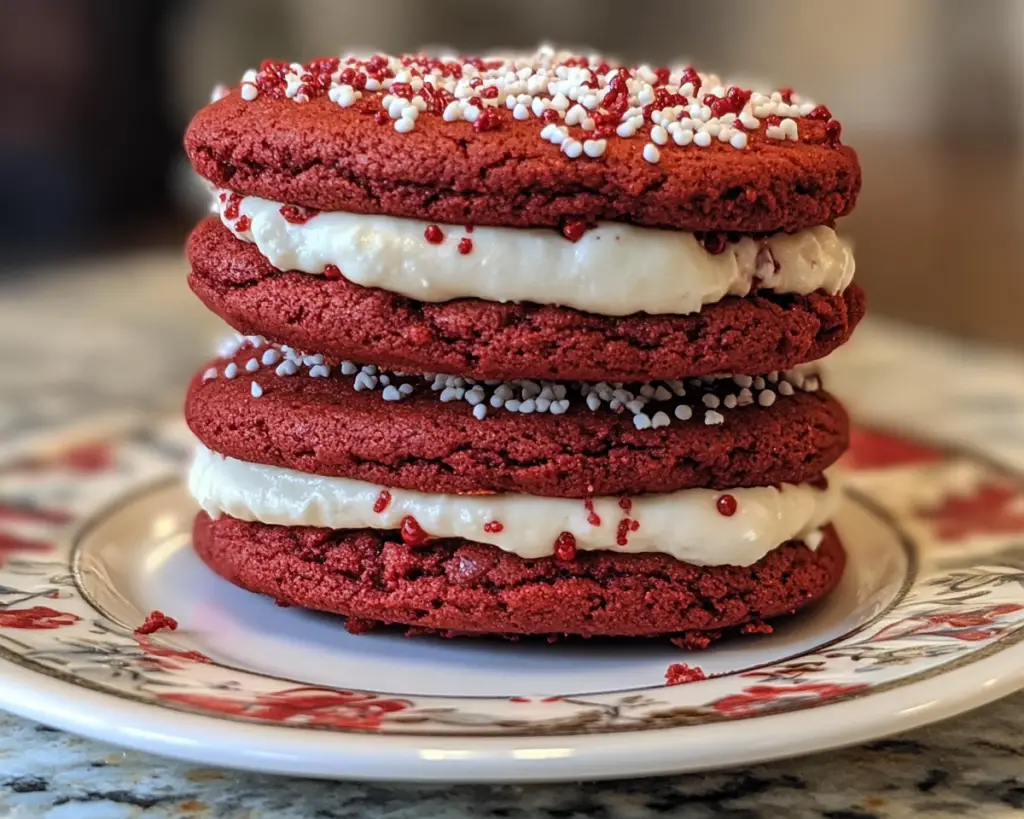
Red Velvet Sandwich Cookies are a creative twist on the classic red velvet cake, typically highlighted during special occasions like Valentine’s Day. The essence of red velvet resides in its unique flavor, often described as a mild chocolate cookie enhanced with a hint of vanilla and a dash of buttermilk. These cookies are characterized by their striking red color, which is a result of cocoa powder combined with the acid from buttermilk, allowing the baked goods to take on a vibrant hue.
The appeal of these cookies goes beyond their aesthetics. They have a soft, almost cake-like texture that makes them irresistible when paired with their creamy filling. Traditionally, cream cheese frosting is used in the filling, giving a rich, tangy taste that perfectly complements the sweetness of the cookies. The combination of flavors and textures makes them not only delicious but also memorable.
These cookies encapsulate the spirit of Valentine’s Day with their romantic appearance and indulgent flavor. Perfect for sharing with loved ones, they serve as a wonderful reminder of the sweetness that love can bring into our lives.
Why You’ll Love This Red Velvet Sandwich Cookies Recipe
There are countless reasons to adore these Red Velvet Sandwich Cookies. First and foremost, they are incredibly easy to make. With just a few key ingredients and straightforward instructions, even novice bakers can feel confident tackling this recipe. The cheerful red color will certainly brighten up your kitchen and add a lovely festive spirit to any gathering.
In terms of flavor, these cookies provide a harmonious blend of sweetness and tanginess thanks to the cream cheese filling. The chewy texture of the cookies contrasts delightfully with the smoothness of the filling, creating a well-rounded dessert that everyone will love. On a practical level, these cookies can be made in advance, making them an ideal choice for busy schedules.
It’s also worth mentioning that you can experiment with these cookies once you master the basic recipe. Adding different flavors to the cream filling or incorporating chocolate chips into the cookie dough are delicious options that can elevate this treat beyond expectations.
Lastly, this recipe can easily cater to various dietary preferences. Whether you want to go gluten-free, vegan, or simply adjust it to suit your personal tastes, there are plenty of enhancements and variations you can explore.
Ingredients You’ll Need
To create the perfect Red Velvet Sandwich Cookies, gather the following ingredients:
- 2 cups all-purpose flour: This is the foundation of your cookie dough. For gluten-free options, you can substitute with a 1:1 gluten-free flour blend.
- 1 tablespoon cocoa powder: This adds a hint of chocolate flavor and contributes to the cookie’s color.
- 1 teaspoon baking soda: Helps the cookies rise and gives them a soft texture.
- 1/2 teaspoon salt: Enhances the flavors in the cookies.
- 3/4 cup granulated sugar: Provides sweetness and helps with the cookie’s texture.
- 1 large egg: Binds the ingredients together and adds moisture.
- 1 tablespoon red food coloring: Crucial for that vibrant red hue!
- 1 teaspoon vanilla extract: Adds great depth of flavor.
- 1/2 cup unsalted butter, softened: Provides richness and tenderness to the cookies.
- 8 oz cream cheese, softened: This is what you’ll use for the filling, giving the cookies a delicious tangy flavor.
- 2 cups powdered sugar: For sweetness and the right consistency in the filling.
Making these cookies is not just about following the recipe; it’s about understanding the role of each ingredient. For example, the egg is essential for binding, while the cream cheese not only serves as the filling but also contributes to the delightful texture. If you prefer a vegan option, you can find vegan cream cheese and substitute the egg with unsweetened applesauce.
How to Make Red Velvet Sandwich Cookies
Follow these steps to create your own batch of delicious Red Velvet Sandwich Cookies:
- Prepare the oven and baking sheets: Start by preheating your oven to 350°F (175°C). Line two baking sheets with parchment paper, ensuring your cookies won’t stick during baking.
- Mix the dry ingredients: In a medium bowl, combine the all-purpose flour, cocoa powder, baking soda, and salt. Whisk them thoroughly together to ensure an even distribution of the leavening agents.
- Cream the butter and sugar: In a large mixing bowl, use a hand mixer or a stand mixer to cream the softened butter and granulated sugar together until it becomes light and fluffy. This step is crucial as it incorporates air into the dough and contributes to the cookies’ texture.
- Add the egg and color: Mix in the egg, red food coloring, and vanilla extract until fully combined. The mixture should take on a vibrant red hue, transforming your batter into a Valentine’s delight!
- Combine wet and dry ingredients: Gradually add the dry ingredients into the creamed mixture. Mix until combined, but be careful not to overmix, which can lead to tough cookies.
- Chill the dough: Once combined, refrigerate the dough for about 15–30 minutes. Chilling the dough helps to firm it up, making it easier to scoop and shape into cookies.
- Scoop and shape: Using a tablespoon or a cookie scoop, portion out the dough onto your prepared baking sheets, leaving about 2 inches of space between each cookie as they will spread slightly while baking.
- Bake: Place the baking sheets in the preheated oven and bake for about 8–10 minutes, or until the edges are set but the centers are still soft. It’s important not to overbake to maintain that soft, chewy texture.
- Cool the cookies: Once baked, remove the cookies from the oven and let them cool on the baking sheets for a few minutes before transferring them to a wire rack to cool completely.
- Make the filling: In a mixing bowl, blend the softened cream cheese with powdered sugar until smooth and creamy. You can add a dash of vanilla extract for extra flavor if desired. This filling should be rich and spreadable but not runny.
- Assemble the cookies: Once the cookies are completely cooled, spread a generous dollop of cream cheese filling onto the bottom of one cookie and sandwich it with another cookie. Press gently to ensure they stick together without spilling out the sides.
- Serve and enjoy: Your Red Velvet Sandwich Cookies are now ready to serve! They can be enjoyed immediately or stored for later.
3 Variations & Substitutions
Chocolate Chip Red Velvet Cookies: If you’re a fan of chocolate, this variation adds a delightful twist. Simply fold in a cup of semi-sweet chocolate chips into the red velvet dough before baking. This change will bring an extra layer of decadence to the cookies, providing a lovely contrast between the creamy filling and the chocolate bits. They will be especially rich and satisfying, making them perfect for those who can’t resist an added chocolate flavor.
Gluten-Free Red Velvet Sandwich Cookies: For those who are gluten intolerant, making these cookies gluten-free is easy! Use a high-quality gluten-free all-purpose flour blend in place of regular flour. Make sure it contains xanthan gum or similar ingredients that provide structure, so your cookies hold up well. The texture may be slightly different, but with the right brand, you’ll hardly notice the difference, and the flavor will remain just as amazing!
Vegan Red Velvet Sandwich Cookies: To make these cookies vegan, you can substitute the egg for 1/4 cup of unsweetened applesauce. Additionally, choose plant-based butter and vegan cream cheese for the filling. The beauty of vegan baking is that you can still achieve a delicious, satisfying cookie without any animal products, and the flavor remains delightful!
Common Mistakes to Avoid
When it comes to making Red Velvet Sandwich Cookies, there are a few common pitfalls to look out for. One mistake is overmixing the dough, which can result in tough cookies rather than soft, chewy ones. When combining the dry and wet ingredients, mix just until you see no more streaks of flour.
Another possible issue could be not chilling the dough long enough. Chilling is essential for achieving the right consistency, as it helps the cookies maintain their shape while baking. If your dough feels too soft or sticky, don’t hesitate to let it chill longer.
Pay attention to the baking time as well; cookies can go from perfectly baked to overdone in a matter of minutes. When they come out of the oven, they should look slightly underbaked in the center, as they will continue to set while cooling.
Finally, be careful with the amount of red food coloring you use. Too much can alter the taste, so stick to the recommended amount unless experimenting for a unique look.
Storage, Freezing & Reheating Tips
Storing your Red Velvet Sandwich Cookies correctly is essential for maintaining their freshness. To keep them at their best, place the assembled cookies in an airtight container in the refrigerator. They can last up to a week when stored this way. If you’d like to freeze the cookies, it’s always best to freeze them without the filling to preserve their texture.
To freeze, place the cooled cookies on a baking sheet and freeze until solid. Once frozen, transfer them to a freezer-safe bag or container. They will keep well for up to 3 months. When you’re ready to enjoy them, thaw the cookies in the refrigerator overnight and prepare the filling fresh to sandwich them together.
For reheating, if you prefer warm cookies, place them in a preheated oven (around 350°F) for 5-7 minutes. This will revive their original gooey texture without compromising their quality.
Frequently Asked Questions
Can I make the cookies ahead of time?
Absolutely! You can bake the cookies a day or two in advance. Just store them in an airtight container. However, it’s best to add the filling right before serving to prevent the cookies from becoming too soft.
Can I use different fillings for the cookies?
Yes, feel free to get creative with the fillings! You can use buttercream, whipped cream, or even jam for a fruity twist. Just ensure whatever filling you choose complements the flavor of the cookies.
What should I do if I lack red food coloring?
If you don’t have red food coloring, you can opt for beet juice as a natural alternative, though the color might be lighter. Alternatively, you can omit the coloring altogether, but the cookies will not have that classic red hue.
How do I know when my cookies are done baking?
The cookies are ready when the edges are set, and the centers still look slightly soft. They will firm up as they cool, so don’t let them go too long in the oven as they can dry out.
What other occasions are these cookies suitable for?
While perfect for Valentine’s Day, these delicious cookies can be enjoyed any time of year, whether for birthdays, anniversaries, potlucks, or just a cozy night in with friends and family!
Conclusion:
Red Velvet Sandwich Cookies are an exceptional treat that embody the spirit of love and celebration. With their beautiful appearance, delicious flavor, and engaging preparation process, they’re perfect for any occasion. Whether you’re sharing them with a loved one, bringing them to a gathering, or simply treating yourself, these cookies are sure to evoke smiles wherever they go. Don’t hesitate to experiment with flavors, variations, and fillings! I encourage you to give this recipe a try, make it your own, and share your creations with those around you.
Happy baking!


