Prep time: 15 minutes
Cook time: 50 minutes
Total time: 1 hour 5 minutes
Servings: 8 slices
Pineapple bread is an enchanting dessert that captures the essence of tropical flavors and comfort. Just the thought of a warm slice of this bread, with its delightful sweetness and moist texture, can evoke cherished memories of sun-kissed beaches and carefree summer days. This recipe stands out for its use of fresh or canned pineapple, transforming an ordinary loaf into a delectable treat that’s perfect for breakfast, brunch, or dessert.
What you are about to learn is not just how to bake pineapple bread, but how to embrace its sweet aroma as it fills your home, creating a cozy ambiance perfect for gatherings or quiet moments. You will find tips for making it, variations to please different palettes, and answers to common questions that arise while baking.
What Is Pineapple Bread?
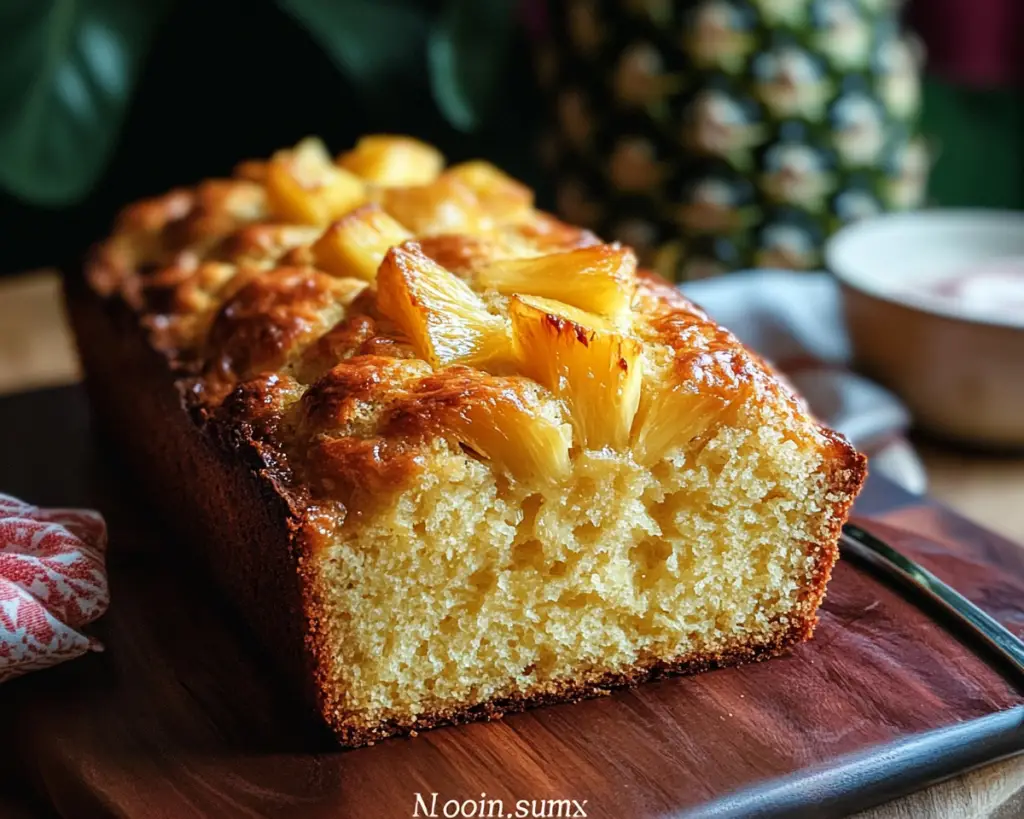
Pineapple bread is a moist, sweet quick bread that incorporates the juicy goodness of pineapple. Originally popular in Hawaiian cuisine, this bread shares characteristics with banana bread, using the natural sugars from the pineapple to enhance flavor and moistness. The texture is tender and slightly dense, making it satisfyingly hearty. Its flavor profile is both tangy and sweet, striking a balance that lifts your spirits with every bite.
The basic ingredients include flour, sugar, eggs, and, of course, pineapple, which lends the bread its unique tropical twist. Whether you choose to use crushed, diced, or even pureed pineapple, each form provides a different texture and intensity of flavor. Many recipes use crushed pineapple for its ability to blend seamlessly into the batter, ensuring that every slice is infused with its lush sweetness.
The versatility of pineapple bread allows it to be enjoyed in various ways. It can be served plain, toasted with butter, or topped with cream cheese for a richer indulgence. The bread can also be incorporated into meals as a side dish, showcasing its adaptability to both sweet and savory pairings.
Why You’ll Love This Pineapple Bread
There are countless reasons to love pineapple bread! First and foremost, it is incredibly easy to prepare. The recipe requires no complicated techniques; even beginners can achieve stellar results. You can quickly combine the ingredients in a single bowl, making clean-up a breeze — perfect for busy parents or anyone looking to minimize kitchen clutter.
From a flavor perspective, the enchanting sweetness of pineapple allows you to indulge your sweet tooth without the guilt that can come from more decadent treat options. The bread is less heavy than many other desserts, making it an excellent choice for breakfast or snacks. You could even enjoy a slice alongside your morning coffee or tea, allowing the flavors to awaken your senses.
There are also many variations to consider, empowering you to tailor the recipe to suit different dietary needs or preferences. Whether you’re following a gluten-free diet or want to make a vegan version, pineapple bread can be adapted accordingly without sacrificing taste or texture.
Ingredients You’ll Need
To create the perfect pineapple bread, gather the following ingredients:
- All-purpose flour: 2 cups – This forms the base of your bread. For a gluten-free option, substitute with a gluten-free flour blend.
- Granulated sugar: 1 cup – Helps to sweeten the bread and contributes to the moist texture.
- Baking soda: 1 teaspoon – Acts as the leavening agent to help the bread rise.
- Salt: 1/2 teaspoon – Enhances flavor and balances the sweetness of the sugar.
- Eggs: 2 large – Provide structure and moisture; swapping with flaxseed meal can create a vegan alternative.
- Crushed pineapple: 1 cup (drained) – This is the star ingredient; its moisture and flavor are key to achieving the right consistency and taste.
- Vegetable oil: 1/2 cup – Offers richness and keeps the bread moist; you could also use melted coconut oil for a tropical twist.
- Vanilla extract: 1 teaspoon – Adds depth of flavor that complements the pineapple.
Each ingredient plays a pivotal role in achieving the best results. For example, consider the importance of draining the crushed pineapple well. Too much liquid can lead to overly moist bread that takes longer to bake.
How to Make Pineapple Bread
Follow these simple step-by-step instructions to whip up a delicious loaf of pineapple bread:
- Preheat your oven to 350°F (175°C). Grease and flour a 9×5-inch loaf pan or line it with parchment paper for easy removal.
- In a large mixing bowl, combine the all-purpose flour, granulated sugar, baking soda, and salt. Mix these dry ingredients together with a whisk until evenly blended.
- In a separate bowl, whisk together the eggs, vegetable oil, and vanilla extract. Add the drained crushed pineapple to this mixture, stirring well to incorporate.
- Pour the wet ingredients into the dry ingredients. Gently fold the mixture together with a spatula until just combined. Be careful not to over-mix, as this can lead to a dense loaf.
- Once your batter is ready, pour it into the prepared loaf pan and spread it out evenly. Tap the bottom of the pan lightly on the countertop to remove any air bubbles.
- Bake in the preheated oven for 45-50 minutes, or until a toothpick inserted into the center comes out clean. The top will also be a beautiful golden brown.
- Once done, remove the pan from the oven and let it cool in the pan for about 10 minutes. After cooling, transfer the bread to a wire rack to cool completely. This will help maintain the bread’s texture.
When done, you’ll be rewarded with a perfectly baked loaf of pineapple bread. The enticing aroma wafting through your kitchen is nothing short of heavenly!
3 Variations & Substitutions
Vegan Pineapple Bread: Substitute the eggs with flaxseed meal by mixing 1 tablespoon of ground flaxseed with 3 tablespoons of water and letting it sit for about 5 minutes until it thickens. Additionally, replace the vegetable oil with unsweetened applesauce to lower the fat content while preserving moisture.
Pineapple Coconut Bread: This tropical blend can be achieved by adding 1 cup of shredded coconut to the batter. Not only does it enhance the sweetness and tropical flair, but it also introduces delightful texture that complements the soft bread perfectly. Make sure to use unsweetened coconut if you want to keep the bread healthy.
Gluten-Free Pineapple Bread: You can easily modify the recipe for a gluten-free diet by swapping the all-purpose flour with a gluten-free flour blend. Ensure all other ingredients are certified gluten-free, especially baking soda, as cross-contamination may occur in some reserves. This variation provides similar sweetness and moisture to the original recipe, allowing everyone to enjoy it.
Common Mistakes to Avoid
Baking pineapple bread is straightforward, but there are pitfalls to avoid for the best results. One common mistake is not draining the crushed pineapple well. The excess liquid can lead to a soggy loaf that doesn’t rise as expected. Always use a fine mesh strainer to remove as much juice as possible before adding the pineapple to the batter.
Another frequent mishap is over-mixing the batter once the wet and dry ingredients are combined. Over-mixing can lead to a dense bread instead of the light and fluffy texture you desire. It’s best to fold the ingredients together gently until just combined.
Finally, remember to check the doneness towards the end of the baking time. Each oven is unique, and factors such as altitude and humidity can affect baking time. Using a toothpick inserted into the center will give you a clear indication—if it comes out clean, the bread is ready!
Storage, Freezing & Reheating Tips
Once you’ve enjoyed your delicious pineapple bread, store any leftovers in an airtight container at room temperature for up to three days. This will help retain its moisture and flavor. For longer storage, slices can be individually wrapped in plastic wrap and placed in a freezer-safe bag or container. Frozen, the pineapple bread will remain fresh for up to three months; simply thaw it in the refrigerator overnight before serving.
To reheat, place slices in a toaster or warm them in the oven set to 350°F (175°C) for about 5–10 minutes. You could also microwave each slice for about 15-20 seconds if you’re in a hurry. This will revive the bread’s moist texture and enhance the tropical aromas.
When thawing from frozen, let it sit at room temperature for a few hours before enjoying, or directly reheat in an oven for a warm, satisfying treat. Storing and reheating properly ensures that every slice is as delightful as the first!
Frequently Asked Questions
Can I use fresh pineapple instead of canned? Yes, you can absolutely use fresh pineapple! Simply chop fresh pineapple into small pieces and drain any excess juice before adding it to your batter. Fresh pineapple contributes an even brighter flavor and aroma to the bread.
Can I make this bread without eggs? Certainly! You can substitute the eggs with flaxseed meal or a commercial egg replacer. For each egg, mix 1 tablespoon of ground flaxseed with 3 tablespoons of water and let it sit until it thickens. This acts as a great binding agent in baking.
Why did my pineapple bread not rise? If your bread did not rise, it is likely due to one of two factors: either your baking soda was expired, or you over-mixed the batter. Be sure to check the freshness of your baking soda before starting, and mix the batter just until combined.
What should I serve with pineapple bread? Pineapple bread pairs beautifully with cream cheese, butter, or even a tropical fruit salad on the side. You could also enjoy it with a cup of coffee or tea for breakfast or as a delightful afternoon snack.
Can I add nuts or dried fruit to the recipe? Absolutely! Walnuts, pecans, or even raisins can be great additions. Just ensure you chop the nuts to a manageable size and fold them into the batter gently. This will enhance the texture and flavor while also adding a nutritional boost.
Conclusion:
Pineapple bread is not merely a recipe; it is an experience that brings joy and warmth into any home. The delightful flavors, ease of preparation, and versatility make this tropical loaf a treasure in the kitchen. Whether you enjoy it plain, with toppings, or experiment with different variations, the potential is endless.
Give this recipe a try – you might just find a new favorite in your baking repertoire! Don’t hesitate to customize it, share with friends and family, or even spread the joy by gifting a loaf. Happy baking!


