Prep time: 15 minutes
Cook time: 45 minutes
Total time: 1 hour
Servings: 4
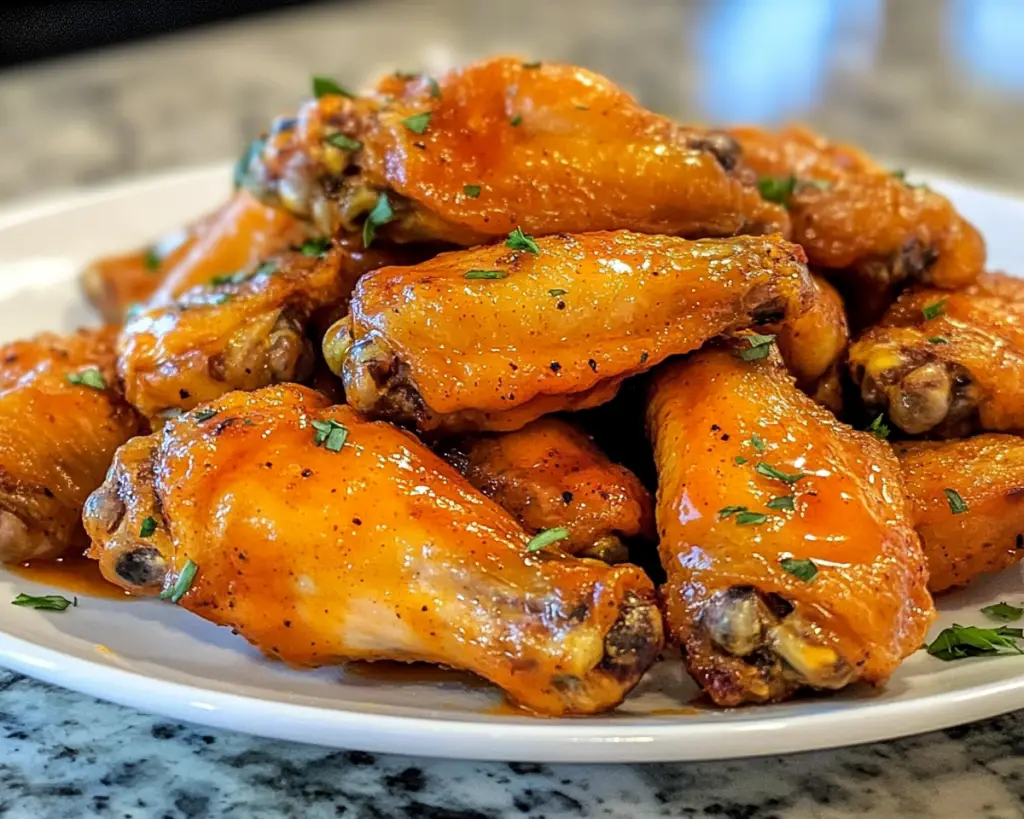
Are you craving that perfect, crispy chicken wing that delivers a delightful kick of flavor without the guilt of deep frying? If so, you’re in for a treat with my Oven-Baked Buffalo Wings Extra Crispy recipe. This dish is a game-changer, perfect for a game day, family gathering, or a cozy dinner night. The beauty of using the oven is that you can achieve a wonderfully crisp exterior while keeping the juicy, tender meat inside. With a few simple ingredients and techniques, you’ll be impressing friends and family in no time.
What sets this recipe apart from traditional fried wings is not only the healthier cooking method but also the incredible flavor combinations you can achieve. You’ll learn how to balance heat, tang, and savoriness, creating wings that will have everyone asking for the recipe. Plus, I’ll share tips to make this dish perfect every time, as well as variations that cater to dietary preferences. Let’s dive into this delicious adventure!
What Is Oven-Baked Buffalo Wings Extra Crispy?
Oven-baked Buffalo wings, particularly those that are extra crispy, are a delightful twist on a classic American appetizer. Originating from Buffalonian cuisine, these wings are marinated and then baked to reach perfection. The crispy exterior is achieved through a careful cooking technique that involves high heat and a specific coating. The flavor profile is a beautiful balance of spicy and tangy, thanks to the use of hot sauce, typically mixed with butter, which gives that signature silky finish.
The texture of these wings is what makes them truly special. Unlike their fried counterparts, these wings are baked, allowing for excess fat to drip away while they cook. When you bite into them, you’ll experience a satisfying crunch contrasted by the tender meat, all coated in that famous zesty sauce. This lighter approach doesn’t sacrifice flavor but elevates the eating experience by allowing you to enjoy them guilt-free. By the end of this recipe, you’ll not only have wings that are crispy but also bursting with flavor.
Why You’ll Love This
There are so many reasons to fall in love with Oven-Baked Buffalo Wings Extra Crispy. First and foremost, they are incredibly tasty. The combination of the spicy Buffalo sauce with the crispy texture creates an irresistible sensation that satisfies cravings without weighing you down. You can enjoy these wings as your main dish or as an appetizer, making them versatile for any occasion.
Another wonderful aspect of this recipe is its ease. Unlike traditional frying methods that require precision and attention to avoid oil splatter, baking is straightforward and mess-free. You can whip up a batch quickly, ensuring that you’ll spend less time in the kitchen and more time enjoying your meal. Moreover, they are budget-friendly. Chicken wings are often one of the most economical cuts of meat, allowing you to serve a crowd without breaking the bank.
Finally, this recipe dispels the misconception that healthy wings can’t be just as delicious as fried ones. Many worry about texture or flavor loss when opting for a healthier approach, but with the right technique, you can achieve an equally satisfying result. You’ll surprise your family and friends with how deliciously crispy and flavorful these wings are.
Ingredients You’ll Need
- Chicken wings: The star of the dish. Opt for fresh wings if possible. You can also use frozen wings, just ensure they are completely thawed before cooking.
- Hot sauce: A key ingredient that offers heat and flavor. Frank’s RedHot is a classic choice for authentic Buffalo flavor, but feel free to experiment with your favorite brand.
- Butter: Adds richness and helps meld the hot sauce into a luscious coating. Consider using unsalted butter for better control of seasoning.
- Salt and pepper: Essential for seasoning. Be generous, as chicken wings can absorb a lot of flavor.
- Garlic powder: Imparts a savory depth. If you love garlic, feel free to up the amount for a more robust flavor.
- Onion powder: Complements the garlic and adds another layer of flavor.
- Cooking spray: To keep the wings from sticking and to enhance crispiness.
Each ingredient plays a vital role in building the overall flavor and texture of your wings. If you’re looking for substitutions, boneless chicken or turkey wings can work as well, though they’ll have a different texture. For a lower-calorie or vegan option, you can use cauliflower florets tossed in the same seasoning mix and baked in the oven.
How to Make
1. **Preheat your oven:** Begin by preheating your oven to 425°F (220°C). This high temperature is crucial for achieving that desired crispy texture. A hot oven assists in rapidly cooking the wings, helping render out the fat.
2. **Prepare the chicken wings:** While the oven heats, rinse the chicken wings under cold water and pat them dry with paper towels. It’s important to dry the skin thoroughly; any moisture can prevent that lovely crispiness from forming.
3. **Season the wings:** In a large bowl, mix the wings with salt, pepper, garlic powder, and onion powder. Make sure each wing is well-coated to ensure even flavor distribution. If you’re feeling adventurous, consider adding some cayenne pepper for an extra kick!
4. **Line your baking sheet:** Line a baking sheet with aluminum foil for easy cleanup, and place a wire rack on top. The wire rack allows air to circulate around the wings, enhancing crispiness. Spray the rack with cooking spray to prevent sticking.
5. **Arrange the wings:** Place the seasoned wings in a single layer on the prepared rack. Ensuring they are not overcrowded will promote even cooking and crisping.
6. **Bake the wings:** Transfer the baking sheet to your preheated oven and bake for 35-40 minutes. About halfway through, flip the wings to ensure they brown evenly. You want them golden brown and crispy!
7. **Prepare the sauce:** While the wings are baking, melt the butter in a saucepan over medium heat. Once melted, add your favorite hot sauce, stirring well to combine. Allow the sauce to simmer for a minute to meld the flavors, then remove it from heat.
8. **Coat the wings:** After the wings are thoroughly cooked and crispy, remove them from the oven and place them in a large mixing bowl. Pour the hot sauce mixture over the wings, tossing them to coat thoroughly.
9. **Serve immediately:** Serve your oven-baked Buffalo wings hot, garnished with celery sticks and a side of ranch or blue cheese dressing for dipping. Trust me, this combo takes them to the next level!
Starting from the prep to the final cooking steps, each moment is filled with tantalizing aromas and anticipation. You’ll be able to savor that first bite of crispy goodness, followed by a burst of hot sauce that dances on your taste buds—pure bliss!
Variations & Substitutions
Buffalo Garlic Parmesan Wings. For those who love a twist on traditional flavors, you can make a Buffalo Garlic Parmesan version of your wings. Instead of using straight hot sauce for coating, mix melted butter with a generous amount of garlic, grated Parmesan cheese, and a hint of lemon juice. The outcome will be a garlicky, cheesy delight that still carries spice from the Buffalo sauce, offering a wonderful alternative for cheese lovers.
Baked Honey BBQ Wings. If you’re in the mood for something sweeter, consider a honey BBQ version. Instead of hot sauce, utilize a homemade or store-bought BBQ sauce mixed with honey. The honey will caramelize beautifully while baking, leading to a sticky and flavorful coating. To make it even more special, add a dash of smoked paprika for an extra layer of depth and smokiness.
Indoor Grilled Flavored Wings. For a smoky flair, marinate your wings in a mixture of soy sauce, garlic powder, and a hint of liquid smoke before baking. This will give the wings a grilled flavor without needing an actual grill. The marinade also ensures that the wings are juicy and flavorful—perfect for grilling aficionados who are stuck indoors.
Spicy Asian Wings. For those who enjoy a bit of zing, toss your baked wings in a mixture of soy sauce, sriracha, and sesame oil. After mixing, sprinkle sesame seeds and sliced green onions on top before serving. Not only will they have a fantastic kick, but the Asian-inspired sauce adds a lovely twist to your usual Buffalo flavors.
These variations can be tailored to fit anyone’s taste preferences, providing delicious alternatives without losing the magic of the original recipe.
Common Mistakes to Avoid
One of the most common mistakes when making oven-baked Buffalo wings is not drying the chicken properly before seasoning. If your wings are wet, they will steam instead of bake, resulting in a soggy texture—not what you want. Always ensure your wings are well-patted dry.
Another critical tip is to overcrowd the baking sheet. This can trap moisture and prevent your wings from getting that coveted crisp texture. Always arrange the wings in a single layer and keep them spaced apart.
Also, be mindful of the baking time. If you take the wings out too early, they won’t be cooked through. Always check for doneness by ensuring the internal temperature reaches 165°F (74°C). On the flip side, overcooking can dry them out—find that perfect balance!
Lastly, if you are preparing a sauce with butter, make sure to mix it into your hot sauce when it’s warm, not cold. Cold butter can clump up and won’t distribute evenly, impacting the flavor and consistency of your sauce.
Storage, Freezing & Reheating Tips
When it comes to storage, allow your leftover wings to cool completely before placing them in an airtight container. They can be stored in the refrigerator for up to 3 days. To maintain the crispiness, consider reheating them in the oven at 375°F (190°C) for about 10-15 minutes, allowing them to regain their crunch.
For long-term storage, you can freeze the wings. Place cooked and cooled wings in a freezer-safe bag, and they can be frozen for up to 3 months. To reheat, simply bake them from frozen at a lower temp, around 350°F (175°C), for about 20-25 minutes, flipping halfway through.
It’s essential to practice good food safety measures by ensuring that any raw chicken wings are handled properly, cooked to the correct temperature, and stored right away to prevent bacterial growth.
Frequently Asked Questions
Can I use frozen chicken wings for this recipe?
Yes, you can use frozen chicken wings! Just make sure to fully thaw them before cooking. This ensures even cooking and helps achieve that wonderful crispy texture you seek.
What can I do if I don’t have a wire rack?
If you don’t have a wire rack, you can place the wings directly on the baking sheet; just be sure to line it with aluminum foil for easy cleanup. Check them midway through cooking, and you might want to flip them to ensure even crispness.
How can I make these wings less spicy?
To tone down the heat, use a milder hot sauce or combine the hot sauce with ranch dressing to shield some of the spice. You can also decrease the amount of hot sauce you use when mixing with melted butter in the final step.
What dipping sauces pair best with Buffalo wings?
Classic pairings include ranch dressing and blue cheese dressing. Each provides a rich, creamy contrast to the spiciness of the Buffalo sauce. For a fun twist, you can also serve them with honey mustard or an Asian-style dipping sauce made from soy and garlic.
Can I bake these wings ahead of time?
While you can cook the wings a day in advance, their crispiness will lessen with time. If you plan ahead, consider baking them a few hours before your event and then reheating them just before serving to restore some of their crunchiness.
Conclusion:
In conclusion, this Oven-Baked Buffalo Wings Extra Crispy recipe is a home cook’s delight, combining convenience, flavor, and health. You’ll fall in love with the crispy texture and robust flavors, making it a favorite for any gathering. Feel free to share your customized versions with family and friends or simply enjoy them as is. Get into that kitchen and create a batch—trust me, you won’t regret it!