Prep time: 20 minutes
Cook time: 1 hour
Total time: 1 hour 20 minutes
Servings: 8 servings
There’s something undeniably indulgent about a creamy cheesecake that can make any occasion feel special. The aroma of a cheesecake baking in the oven has a way of wrapping you in warmth, evoking memories of family gatherings and celebratory desserts. Among all desserts, the creamy burnt cheesecake stands out with its rich, caramelized flavor and velvety texture, inviting you to take just one more slice. This recipe for creamy burnt cheesecake is not just about satisfying a sweet tooth; it embodies simplicity and elegance, making it the perfect treat for busy parents, novice bakers, or anyone looking to impress with minimal fuss.
In this article, we will guide you through the steps to create this heavenly dessert, discuss the necessary ingredients, and provide helpful tips and variations for making it your own. Whether you’re hosting a dinner party or simply craving something sweet to enjoy with your afternoon coffee, this cheesecake will not disappoint.
What Is Creamy Burnt Cheesecake Recipe – Best Easy Dessert for Sweet Treats?
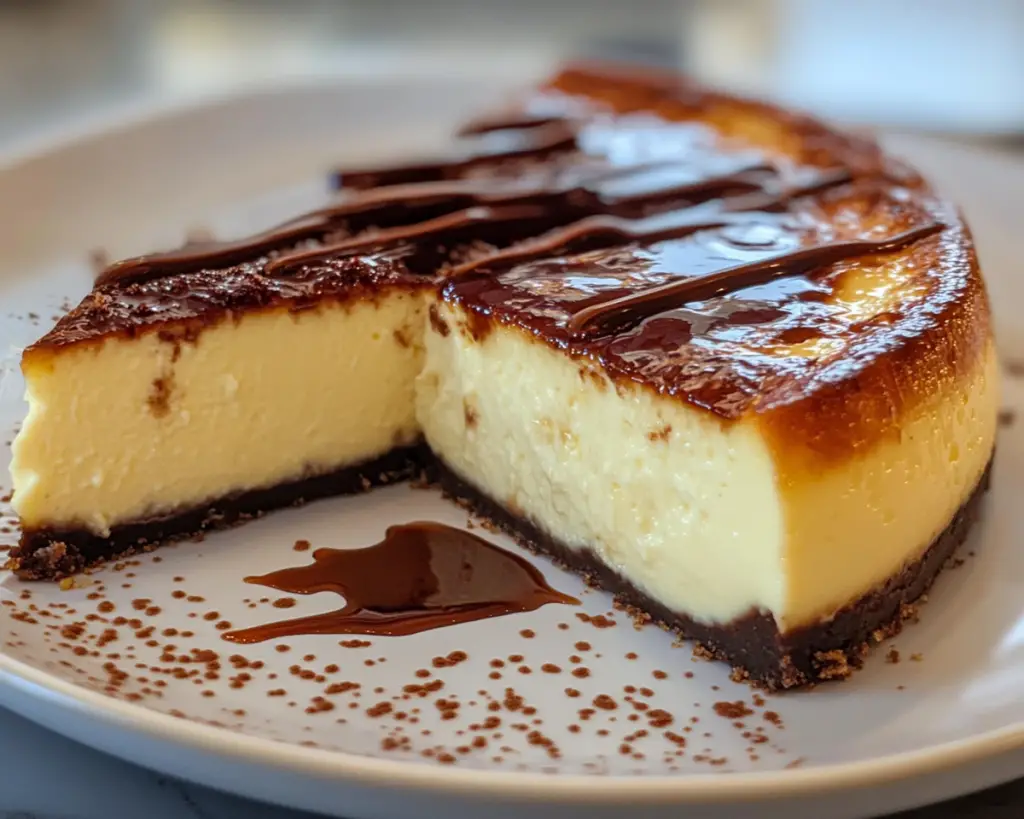
The creamy burnt cheesecake finds its roots in Spanish culinary tradition, often referred to as “tarta de queso.” This culinary gem is characterized by its unique preparation method, where the cheesecake is baked at a high temperature to achieve a slightly charred top. The combination of temperatures creates a delightful contrast between the deep caramelized exterior and the soft, luscious interior.
The beauty of this cheesecake lies in its luscious filling, made from simple ingredients like cream cheese, sugar, and heavy cream. This rich filling is what makes the dessert feel so decadent and satisfying. When baked, the outer layer develops a burnt exterior that adds a complex flavor, giving it an almost smoky touch. The cheesecake balances the sweetness with a slight bitterness, creating a perfect harmony of taste and texture in every bite. This makes the creamy burnt cheesecake not just a dessert; it’s a glorious experience.
The flavor profile is further enhanced by the sweetness of the sugar, which caramelizes during baking, providing a crunchy texture that contrasts beautifully with the smooth filling. This cake is not merely a sweet treat; it brings a touch of sophistication to your dessert table, making it a favorite among both casual diners and dessert aficionados.
Why You’ll Love This
There are numerous reasons to fall in love with this creamy burnt cheesecake. First, the taste is simply unparalleled—rich, creamy, and just the right amount of sweetness. It pairs exceptionally well with fresh berries or a drizzle of chocolate sauce for those seeking that added flair. But what really sets this cheesecake apart is its ease of preparation. Unlike traditional cheesecakes that require meticulous attention to detail, this recipe allows you to enjoy baking without the fuss.
Another reason you’ll love this recipe is its cost-effectiveness. Using basic ingredients that you may already have in your pantry, you can create a stunning dessert without breaking the bank. It’s a budget-friendly way to impress guests or treat your family. Furthermore, the cheesecake is incredibly versatile. You can easily tweak the recipe to incorporate flavors that suit your special preferences or dietary needs.
Common misconceptions about cheesecakes often revolve around their complexity and cooking techniques, but this creamy burnt cheesecake busts those myths. The beautiful charred top calls for a casual baking style—no need to worry about cracks or imperfections. The finished product is effortlessly beautiful, even if it isn’t perfect. This is the kind of dessert that invites experimentation, making it the ideal choice for both seasoned bakers and those just starting out.
Ingredients You’ll Need
- Cream Cheese: 24 ounces, softened. This is the base of your cheesecake, providing a rich and creamy texture. You can substitute with Neufchâtel cheese for a lighter version.
- Sugar: 1 cup. This sweetens the cheesecake while helping to form its unique burnt exterior. Brown sugar can add a deeper flavor.
- Heavy Cream: 1 cup. The heavy cream adds richness and creaminess. If you want a lighter option, you can use half-and-half.
- Eggs: 3 large. Eggs help to set the cheesecake. For a vegan option, consider using silken tofu blended until smooth in place of eggs.
- Vanilla Extract: 1 teaspoon. Adds essential flavor. For a different taste, opt for almond extract.
- Salt: A pinch. A small amount of salt enhances the flavors of the other ingredients.
These ingredients combine to create a delightful balance of flavors and textures. You can play around with different options and find what works best for you!
How to Make
To bring this creamy burnt cheesecake to life, follow these step-by-step instructions that will guide you through the process.
- Preheat the Oven: Start by preheating your oven to 400°F (200°C). This high temperature is crucial for creating the burnt top layer that gives the cheesecake its unique flavor.
- Prepare the Pan: Line an 8-inch springform pan with parchment paper, allowing the paper to hang over the edges. This will make it easier to remove the cheesecake when it’s baked and cooled.
- Blend the Cream Cheese: In a large mixing bowl, use an electric mixer to beat the softened cream cheese until it’s smooth and creamy. This process should take about 2-3 minutes. Make sure there are no lumps to achieve that perfect velvety texture in your cheesecake.
- Add Sugar: Gradually add in the sugar while continuing to mix on medium speed. Beat until well combined—about another 2 minutes. The mixture should be light and fluffy.
- Incorporate Eggs: Add the eggs one at a time, mixing thoroughly after each addition. Ensure everything is well combined before moving on. This step is essential for achieving a rich, thick filling.
- Add Cream and Flavoring: Next, pour in the heavy cream and vanilla extract. Hold onto that mixer and blend on low until just incorporated, taking care not to overmix. You want a smooth batter without air bubbles.
- Pour into Pan: Pour the batter into your prepared springform pan, smoothing the top with a spatula. This will help you achieve a flat surface that cooks evenly.
- Bake: Place the pan in the preheated oven and bake for 55-60 minutes, or until the top is dark brown and the edges are set but the center remains slightly jiggly. This is the perfect time to enjoy the delectable aroma wafting through your kitchen!
- Cool: Once baked, turn off the oven and crack the oven door. Let the cheesecake cool in the oven for about an hour. This gentle cooling helps to prevent cracking.
- Chill: After cooling, transfer the cheesecake to the refrigerator and chill for at least 3 hours, preferably overnight. This allows the flavors to meld beautifully and improves the texture.
- Serve: Finally, carefully remove the cheesecake from the springform pan and slice it into generous pieces. Serve with fresh berries, a drizzle of chocolate, or enjoy it plain!
These steps, while simple, yield a decadent cake that will leave your friends and family raving. Remember to take your time, especially during the mixing process, as achieving that smooth and creamy consistency is crucial.
Variations & Substitutions
Citrus Burst Variation: For those who love a hint of freshness, add the zest of one lemon or orange to the batter. This lends a delightful tang that beautifully contrasts with the creamy texture. It’s perfect for summer gatherings or when you want a light and refreshing dessert.
Chocolate Lover’s Variation: If you’re a chocolate enthusiast, try folding in 1 cup of melted dark chocolate into the cheesecake batter. This version brings a rich and indulgent chocolate flavor that pairs incredibly well with the burnt exterior, creating a dessert that is both versatile and decadent.
Vegan Version: Substitute cream cheese with a combination of blended silken tofu and cashew cream to create a dairy-free alternative. Use aquafaba, the liquid from canned chickpeas, in place of eggs to help the cheesecake set. This variation makes it inclusive for those following a vegan lifestyle while still enjoying a slice of creamy burnt cheesecake.
Gluten-Free Version: If you are looking to make this dessert gluten-free, be sure to use gluten-free baking parchment to line your springform pan. This small adaptation makes it suitable for gluten-sensitive guests without compromising the rich flavors of the cheesecake.
Common Mistakes to Avoid
One common mistake that happens during cheesecake preparation is overmixing the batter. Overmixing can introduce too much air, which can lead to cracks in the cheesecake as it cools. To keep your cheesecake smooth, mix just until ingredients are combined. Another pitfall is baking the cheesecake at too low a temperature. The high heat is crucial for achieving that caramelized top; do not be afraid of a little browning.
Additionally, forgetting to let the cheesecake cool in the oven before transferring it to the fridge can result in cracks. As tempting as it is to dive in right away, patience will yield a much better result. Finally, avoid cutting the cheesecake too soon after chilling; it’s best to let it set for a few hours or overnight to reach that perfect creamy consistency.
Storage, Freezing & Reheating Tips
To store your creamy burnt cheesecake, cover it tightly with plastic wrap or aluminum foil and keep it in the refrigerator. It’s best enjoyed within 3-4 days for maximum freshness, though it may last longer. If you need to keep it longer, consider freezing the cheesecake. You can freeze slices wrapped individually in plastic wrap and placed in an airtight container. This method keeps the cheesecake fresh for up to three months.
When you’re ready to enjoy it again, simply remove it from the freezer and let it thaw in the refrigerator for several hours or overnight. Reheating is not necessary, but if you prefer it warm, gently warm in an oven at a low temperature. Always ensure you don’t overheat, as this could affect the texture of the creaminess.
Food safety is paramount, so always remember to observe the general guidelines when storing and reheating. Always ensure your cheesecake is kept at safe temperatures and never left out at room temperature for too long.
Frequently Asked Questions
Can I use low-fat cream cheese? Yes, you can use low-fat cream cheese, but this may affect the texture and richness of the cheesecake. You may need to increase the sugar slightly to balance the reduced creaminess.
What can I serve with creamy burnt cheesecake? A variety of toppings can enhance the flavors of your cheesecake, including fresh fruit, a drizzle of chocolate sauce, or even a sprinkle of nuts. These add delightful textures and tastes to each slice.
How do I know when my cheesecake is done baking? The cheesecake is done when the edges are set, but the center is still slightly jiggly. It will continue to firm up as it cools, so don’t worry if it looks a bit wobbly when it comes out of the oven.
Can I make this cheesecake a day ahead of time? Absolutely! In fact, making the cheesecake a day ahead allows the flavors to deepen as it chills in the refrigerator. It’ll be ready and waiting for you on your special day!
Why is my cheesecake cracking? Cracking can happen if the batter was overmixed, if the oven temperature was too high, or if you didn’t cool it slowly. To avoid cracks, mix gently, bake at the correct temperature, and let it cool gradually in the oven after baking.
Conclusion:
This creamy burnt cheesecake is not just a recipe; it’s a celebration of flavors and textures that everyone can relish. It stands as a testament to how delicious simplicity can be, and it invites you to customize, create, and savor. I encourage you to try this delightful dessert and experience its charm firsthand. Whether in a busy household or during a special occasion, every bite is sure to delight. Share your experience or variations in the comments; I’d love to hear how you made it uniquely yours!


