Prep time: 30 minutes
Cook time: 30 minutes
Total time: 1 hour
Servings: 12 slices
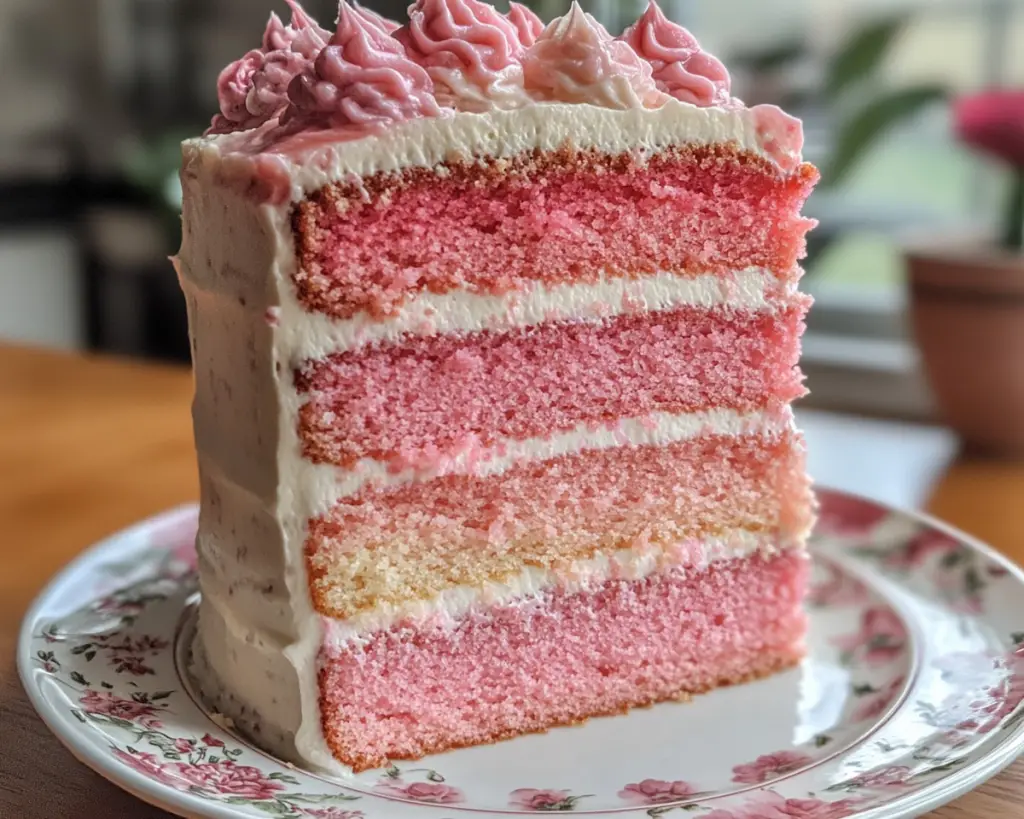
There’s something truly enchanting about a beautifully crafted layer cake, especially one as visually captivating as a Pink Ombre Layer Cake. This cake not only serves as a stunning centerpiece for any occasion, but it also hints at a delightful flavor awaiting those who are lucky enough to enjoy it. With Valentine’s Day around the corner, the Pink Ombre Layer Cake emerges as an ideal treat to celebrate love, friendship, or simply the joy of indulging your sweet tooth.
This recipe is special for its ability to combine style with taste effortlessly. Each layer of cake transitions from a deep pink to a lovely pastel hue, inviting you to take that first slice. As you cut into it, the vibrant layers become visible, delighting your eyes even before you take that first bite. You’ll learn not only how to achieve the ombre effect but also how to create a soft and fluffy cake that melts in your mouth.
Get ready for a sweet journey filled with flavor tips, variations to tailor it to your taste, and expert advice on achieving that perfect ombre look!
What Is Pink Ombre Layer Cake Recipe Easy Valentine’s Day Showstopper?
The Pink Ombre Layer Cake is a visually stunning dessert that has quickly gained popularity among bakers and dessert lovers alike. Originating as part of the modern cake trend, this delightful treat embodies the essence of celebration with its lovely gradient design. This cake consists of multiple layers, with each layer featuring a slightly different shade of pink, creating a beautiful ombre effect that can easily capture anyone’s attention at a gathering.
The texture of this cake is soft and airy, thanks to the combination of high-quality ingredients and proper baking techniques. You’ll find that it closely resembles a traditional vanilla or sponge cake in flavor, yet its visual presentation gives it a luxurious twist. The use of fruit flavors or flavored frostings enhances the overall taste, making each bite a luscious experience. As you savor the cake, its subtle sweetness harmonizes beautifully with the velvety buttercream that can be customized to match your flavor preferences, enhancing its overall appeal.
In essence, the Pink Ombre Layer Cake is both a feast for the eyes and the palate, perfect for special occasions such as Valentine’s Day, birthday celebrations, or any other festive moment worth commemorating.
Why You’ll Love This
One of the standout features of the Pink Ombre Layer Cake is its delightful and eye-catching presentation, making it an instant hit at any gathering. Not only is it pleasing to the eyes, but it also satisfies the taste buds with its rich flavors and soft texture. The versatility of this cake allows you to customize the color and flavor to match the occasion or personal preferences, whether that be for a romantic dinner or a fun children’s party.
Additionally, this recipe is easier to prepare than it may initially seem. With simple ingredients and straightforward steps, even novice bakers can create an impressive cake without feeling like they’re in over their heads. Unlike more intricate pastries that often require specialized skills, the Pink Ombre Layer Cake allows you to focus on enjoyment rather than stress.
Furthermore, you can manage costs effectively as the fundamental ingredients are often household staples. Opting for homemade buttercream frosting instead of store-bought options can also save you money while allowing you to control the quality and sweetness level. This makes it an appealing choice for budget-conscious families who still want to indulge in something special without breaking the bank.
Ingredients You’ll Need
- All-purpose flour: This is the backbone of your cake. It provides structure and ensures your cake rises beautifully. If you’re looking for a gluten-free option, consider using a gluten-free flour blend.
- Sugar: Granulated sugar sweetens the cake and contributes to its moistness. You can also experiment with alternatives like coconut sugar for a different flavor profile.
- Unsalted butter: This adds richness and flavor. Always make sure it’s softened before mixing for the best results.
- Baking powder: A crucial leavening agent that helps your cake rise, giving it that fluffy texture. Verify the expiration date for optimal performance.
- Salt: Just a pinch helps enhance the flavors in your cake. Don’t skip this step!
- Milk: This adds moisture to the batter. You can use almond or oat milk for a dairy-free alternative.
- Eggs: These are essential for binding the ingredients together and also contribute to the cake’s texture. For a vegan option, consider flaxseed eggs.
- Vanilla extract: The star flavor that elevates your cake. Choose pure vanilla extract for the best taste. Alternatively, you can use almond extract for a nutty essence.
- Food coloring: Gel or liquid food coloring in shades of pink to achieve that beautiful ombre effect.
- Buttercream frosting: To smear between the layers and cover the entire cake. You can customize it further with flavors like strawberry or raspberry.
Each ingredient plays a pivotal role in creating the Pink Ombre Layer Cake. Ensuring you have high-quality ingredients will yield the best results; therefore, always try to use the freshest products available.
How to Make
- Preheat your oven: Start by preheating your oven to 350°F (175°C). This is an essential step to ensure that your cakes rise evenly. Prepare three 8-inch round cake pans by greasing and flouring them to prevent sticking.
- Mix dry ingredients: In a large bowl, whisk together the all-purpose flour, granulated sugar, baking powder, and salt. This step is crucial for ensuring that the baking powder is evenly distributed throughout the flour mixture, leading to a consistent cake.
- Combine wet ingredients: In another bowl, cream the softened unsalted butter until smooth. Gradually add the sugar, beating until light and fluffy. Next, add the eggs one at a time, allowing each egg to be fully incorporated before adding the next.
- Add milk and vanilla: Gradually mix in the milk and vanilla extract into the butter mixture, blending well. Your mixture should be creamy and well-combined at this stage.
- Combine mixtures: Gently add the dry ingredients to the wet mixture in three parts. Stir just until you no longer see any flour; overmixing can lead to a dense texture.
- Divide and color the batter: Divide the batter into three equal portions in separate bowls. Add varying amounts of pink food coloring to each portion: the lightest shade will be your bottom layer, with darker shades for the middle and top layers. Mix until you’ve achieved the desired colors.
- Bake the cakes: Pour each color-coded batter into its respective cake pan. Bake for about 30 minutes, or until a toothpick inserted in the center comes out clean. Keep an eye on the cakes; overbaking can lead to dryness.
- Cool and level: Once baked, allow the cakes to cool in the pans for about 10 minutes. Then, transfer them to racks to cool completely. Level the tops if necessary using a serrated knife so that your layers stack neatly.
- Prepare the buttercream frosting: In a large bowl, beat softened butter until creamy. Gradually add powdered sugar, milk, and vanilla extract, mixing until you achieve a fluffy consistency. For the best flavor, taste as you go and adjust based on your preference.
- Assemble the cake: Place the darkest pink layer on your serving plate. Spread a layer of buttercream on top before adding the medium pink layer, repeating the process with the lightest layer on top. Once stacked, use the remaining frosting to cover the entire cake smoothly. You can create a textured finish or leave it smooth based on your preference.
- Chill before serving: Refrigerate the finished cake for at least 30 minutes to set the frosting. This helps to maintain the layers and makes slicing easier. Before serving, let it sit at room temperature for a few minutes for the best flavor and texture.
Follow these steps, and you’ll create a beautiful Pink Ombre Layer Cake that’s as delightful to eat as it is to look at! Don’t forget to enjoy the aroma of freshly baked cake filling your kitchen; it’s a truly rewarding experience.
Variations & Substitutions
Fruit-Flavored Ombre Layer Cake: If you’re looking for a fruity twist to your cake, consider incorporating fruit purees such as strawberry, raspberry, or even peach into the batter. This not only enhances the flavor but also adds a natural color, giving the cake an even richer appearance. Use fresh or frozen fruit and blend them into a puree before mixing into the batter. This variation is ideal for summer celebrations or when you want a fresh taste. Be mindful to adjust the sugar levels since fruits can naturally sweeten the cake.
Gluten-Free Pink Ombre Layer Cake: For those with dietary restrictions, making this cake gluten-free can be just as delicious. Simply substitute the all-purpose flour with a 1:1 gluten-free flour blend, ensuring that it contains xanthan gum to maintain structure. You can also experiment with almond flour for a slightly nuttier flavor. This variation allows everyone, including gluten-sensitive friends and family, to enjoy a slice of this visually stunning cake during celebrations.
Vegan Pink Ombre Layer Cake: Making a vegan version of this cake is not only simple, but it can also be equally delightful. Replace the eggs with flaxseed meal or chia seeds (1 tablespoon mixed with 2.5 tablespoons of water per egg) and use plant-based milk and butter, ensuring that the food coloring is also vegan-friendly. The texture may differ slightly, but the flavor will impress your guests just the same, providing inclusivity during celebrations.
Common Mistakes to Avoid
One common mistake when making the Pink Ombre Layer Cake is overmixing the batter, which can lead to a dense and heavy cake. To prevent this, mix your wet and dry ingredients just until they are combined, as overmixing introduces too much air and can affect the texture adversely.
Another issue is baking the layers for too long, resulting in dry cakes. To avoid this, always keep an eye on the baking time and perform the toothpick test in the center. Remove the cakes as soon as the toothpick comes out clean to lock in moisture.
Finally, when it comes to frosting, some may rush through the process of decorating. Remember to allow the cakes to cool completely before frosting; otherwise, the buttercream will melt into the cake layers. For a flawless finish, use a bench scraper for smoothing the sides of the cake, giving it that bakery-style look.
Storage, Freezing & Reheating Tips
Proper storage of your Pink Ombre Layer Cake is crucial for maintaining its texture and flavor. If you have leftovers (though they might disappear quickly!), cover the cake with a cake dome or wrap it tightly in plastic wrap and store it in the refrigerator. This will keep it fresh for about 3–5 days.
If you want to make it ahead of time, consider freezing the un-frosted cake layers. Wrap each layer tightly in plastic wrap and store in an airtight container or freezer bag. They can last up to three months when properly stored. When you’re ready to serve, simply thaw at room temperature and frost as directed.
Reheating is generally not necessary, as cakes are typically best served at room temperature, maintaining their moisture and texture. However, if you prefer a warm slice, you can gently microwave individual pieces for about 10–15 seconds.
Frequently Asked Questions
Can I use a different flavor for the frosting?
Absolutely! While the traditional buttercream frosting works wonderfully, you can easily customize it. Consider flavors like cream cheese frosting or whipped cream for a lighter touch. Adding extracts like almond or peppermint can also give your frosting a delightful twist. Don’t hesitate to mix in fruit purees for an added burst of flavor that complements your ombre colors.
How do I achieve a perfect ombre effect?
To create an ideal ombre effect, focus on using gel food coloring, as it provides more vibrant colors without altering the cake’s consistency. Start with white batter and gradually add more color to each layer, making sure to blend it thoroughly. The key is to ensure a smooth transition from dark to light shades; layering from dark to light helps the visual impact immensely when friends or family admire your work.
Can I make this cake without food coloring?
Yes, you can create a natural ombre effect without artificial food coloring. Use pureed fruits like raspberries and strawberries to achieve pink hues while adding natural flavor. Using natural colors may result in lighter shades, but they’ll provide a subtle, fruity flavor that enhances the cake’s overall deliciousness.
Is it possible to make this cake gluten-free?
Definitely! Just substitute the all-purpose flour with a gluten-free flour blend that contains xanthan gum. This will maintain the structure of the cake while allowing those with gluten sensitivities to enjoy this delicious treat without compromise.
Can I stack the layers ahead of time?
It’s best to stack the layers the day you plan to serve the cake, as this helps maintain freshness and stability. However, if you need to prepare in advance, simply frost between layers and refrigerate. Just ensure that each layer is completely cooled to prevent the buttercream from melting or collapsing. When you’re ready to serve, allow it to sit at room temperature for the best slice possible.
Conclusion:
The Pink Ombre Layer Cake is not just about its stunning appearance; it’s a delightful symphony of flavor and texture that can elevate any celebration. By following the steps provided and utilizing a few key tips, you will have a show-stopping dessert ready to share with loved ones. Remember, baking is about creativity and joy, so feel free to personalize this recipe as you wish. Whether you opt for a fruit-infused flavor, gluten-free alternative, or a vegan version, this versatile cake will surely impress. Don’t hesitate to give it a try and even share your variations with friends and family. Happy baking!


