Prep time: 20 minutes
Cook time: 25 minutes
Total time: 45 minutes
Servings: 12
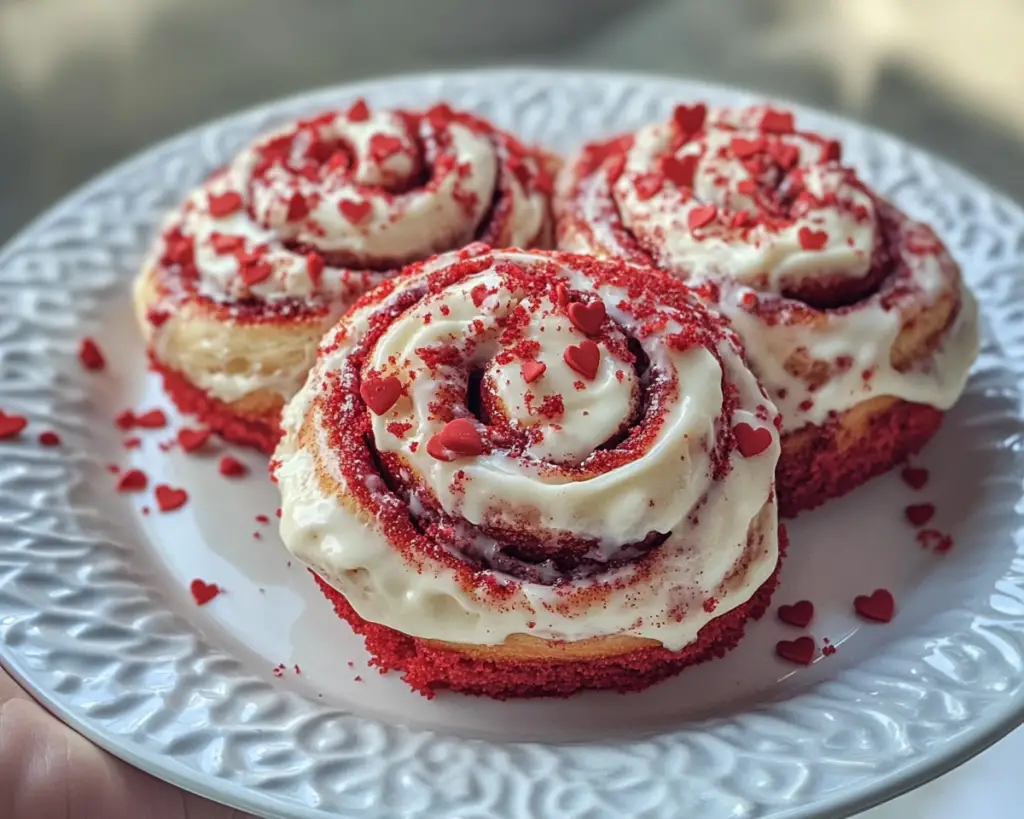
Imagine waking up on Valentine’s Day to the enticing aroma of freshly baked Red Velvet Cinnamon Rolls wafting through your home. This delicious treat is not only visually stunning with its rich red color and swirl pattern, but it is also incredibly easy to prepare. Whether you’re a busy parent looking for a quick brunch idea or a beginner in the kitchen wanting to impress loved ones, this recipe is the perfect solution. You will learn how to create soft, fluffy rolls with a warm, gooey center that are topped with a classic cream cheese frosting, making every bite a delightful celebration of flavors.
This recipe for Red Velvet Cinnamon Rolls is truly special. Inspired by the classic red velvet cake, it takes the moistness and distinct cocoa flavor of that beloved dessert and combines it with a familiar breakfast staple—the cinnamon roll. With its smooth texture and vibrant color, these rolls aren’t just a feast for the taste buds but also a visual treat that elevates any brunch table. The addition of cinnamon adds warmth, while the cream cheese frosting brings a tangy richness that perfectly balances the sweetness of the dough. It’s an indulgent and festive way to mark a special occasion!
Furthermore, this easy recipe is perfect for gatherings or even for a cozy day at home. The step-by-step instructions are straightforward, ensuring that even novice cooks can follow along without a hitch. Grab your apron, and let’s get started!
What Is Red Velvet Cinnamon Rolls Recipe Easy Valentine’s Day Brunch Treat?
Red Velvet Cinnamon Rolls are a delightful twist on traditional cinnamon rolls infused with the signature flavors and colors of red velvet cake. Originating from the culinary tradition of using cocoa powder for subtle chocolate flavoring, these rolls evoke a sense of celebration and romance, making them an ideal choice for Valentine’s Day brunch. The rolls themselves boast a soft, light texture, thanks to the careful blending of ingredients and the kneading process that develops gluten. This results in airy rolls that melt in your mouth.
The characteristic flavor profile is a harmonious blend of cocoa, sugar, and a hint of vanilla, all wrapped in a buttery dough. When you bite into one of these rolls, you’ll initially be greeted by the slightly sweet, aromatic scent of cinnamon before the rich red velvet flavor takes over. The cream cheese frosting not only adds a tangy sweetness but also creates a beautiful contrast to the vibrant red of the rolls.
Why You’ll Love This
You’ll absolutely love making these Red Velvet Cinnamon Rolls for many reasons. First and foremost, they are incredibly **delicious**. The combination of soft dough, rich cocoa, and sweet cream cheese frosting makes them a treat your family and friends won’t forget. Besides taste, they are easy to make, even for those with minimal baking experience. The detailed steps guide you through the process, ensuring a successful outcome every time.
There’s also cost-effectiveness to consider. Baking at home allows you to control ingredients and avoid overpriced bakery items. The ingredients are generally affordable and accessible, making this an excellent option for budget-conscious cooks. Additionally, you have the freedom to personalize the level of sweetness or add extra flavors, making them versatile.
Common misconceptions about red velvet pastries might make you think they are labor-intensive, but this simple recipe shatters that myth. You can achieve stunning results without spending hours in the kitchen. Furthermore, these cinnamon rolls can easily accommodate different dietary needs.
Ingredients You’ll Need
- All-purpose flour: The foundation of any bread recipe, it gives structure and ensures the rolls are fluffy. You can substitute it with gluten-free flour for a gluten-free option.
- Granulated sugar: This adds sweetness to the dough and helps with browning during baking. You may use coconut sugar or honey as alternatives, though adjustments in quantities may be necessary.
- Cocoa powder: Essential for that signature red velvet flavor, it adds a rich, chocolatey taste. Ensure you use unsweetened cocoa powder for the best results.
- Active dry yeast: This helps the dough rise, giving it that soft and airy texture. Make sure to check the expiration date for best performance.
- Milk: Provides moisture and richness to the dough. You can substitute it with almond or oat milk for a lactose-free version.
- Butter: Adds richness and a lovely flavor. Use unsalted butter to control the saltiness of your dough.
- Egg: Acts as a binding agent and contributes to the color and fluffiness of the rolls. For a vegan option, use a flax egg or applesauce.
- Vanilla extract: Elevates the overall flavor profile. Use pure vanilla extract for the best taste.
- Cinnamon: This spice adds warmth and a lovely aroma. You can also mix in nutmeg for a spicier flavor.
- Powdered sugar: Used in the frosting, giving it a smooth consistency. You can use alternative sweeteners if you prefer a lower sugar option.
- Cream cheese: Essential for the rich frosting that pairs perfectly with the cinnamon rolls. For a dairy-free version, look for a vegan cream cheese substitute.
How to Make
- Prepare the yeast mixture: Start by dissolving the active dry yeast in warm milk (110°F-115°F) along with 1 teaspoon of sugar. Wait for about 5-10 minutes until it’s frothy. This step ensures your yeast is alive and will help the dough to rise successfully.
- Mix dry ingredients: In a large mixing bowl, combine the all-purpose flour, sugar, cocoa powder, and salt. This blends all the dry ingredients thoroughly, ensuring even distribution before mixing in the wet ingredients.
- Add wet ingredients: Once the yeast is ready, add it to the dry mixture along with melted butter, beaten egg, and vanilla extract. Mix using a wooden spoon or dough scraper until it all comes together.
- Knead the dough: Transfer the mixture onto a well-floured surface and knead for about 5-7 minutes until the dough is smooth and elastic. You might need to add a little more flour if it’s too sticky. This kneading process is essential for developing the dough’s gluten structure.
- First rise: Place the kneaded dough in a lightly greased bowl, cover it with a clean kitchen towel, and let it rise in a warm place for 1 hour, or until doubled in size. This waiting period is crucial; don’t rush it!
- Roll and fill: Once the dough has risen, roll it out on a floured surface into a large rectangle (about 16×12 inches). Spread softened butter over the dough, then sprinkle generously with a mixture of brown sugar, cinnamon, and a dash of cocoa powder. This adds the delicious sweet filling to the cinnamon rolls.
- Shape the rolls: Starting from the long edge, carefully roll the dough tightly into a log. Pinch the seams to seal and slice into even pieces (around 12 rolls). Using a sharp knife or dental floss works well for clean cuts without squishing the dough.
- Second rise: Place the cinnamon rolls in a greased baking dish, cover, and let rise for another 30-45 minutes in a warm spot, allowing them to become puffy and lighter.
- Bake: Preheat your oven to 350°F (175°C). Bake the rolls for 20-25 minutes until they are golden and cooked through. The delightful aroma of cinnamon and cocoa will fill your kitchen—it’s worth the wait!
- Prepare cream cheese frosting: While rolls are baking, mix cream cheese, powdered sugar, and a splash of milk in a medium bowl until smooth and creamy. Adjust consistency by adding more milk or sugar as needed. The frosting should be pourable yet thick enough to coat the rolls.
- Glaze the rolls: Once your cinnamon rolls have cooled slightly, pour the cream cheese frosting generously over the warm rolls, allowing it to melt into the cracks. Serve warm, and watch everyone’s eyes light up!
Variations & Substitutions
Red Velvet Nutella Swirl: For a unique twist, spread Nutella along with the butter before rolling. This adds a rich chocolate hazelnut flavor that complements the red velvet perfectly. If you are a Nutella lover, this is a must-try variation!
Vegan Red Velvet Cinnamon Rolls: To make these rolls vegan, use almond milk, a flax egg, and vegan butter in the dough. Substitute cream cheese with a dairy-free variety. These simple changes make it possible for everyone to enjoy this festive treat.
Chocolate Chip Add-in: To elevate the richness, consider adding semi-sweet chocolate chips to the filling. They create delightful pockets of melted chocolate within the rolls, enhancing both flavor and texture. You can’t go wrong with an extra touch of sweetness.
Spiced Red Velvet Cinnamon Rolls: For those who love spices, consider adding nutmeg or ginger powder to your cinnamon mixture. This will bring a warm depth of flavor that contrasts beautifully with the sweetness of the rolls.
Gluten-Free Version: For gluten sensitivities, swap all-purpose flour with a gluten-free flour blend. Ensure that your baking powder and baking soda are also gluten-free, and you have a delicious option suitable for those with dietary restrictions.
Common Mistakes to Avoid
One of the most frequent mistakes people make is using **cold ingredients**. Using cold butter or milk will prevent proper blending and affect the rising of the dough. Always aim to have your ingredients at room temperature.
Another common pitfall is **not allowing the dough to rise adequately**. Patience is key in baking; skipping or rushing the rise can yield denser rolls. If you rush the process, your rolls may not achieve that light and fluffy texture we all love.
Also, ensure you are using **the right type of yeast**. Active dry yeast should be dissolved in warm liquid before mixing. Double-check that your yeast is fresh—expired yeast can hinder rising.
Lastly, remember that every oven is different. **Check the rolls a few minutes before the recipe’s expected cook time**. Baking is part science and part intuition; being vigilant will help you achieve the best results.
Storage, Freezing & Reheating Tips
To store your Red Velvet Cinnamon Rolls, allow them to cool completely before placing them in an airtight container. They can last up to 3 days at room temperature or up to one week in the refrigerator. However, the rolls are best enjoyed fresh!
For longer storage, you can freeze the unbaked rolls after shaping. Place them on a baking sheet to freeze individually before transferring them to a freezer-safe container. When you’re ready to bake, let them thaw in the refrigerator overnight, then allow them to rise before baking as instructed.
If you have leftover baked rolls, reheat them in the oven at 350°F (175°C) for about 10–15 minutes, wrapped in foil to prevent drying. A microwave can work in a pinch, but take care not to overheat them, as this can make the rolls chewy rather than tender.
Frequently Asked Questions
Can I make the dough ahead of time?
Yes, you can make the dough the night before. After kneading, allow it to rise for one hour, then punch it down, cover it tightly, and refrigerate overnight. The next morning, let it come to room temperature before rolling it out.
What else can I add to the filling?
Aside from cinnamon and sugar, you can add nuts, such as pecans or walnuts, raisins, or even crushed candies for an unexpected crunch. Feel free to experiment with flavors that you enjoy!
How do I know when the rolls are done?
The rolls should be golden brown on top and when you lightly tap the surface, it should sound hollow. If you’re uncertain, use a toothpick to poke a roll; it should come out clean if they are fully cooked.
Can I use whole wheat flour instead?
Yes, you can substitute whole wheat flour for half of the all-purpose flour, but keep in mind that this will yield denser rolls. The texture might also change slightly, but the flavor will be just as tasty.
How can I adjust the sweetness level in the frosting?
You can easily customize the frosting by adding more powdered sugar for sweetness or more cream cheese for a thicker texture. Taste as you go to find the perfect balance that you prefer!
Conclusion:
The Red Velvet Cinnamon Rolls are a fantastic treat that brings joy and satisfaction to any brunch table. With their stunning appearance and mouth-watering taste, they make for an unforgettable occasion. Don’t hesitate to experiment with variations, and remember that baking should be fun! Try your hand at this festive recipe, personalize it to your liking, and feel free to share your experience. Happy baking!


