Prep time: 20 minutes
Cook time: 45 minutes
Total time: 1 hour 5 minutes
Servings: 8
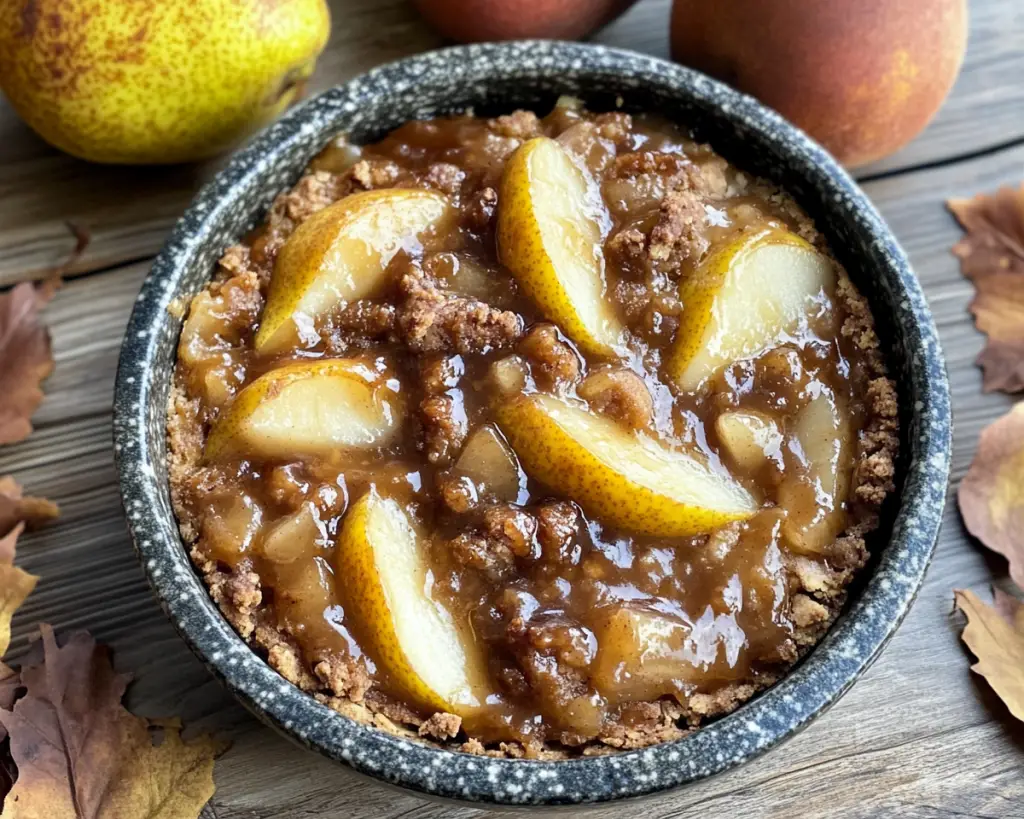
If you’re looking for a dessert that envelops your senses and brings the warm essence of fall into your home, look no further than Salted Caramel Pear Cobbler. Imagine a comforting dessert that combines juicy pears, rich salted caramel, and a golden, flaky topping, all coming together to create the ultimate cozy experience. This delightful cobbler not only satisfies your sweet tooth but also evokes fond memories of crisp autumn days, family gatherings, and the simple joys of home-cooked meals.
What makes this recipe special is not only its delicious flavor but also its ease of preparation. Whether you’re a busy parent juggling a thousand responsibilities or a beginner in the kitchen, this cobbler is incredibly forgiving and approachable. Today, we’ll walk through not just the recipe but tips, variations, and even common pitfalls to avoid, ensuring that your cobbler turns out perfectly every time.
What Is Salted Caramel Pear Cobbler (Easy Fall Dessert)?
Salted Caramel Pear Cobbler is a delightful twist on traditional cobblers, where luscious, ripe pears take center stage amid a blanket of warm caramel. Originating from classic American desserts, cobblers were originally made with leftover fruits topped with rich biscuits or cake batter. In this rendition, we introduce a salted caramel twist that elevates the dish to new heights, blending sweet and salty flavors in a way that is absolutely irresistible.
Picture this: the moment you cut into the cobbler, a warm, gooey salted caramel oozes out, glistening in the light. The pears, tender yet maintaining a slight bite, offer a juicy texture that perfectly complements the rich topping. This harmonious blend of textures—creamy caramel, soft pears, and a crisp topping—creates an experience that is not just about taste but also about the wonderful sensations of fall. Each bite is a burst of flavor, combining the sweetness of the fruit and the savory notes of the salt that bring it all together.
With its simple preparation and minimal ingredients, Salted Caramel Pear Cobbler is a versatile dessert that suits any occasion, from family dinners to holiday feasts. You will learn how to make this sensational dessert, along with helpful tips and variations to customize it just to your liking.
Why You’ll Love This
There are a multitude of reasons to adore this Salted Caramel Pear Cobbler. First and foremost, the taste is a sensational blend of sweet and salty that hugs your taste buds and leaves a lasting impression. The tartness of the pears beautifully balances the richness of the salted caramel, making each mouthful a journey of flavor.
Then there’s the ease with which you can prepare this dish. Even if you’re beginning your culinary adventures, this cobbler is straightforward, requiring no elaborate techniques. It comfortably fits within a budget, allowing you to use seasonal fruit without breaking the bank. Unlike intricate layered cakes or pastries that demand time and precision, this recipe requires just a few easy steps, yielding delightful results.
Common misconceptions about cobblers often revolve around their complexity. Many believe that only experienced bakers can create a dessert that looks and tastes gourmet. This Salted Caramel Pear Cobbler defies that notion with its simple yet impressive flavors, enabling everyone—beginners and seasoned cooks alike—to create a stunning dish without the fuss.
Ingredients You’ll Need
To create this sumptuous Salted Caramel Pear Cobbler, you’ll need the following ingredients:
- Fresh pears: About 4 cups, peeled and sliced. Choose ripe yet firm pears like Bartlett or Bosc for optimal texture.
- Granulated sugar: For sweetness in both the caramel and the cobbler topping.
- Brown sugar: Adds depth and a hint of molasses flavor to the caramel.
- Salt: Essential for the salted caramel flavor. Use coarse sea salt for best results.
- Unsalted butter: Provides richness in the topping. Cold butter yields a flakier texture.
- Flour: All-purpose flour for the cobbler batter. Gluten-free flour can be used as a substitute.
- Milk: Whole milk is preferred for a rich texture, but any milk will do.
- Baking powder: Helps the cobbler topping rise and gives it a fluffy texture.
- Cinnamon: Optional, but it adds a lovely warmth typical of fall desserts.
Each of these ingredients plays a vital role in crafting the perfect cobbler. The fresh pears provide juicy sweetness, while the sugars create a comforting caramel layer. The use of unsalted butter ensures that you have better control over the salt levels in your caramel—they can be adjusted to your liking. Flour and baking powder help achieve that desirable cobbler texture, so don’t skip these!
How to Make
Follow these step-by-step instructions to create your Salted Caramel Pear Cobbler. Each step will guide you in making this delectable dish effortlessly.
- Preheat your oven: Begin by preheating your oven to 350°F (175°C). A properly heated oven allows the cobbler to cook evenly, helping the topping to become golden while keeping the pears tender.
- Prepare the pears: Peel and slice the fresh pears into thin slices. Aim for about 4 cups of sliced pears. Make sure they are ripe but firm, as overly soft pears may turn mushy when baked. You can toss them with a pinch of cinnamon for added flavor, but this is optional.
- Make the salted caramel: In a medium saucepan over medium heat, combine 1 cup granulated sugar and 1/2 cup brown sugar. Stir gently until the mixture begins to dissolve. If using a candy thermometer, aim for a temperature of about 350°F (175°C). Once it reaches a lovely amber color, carefully add 1/2 cup of cold unsalted butter. The mixture will bubble vigorously—this is normal! Stir until the butter is completely melted and combined. Finally, stir in 1 teaspoon of salt, then remove from heat.
- Arrange the pears: In a greased 9×13 inch baking dish, layer the sliced pears evenly across the bottom. Pour the warmed salted caramel over the pears, ensuring every slice gets some love from that luscious sauce.
- Prepare the cobbler topping: In a large bowl, mix together 1 cup flour, 1/2 cup granulated sugar, 1 tablespoon baking powder, and (if using) 1 teaspoon of cinnamon. Add 1/2 cup of cold milk and 1/4 cup of cold unsalted butter (cubed). Use a fork or pastry cutter to combine until a thick batter forms. It should be slightly lumpy—overmixing can make the topping tough.
- Top the pears: Spoon the cobbler batter over the caramel and pears. Use the back of a spoon to spread it evenly, but don’t worry if it doesn’t cover every inch. The topping will expand during baking and fill in the gaps.
- Bake: Slip the baking dish into the preheated oven. Bake for about 45 minutes or until the cobbler topping is golden and cooked through. You may notice some caramel bubbling up around the edges—this is a sign that it’s working its magic!
- Cool and serve: Once baked, allow the cobbler to cool for about 15-20 minutes. This will help the caramel to slightly thicken. Serve warm, perhaps with a scoop of vanilla ice cream or whipped cream, and drizzle with any leftover salted caramel for an extra touch of indulgence.
This simple step-by-step guide makes it easy for anyone to bring the deliciousness of Salted Caramel Pear Cobbler into their kitchen. Each step builds on the last, leading you naturally toward dessert joy.
Variations & Substitutions
Gluten-Free Cobbler: If you’re looking to make this dish gluten-free, it’s easy to swap out the all-purpose flour with a **gluten-free all-purpose baking blend**. Look for one that contains xanthan gum for the best results. The texture might differ slightly, but the delicious flavors will still shine through.
Fruit Variations: While pears are the star of this recipe, you can easily adapt this cobbler to suit your taste preferences. Try using **apples, peaches, or even mixed berries**! Each fruit adds its unique flavor profile and will require slight adjustments in sugar based on their sweetness. For instance, tart apples may require a bit more sugar, while ripe peaches may require less.
Caramel Sauce Alternatives: If you’re in a pinch or looking for an easier route, you can substitute homemade caramel with a high-quality store-bought salted caramel sauce. The flavor will be just as delicious, reducing your prep time significantly. You can also use a **maple syrup mixture** for a hint of a different flavor profile.
Lower Sugar Option: If you’d like to decrease the sugar content in your cobbler, consider using natural sweeteners such as **honey or agave syrup**. This will provide sweetness without the same calorie count. Additionally, you can reduce the overall amount of sugar in the cobbler topping while increasing the quantity of ripe fruit to maintain sweetness.
Each variation opens up new possibilities while still honoring the original flavors of Salted Caramel Pear Cobbler. Experimenting with these alternatives will allow you to customize the dish to your preferences or dietary needs.
Common Mistakes to Avoid
When embarking on your Salted Caramel Pear Cobbler adventure, there are a few common pitfalls to be aware of to ensure your dessert turns out as delicious as possible. One major mistake is **overcooking the caramel**. For the best flavor and color, watch it closely as it cooks until it turns a perfect amber shade. If it gets too dark, it will taste burnt and could ruin your cobbler.
Another area where home cooks often falter is underestimating the importance of choosing the right pears. Selecting **overripe or mealy pears** can lead to a mushy texture in the final product. Look for pears that are firm and fragrant for the best results. Make sure to slice them evenly to ensure uniform cooking, avoiding any bites that are either hard or disintegrated.
Finally, not allowing the cobbler to cool for a sufficient amount of time can affect the texture. Cooling helps the caramel to set, resulting in a more pleasant eating experience. Don’t skip this step, or you might end up with a rather messy serving, though there’s a chance no one will mind too much!
By keeping these common mistakes in mind, you can elevate your preparation of Salted Caramel Pear Cobbler and emerge victorious in your baking journey.
Storage, Freezing & Reheating Tips
If you find yourself with leftovers (which is unlikely, but possible!), storing your Salted Caramel Pear Cobbler is straightforward. Allow it to cool completely, then cover the dish tightly with plastic wrap or aluminum foil and refrigerate for up to 3 days. Ensure you store it in an airtight container to maintain its best flavor and prevent it from absorbing any odors from the fridge.
For longer storage, consider **freezing** the baked cobbler. If well-wrapped in plastic followed by aluminum foil, it can keep in the freezer for up to 3 months. To reheat, simply thaw it in the refrigerator overnight and rewarm in the oven at 350°F (175°C) until heated through.
When reheating, cover the cobbler with aluminum foil to prevent the topping from over-browning while ensuring the pears and caramel warm up nicely. If you prefer a fresh cobbler taste, you can also reheat individual portions in the microwave, but be cautious about overheating, which can make the caramel too runny.
Following these storage tips will allow you to enjoy your Salted Caramel Pear Cobbler long after you’ve baked it!
Frequently Asked Questions
Can I use canned pears instead of fresh ones?
While fresh pears offer the finest texture and flavor, you can use **canned pears** in a pinch. Drain them well and consider reducing the overall sugar, as canned versions can be syrupy and sweet.
What desserts can I serve alongside this cobbler?
Salted Caramel Pear Cobbler pairs beautifully with desserts like **vanilla ice cream** or a dollop of **whipped cream**. You might also consider serving it with a side of **warm caramel sauce** for those who want an extra indulgence.
Can I make this cobbler ahead of time?
Absolutely! You can prepare the cobbler ahead of time, cover it, and refrigerate it before baking. Just allow it to come to room temperature before popping it in the oven. This option makes it great for gatherings where you want to minimize kitchen time.
Is it necessary to peel the pears?
Peeling the pears is recommended as it allows their flavors to meld beautifully with the caramel, creating a more refined texture. However, if you’re in a rush or prefer the skins for added nutrition, feel free to leave them on!
What drink pairs well with Salted Caramel Pear Cobbler?
A warm spiced cider or a **light dessert wine** complements the flavors perfectly. For those preferring non-alcoholic choices, a **chai latte** or **herbal tea** pairs beautifully, enhancing the warm and cozy experience of enjoying this delightful dessert.
Conclusion:
In summary, Salted Caramel Pear Cobbler combines the delightful flavors of autumn with a simple, approachable baking experience. Its unique blend of textures and tastes makes it a perfect dish to serve at family gatherings, cozy nights in, or as an everyday treat. I encourage you to try your hand at this recipe, customize it, and perhaps even share your creations with friends and family. Remember, great desserts are best enjoyed with loved ones! So grab your apron, gather your ingredients, and let the magic of baking fill your home with warmth and delicious aroma.


