Prep time: 30 minutes
Cook time: 30 minutes
Total time: 1 hour
Servings: 12 servings
Have you ever craved that perfect slice of cake that combines rich flavors and a stunning appearance? The Red Velvet Cake is much more than a dessert; it’s a delightful journey into the world of baking. With its vibrant color and buttery, soft crumb, this cake has a history that invokes a sense of nostalgia and celebration. Whether you’re planning a birthday party or simply want to treat yourself on a quiet weekend, learning how to bake the best Red Velvet Cake is a rewarding skill that will impress everyone at the table.
This recipe doesn’t just guide you through the basic steps; it holds your hand, helping you with tips and tricks to ensure that you achieve that quintessential red hue, along with a moist and delectable crumb. You’ll discover the significance of ingredients like buttermilk, and cocoa powder, and how they come together to create that iconic flavor profile. Plus, you’ll learn variations and substitutions that cater to various dietary needs, making this cake an inclusive treat for all.
What Is How Can You Bake The Best Red Velvet Cake?
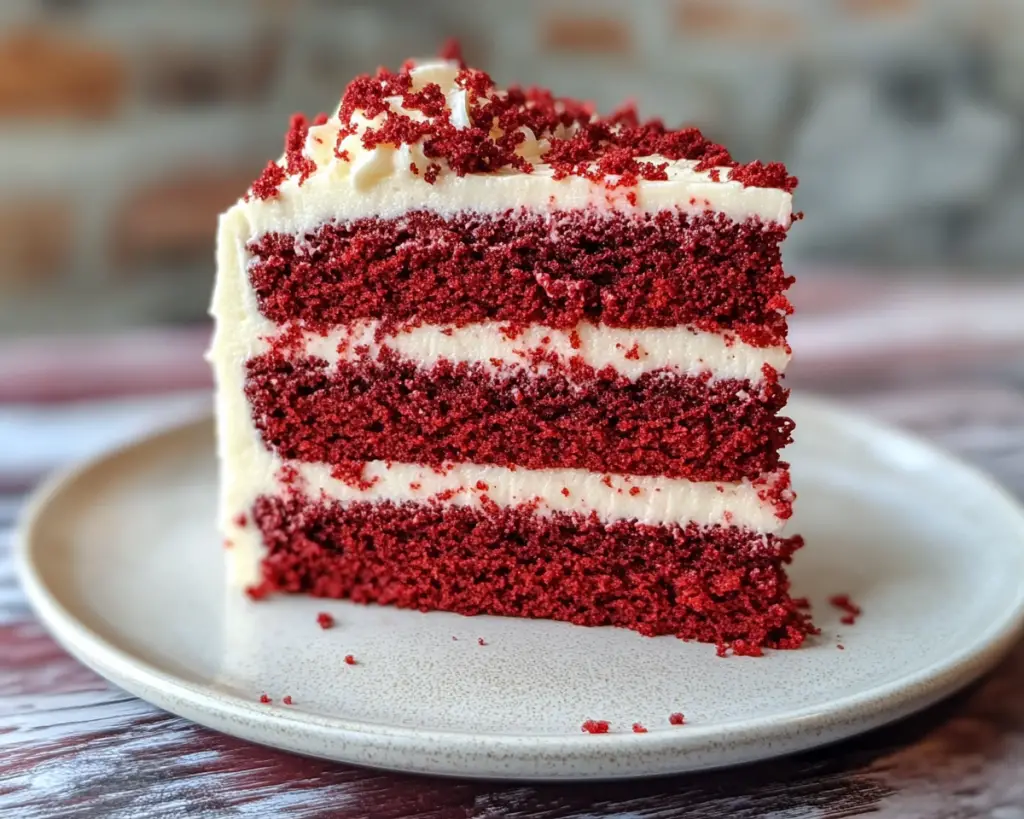
Originating from the southern United States, the Red Velvet Cake has a unique charm that has drawn dessert enthusiasts for generations. The cake typically stands out with its striking red color, often enhanced by a rich cream cheese frosting. But what truly makes Red Velvet special is its texture and flavor. The cake is remarkably soft and velvety, achieved by the right balance of ingredients, including **cocoa powder**, which contributes to a slight chocolatey undertone.
Flavor-wise, expect a delightful blend of sweetness that harmoniously balances the tang from the cream cheese frosting. Traditionally, the cake uses some chemical leavening, which creates that vaunted lift, while the acids in buttermilk activate the cocoa, enhancing the flavor profile. With each bite, you’ll be met with a tender crumb that melts in your mouth, combining the subtle richness of butter with the distinct tanginess of the frosting.
Baking a Red Velvet Cake is an experience that allows you to showcase your skills while indulging in comfort food that invokes warmth and happiness. It’s perfect for family gatherings, celebrations, or simply as a treat for yourself during the weekend.
Why You’ll Love This
You’ll fall in love with this Red Velvet Cake not just for its stunning appearance but also for its rich taste and moist texture. It’s relatively easy to whip up, making it perfect for both novice bakers and experienced chefs. Given its versatility, you can serve this cake on any occasion, from birthday parties to holiday celebrations. Additionally, the ingredients are often pantry staples, meaning you can make this cake at any time without huge expenses.
Many people mistakenly think that making a beautiful Red Velvet Cake is overly complicated, but this recipe aims to debunk that myth. One of the most common mistakes is using too much food coloring, resulting in a harsh flavor. Instead, the right amount will yield a beautiful hue without compromising the taste. Another common error is underbaking, which leads to a dry cake.
This recipe not only guides you through avoiding those pitfalls but also ensures you’ll achieve a stunning outcome every time. Whether you’re baking for yourself, your family, or guests, this cake is sure to evoke smiles all around.
Ingredients You’ll Need
- All-Purpose Flour: The backbone of the cake. It provides the necessary structure. For a gluten-free option, you can use a gluten-free flour blend, but ensure it contains xanthan gum for best results.
- Cocoa Powder: Just enough to give a hint of chocolate flavor without overpowering the red hue. Use unsweetened cocoa powder for authenticity.
- Granulated Sugar: This sweetener not only adds sweetness but helps in creating a fluffier texture after creaming it with butter.
- Vegetable Oil: This keeps the cake moist. You can substitute with melted coconut oil for a slight flavor twist.
- Buttermilk: This gives the cake its signature tangy flavor and keeps it tender. If buttermilk is unavailable, a mix of regular milk and vinegar can serve as a substitute.
- Eggs: They act as a binder and also add moisture. Make sure they are at room temperature for easier incorporation.
- Red Food Coloring: This is crucial to achieving the bright red color. Use gel food coloring for best results, as it requires less liquid.
- Baking Powder and Baking Soda: These leavening agents provide lift and ensure a light, fluffy cake.
- Salt: Balances flavors and enhances the overall taste of the cake.
- Cream Cheese: For the frosting, it adds a tangy richness that complements the sweet cake.
- Powdered Sugar: This sweetens the frosting while giving it a smooth texture.
- Vanilla Extract: Adds a floral sweetness to the frosting and enhances the flavor profile of the cake.
These ingredients combine beautifully to create a cake that is not only visually appealing but also deliciously satisfying.
How to Make
- Preheat your oven to 350°F (175°C). Greasing and flouring three 9-inch round cake pans is crucial for an easy release once baked. This step ensures that your cakes maintain their beautiful shape.
- In a medium bowl, sift together the all-purpose flour, cocoa powder, baking powder, baking soda, and salt. Sifting not only helps mix the ingredients uniformly but also aerates the flour. This means your cake will be lighter and fluffier.
- In a large mixing bowl, combine granulated sugar and vegetable oil. Beat this mixture with an electric mixer on medium speed until fluffy, usually around 3–5 minutes. This is a crucial step as it incorporates air into the sugar-oil mixture, ensuring your cake doesn’t turn out dense.
- Add in the eggs, one at a time, making sure to mix well after each addition. Incorporate the buttermilk and red food coloring, mixing until fully combined to create a consistent batter. The batter should resemble a slightly thick liquid.
- Gradually add the dry ingredients to the wet mixture, alternating with vanilla extract. Start and end with the dry ingredients to prevent lumps. Mix only until just combined, as overmixing can result in a tough cake.
- Divide the batter evenly among the prepared pans and smooth the tops with a spatula. Gently tap the pans on the counter to release any air bubbles.
- Bake in the preheated oven for 25-30 minutes, or until a toothpick inserted into the center comes out clean. Keep an eye on the cakes to prevent overbaking; check around the 25-minute mark.
- Once baked, allow the cakes to cool in their pans for about 10 minutes. Then, carefully remove them from the pans and let them cool completely on a wire rack. This ensures they won’t continue baking and becoming dry.
- While the cakes are cooling, prepare your frosting. In a mixing bowl, beat the cream cheese and butter (if using) until smooth and fluffy. Gradually add in the powdered sugar and vanilla extract, mixing until well combined and creamy.
- Once the cakes are completely cool, frost the top of one layer with the cream cheese frosting. Add the second layer and repeat the frosting, then place the third layer on top. Frost the top and sides of the cake for a beautiful finish.
Follow these step-by-step instructions to create a delicious Red Velvet Cake that not only tastes fantastic but looks amazing as well!
Variations & Substitutions
Gluten-Free Red Velvet Cake: If you’re looking for a gluten-free alternative, substitute the all-purpose flour with a gluten-free flour blend. Be sure to check that it includes xanthan gum, which will help bind the cake and improve the texture.
Vegan Red Velvet Cake: To make this cake vegan-friendly, you can replace eggs with aquafaba (the liquid from a can of chickpeas), which provides similar binding properties. Use almond or coconut milk in place of buttermilk, and opt for a plant-based butter substitute for the frosting.
Chocolate Red Velvet Cake: For more chocolatey goodness, consider increasing the amount of cocoa powder. You can also add chocolate chips into the batter for a fun surprise.
Low-Sugar Red Velvet Cake: If you’re watching your sugar intake, you can reduce the amount of granulated sugar in the batter by half. Consider using a natural sweetener, like agave or maple syrup, but keep in mind the liquid ratios might need balancing.
Layered Red Velvet Cake: For a stunning presentation, consider stacking multiple layers of cake, alternating with cream cheese frosting between them. Finish with extra frosting on the top and sides, and decorate with crushed nuts or chocolate shavings.
Each of these variations can help cater to different dietary needs without compromising on taste and texture. You’ll find that the beauty of this cake lies in its versatility!
Common Mistakes to Avoid
One frequent issue is overmixing the batter, which can lead to a dense cake rather than the light, airy texture that is desired. Always mix the ingredients just until incorporated. Another common mistake is skimping on the leavening agents; without enough baking powder or baking soda, your cake might turn out flat. Follow the recipe measurements closely.
Using too much food coloring can also be a pitfall. Not only can excess coloring alter the taste, but it can also turn the cake an unappealing shade. Aim for a vibrant yet balanced hue—the right amount should give you that signature color without compromising flavor. Lastly, ensure your cakes are completely cool before frosting; if they’re even slightly warm, the frosting can melt, leading to a messy outcome.
Storage, Freezing & Reheating Tips
For optimal freshness, store your Red Velvet Cake in an airtight container at room temperature, where it can last for up to 3 days. If you’d like to prolong its life, you can refrigerate it, where it will stay good for up to a week. Be sure to wrap it tightly to keep it from drying out.
If you have leftovers that you want to save for an extended period, consider freezing the cake. Wrap individual slices in plastic wrap, followed by aluminum foil to prevent freezer burn. When you’re ready to enjoy, simply thaw them in the refrigerator overnight before serving.
Reheating isn’t typically necessary unless you prefer a warm slice. If that’s the case, you can pop a slice into the microwave for about 10-15 seconds, just enough to warm it without melting the frosting.
Frequently Asked Questions
Can I make this Red Velvet Cake in advance?
Absolutely! The cake can be made a day in advance; just ensure it’s wrapped properly to maintain moisture. If you prefer, you can also bake and freeze layers ahead of time, frosting them right before serving for the best taste.
What can I substitute for buttermilk?
If you don’t have buttermilk on hand, a mixture of regular milk and vinegar can serve as a good substitute. Simply add 1 tablespoon of white vinegar to 1 cup of milk and let it sit for about 10 minutes. It will thicken and sour, achieving a similar taste.
Is there a gluten-free option available for this cake?
Yes! You can substitute regular all-purpose flour with a gluten-free flour blend that contains xanthan gum. This will help bind the ingredients and provide a softer texture.
How should I store the leftover cake?
Leftover Red Velvet Cake should be stored in an airtight container at room temperature for up to 3 days. If you want to keep it fresh longer, refrigerate it, or you can freeze slices tightly wrapped for later enjoyment.
Can I use different frosting than cream cheese?
While cream cheese frosting is traditional, you can substitute it with buttercream frosting or even whipped cream if you prefer something lighter. Each option will give a different flavor profile that can enhance the cake.
Conclusion:
This Red Velvet Cake is more than just a dessert; it’s a celebration on a plate, bringing joy and warmth to any occasion. With its stunning presentation and rich flavors, it’s sure to be a hit at your gatherings or simply as a weeknight treat. Don’t be afraid to make it your own with variations and substitutions that fit your dietary needs. Go ahead, gather your ingredients, and step into the world of baking this delightful cake. You’ll be proud to share your creation with family and friends, and before you know it, it might become a staple in your home!


