Prep time: 30 minutes
Cook time: 2 hours
Total time: 2 hours 30 minutes
Servings: 8-10
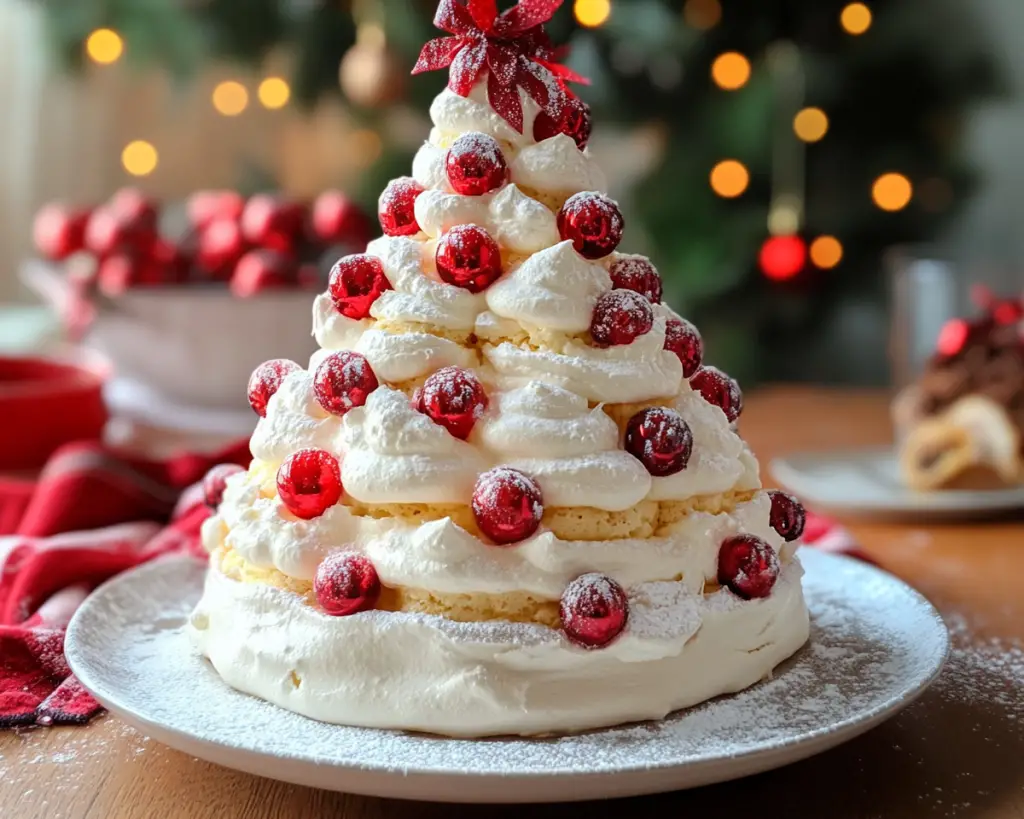
This *Stunning Pavlova Christmas Tree Recipe* is nothing short of a showstopper, guaranteed to impress your family and friends during the holiday season. Every bite of this delightful dessert feels like a special occasion, blending the crisp texture of the meringue with the rich, sweet flavors of whipped cream and fresh fruit. If you’re searching for something that will elevate your holiday celebrations, look no further. This recipe is not just visually appealing but offers a symphony of textures and flavors that will keep them coming back for more.
Throughout this article, you will discover how to create your own stunning pavlova Christmas tree, what special ingredients to consider, important tips to ensure success, and a few variations to customize your dessert to match your family’s tastes.
What Is Can You Make This Stunning Pavlova Christmas Tree Recipe?
The pavlova has a rich history rooted in New Zealand and Australia, and its *delicate meringue base* is both crisp on the outside and soft on the inside, creating an exquisite contrast in texture. The name is believed to have been inspired by the Russian ballerina Anna Pavlova, reflecting the dessert’s light, airy quality. In this festive version, the pavlova is shaped like a Christmas tree, making it a stunning centerpiece for any holiday table.
The delightful *flavors of the meringue* marry beautifully with airy whipped cream and a vibrant assortment of fruits. Think juicy strawberries, sweet blueberries, and tart kiwi, creating a multicolored explosion that evokes the spirit of the holiday season. Layers of flavors come together to provide a refreshing and satisfying combination, making each bite feel like a little celebration.
As you embark on making this pavlova Christmas tree, you’ll find that the process is not only rewarding but can also serve as a bonding experience in the kitchen, perfect for families looking to create festive traditions. Plus, the overall experience of putting together this dessert is filled with fun and creativity, allowing you to prepare a unique dessert that captures the spirit of Christmas.
Why You’ll Love This
One of the top reasons you’ll love this pavlova Christmas tree is its *stunning presentation*. It’s not every day that you can serve something that looks as beautiful as it tastes. This dessert is guaranteed to be the highlight of your holiday dessert table, turning heads and eliciting gasps of delight from your guests. Not only do aesthetics matter, but the *flavors* work harmoniously to provide a refreshing treat that contrasts with heavier holiday foods.
Ease of preparation is also a significant advantage. While it may look complex, pavlova is relatively simple to make, especially for beginners. This recipe involves just a few key steps: whipping the egg whites, baking the meringue, and assembling the delicious toppings. You can also make the meringue in advance and store it, which is perfect for busy parents or those who like to plan ahead during the hectic holiday season.
The pavlova’s versatility is another aspect that makes it a crowd-pleaser. You can customize the toppings to suit your family’s preferences, making it a flexible option for various tastes. Whether you prefer berries, tropical fruits, or even a chocolate ganache drizzle, you can easily make this dessert your own.
Common misconceptions about pavlova are that it requires special skills or expensive ingredients. In reality, anyone can create a beautiful pavlova with just a few pantry staples. Just remember to use *fresh ingredients* and pay attention to detail for the best results, and you’ll have a dessert that will impress even the most critical foodies.
Ingredients You’ll Need
- Egg whites: You’ll need about 4 large egg whites. Fresh egg whites whip up better, making your meringue more stable and airy. You can substitute with pasteurized egg whites for a safer alternative.
- Caster sugar: Approximately 1 cup is needed. Caster sugar dissolves easily, contributing to a smooth and glossy finish. You could also use granulated sugar, but be sure to blend it thoroughly.
- White vinegar: Just 1 teaspoon will help stabilize the meringue. This is crucial because it ensures your pavlova holds its shape even after baking.
- Cornstarch: About 2 teaspoons adds to the softness of the pavlova’s interior. A must-have to create that perfect chewy texture.
- Heavy cream: 1 to 1.5 cups for whipping, depending on how creamy you’d like your final dessert. Opt for heavy cream for the best results as it whips into peaks easily.
- Fresh fruits: A colorful mix of strawberries, blueberries, kiwi, and raspberries will give the pavlova that festive flair. The combination of flavors adds an exciting contrast to the sweet meringue.
- Mint leaves: Optional, but a few sprigs give an aromatic touch and elevate the presentation.
How to Make
- Preheat your oven: Start by preheating your oven to 250°F (120°C). Using a lower temperature ensures that the meringue dries out rather than bakes quickly, which is essential for achieving that soft interior and crisp exterior.
- Prepare the baking sheets: Line two large baking sheets with parchment paper. You can draw a tree shape on the backside of the parchment to guide your meringue, or use a tree template. This will help in creating a well-defined shape, so the final result looks like a beautiful tree.
- Whip the egg whites: In a clean, dry bowl, begin beating your egg whites on medium speed until soft peaks form. This usually takes around 3 to 4 minutes. Adding a pinch of salt can help stabilize your egg whites as they foam.
- Add sugar gradually: Once soft peaks appear, gradually add your caster sugar, one tablespoon at a time. Continue to beat on high speed until the mixture is glossy and stiff peaks form. This should take about 5-7 minutes.
- Incorporate vinegar and cornstarch: Gently fold in the vinegar and cornstarch using a spatula. This ensures even distribution without deflating the mixture. The vinegar acts as a stabilizer, while the cornstarch contributes to the chewy texture.
- Create the shape: Using a piping bag or a spoon, carefully pipe the meringue into the shape of the Christmas tree on your parchment paper. Use a circular motion to create layers, making a wider base and tapering off toward the top. This layering will give your tree dimension and elegance.
- Bake the meringue: Place the trays in the preheated oven for about 1.5 to 2 hours. Resist the urge to open the oven door during this time, as it can create cool drafts that affect the drying process. You want the exterior to harden while the interior remains soft.
- Cool the meringue: Once baked, turn off the oven and leave the door slightly ajar. Allow the meringues to cool inside the oven for at least 1 hour. This gradual cooling helps prevent cracks.
- Whip the cream: In a chilled bowl, whip the heavy cream until soft peaks form. You can sweeten it slightly with sugar or vanilla extract if desired. The cream should be thick enough to hold its shape but airy to complement the meringue.
- Assemble your pavlova tree: Once the meringue has completely cooled, carefully lift it off the parchment. Layer whipped cream between the meringue tiers to create the tree structure. Generously top the entire assembled tree with more whipped cream.
- Decorate with fruits: Finish off the tree by adding fresh fruit on top and in between the layers. Arrange them festively to look like ornaments. Use mint leaves for garnish if desired.
- Serve and enjoy: Slice carefully to serve your guests, highlighting the captivating layers of pavlova, cream, and fruit. Enjoy the delightful fusion of flavors and textures, and don’t forget to take a few pictures to capture this moment!
Variations & Substitutions
Chocolate Pavlova Christmas Tree: If you’re a chocolate lover, consider adding cocoa powder to your meringue. Use about 2 tablespoons of unsweetened cocoa powder, and fold it in after you’ve created stiff peaks with your egg whites. Top with whipped chocolate ganache and chocolate shavings for a truly decadent dessert. This variation would be perfect for those who enjoy a rich twist on the classic pavlova.
Fruit-Only Pavlova: For a lighter version that emphasizes seasonal fruits, feel free to skip the whipped cream altogether. Instead, replace it with a fruit puree, like a raspberry coulis, for a refreshing touch. This is an excellent option for anyone following a lower-fat diet or simply wanting to enjoy the natural flavors of the fruit themselves.
Vegan Pavlova: Those following a vegan diet can still enjoy pavlova by using aquafaba (the liquid from canned chickpeas) in place of egg whites. Whip the aquafaba until stiff peaks form, and proceed with the same method as traditional pavlova. Adjust the sugar based on your taste preference. This provides a fantastic alternative for vegans while still achieving the same light and airy texture.
Nutty Pavlova: Incorporating finely chopped nuts, such as pistachios or almonds, into the meringue can give an exciting crunch. Just fold in about half a cup of finely chopped nuts just before piping the meringue shape. This works particularly well for those looking for added texture and nutty flavors that complement the other components beautifully.
Common Mistakes to Avoid
One common mistake is using cold egg whites. Always ensure your eggs are at room temperature, as they whip much better this way. If your meringue is runny and refuses to stiffen, it is likely that the egg whites were too cold or even had traces of yolk mixed in. Always crack each egg into a separate bowl before mixing it into the egg white mix to guarantee no yolk contamination.
Another pitfall is opening the oven door too soon, which can cause your pavlova to collapse. Once your meringue is in the oven, give it time to bake and cool without opening the door until the baking time is complete.
Lastly, not allowing the pavlova to cool gradually can lead to cracking. Always turn off the heat and leave the meringue to cool in the oven. This sudden temperature change can cause cracks and breakage.
Storage, Freezing & Reheating Tips
To maintain the integrity of your pavlova, it’s best to assemble it fresh before serving. However, you can store the individual components separately. The meringue can be kept in an airtight container at room temperature for up to 3-4 days. Avoid refrigeration, as humidity will make the meringue soggy.
If you have leftover whipped cream, store it in the refrigerator in a sealed container for a maximum of 2-3 days. Fresh fruits should be added just before serving to prevent them from becoming wilted or soggy.
In terms of freezing, it is not advisable to freeze assembled pavlova due to texture changes once thawed. However, if you must freeze, consider actually freezing the meringue layers separately. Be sure to wrap them well in plastic wrap or foil and use within a month. To defrost, place the meringue layers in the refrigerator until thawed.
Frequently Asked Questions
Can I use regular sugar instead of caster sugar?
While it’s possible, caster sugar has a finer texture, which helps create a smooth and glossy meringue. If you use granulated sugar, make sure to blend it well while mixing to reduce any gritty texture.
What can I do if my meringue starts to crack during baking?
In most cases, cracks during baking may not affect the final result, but to avoid them, ensure your oven temperature is not too high. If it cracks, simply spoon some whipped cream on top when you serve it; it’ll be just as delicious!
How do I know when my pavlova is done baking?
A good indicator that your pavlova is ready is when it feels dry to the touch and can be easily lifted off the parchment without sticking. The exterior should be beautifully pale and firm.
Can I make this in advance and keep it in the fridge?
It’s best to assemble the pavlova just before serving to ensure the meringue remains crisp. Keep the meringue base and cream stored separately until you’re ready to serve to maintain texture and quality.
What if I can’t find fresh fruits?
If fresh fruits are unavailable, consider using frozen fruit. Just ensure they are fully thawed and drained of excess moisture before adding to your pavlova to prevent sogginess.
Conclusion:
The *Stunning Pavlova Christmas Tree Recipe* promises not just a feast for the eyes but also a delightful taste experience that combines sweet meringue, luscious cream, and fresh fruits in a charming presentation. Perfect for gatherings, this recipe allows you to engage creatively in the kitchen while creating lasting memories with family and friends.
I encourage you to give it a try, perhaps even customizing it along the way to suit your preferences. Remember, there’s no wrong way to enjoy this dessert—it’s all about your creativity and the joy it brings during the festive season. Don’t forget to share your experience with those close to you and, best of all, savor every bite!