Prep time: 20 minutes
Cook time: 1 hour
Total time: 1 hour 20 minutes
Servings: 12 bars
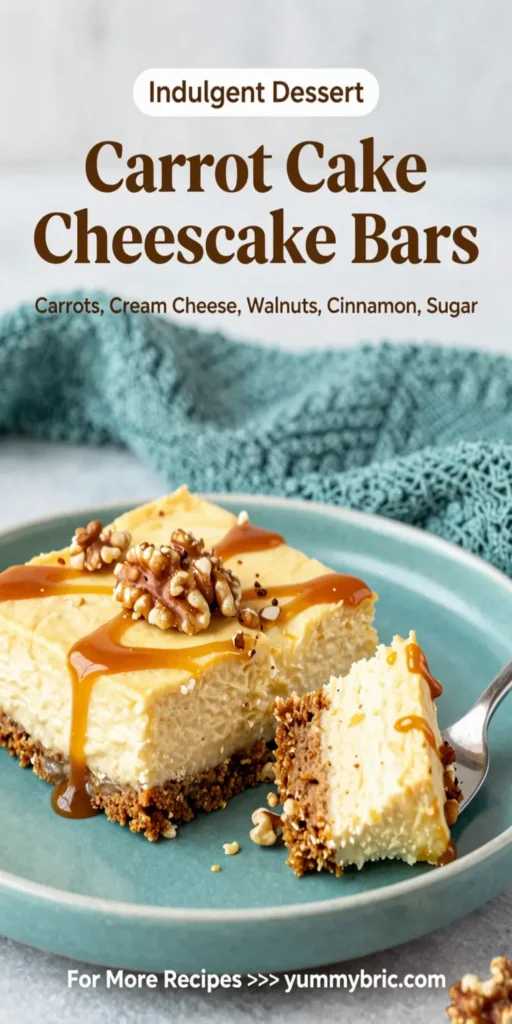
Carrot Cake Cheesecake Bars blend the rich flavors of traditional carrot cake with the creamy, dreamy texture of cheesecake, creating a dessert that’s perfect for any occasion. Whether you’re celebrating a birthday, hosting a holiday gathering, or just want a sweet treat after dinner, these bars are sure to impress. Picture a moist carrot cake base layered with velvety cheesecake, all topped with a light sprinkle of cinnamon and toasted walnuts. They’re irresistible and truly capture the joy of sweet baking.
What Is Carrot Cake Cheesecake Bars?
Carrot Cake Cheesecake Bars are a delightful dessert that combines two beloved treats into one. At their core, they consist of a moist carrot cake drizzled with aromatic spices, topped with a luscious cheesecake layer. The result is a bar that provides both the familiar comfort of carrot cake and the creamy indulgence of cheesecake. These bars are often served chilled, making them an excellent choice for warm-weather gatherings or as a sweet finish to any meal.
Why You’ll Love This
You’ll love these bars for several reasons. First, they are incredibly easy to make, even for those who may be new to baking. The simplicity of the recipe allows busy parents and kitchen beginners to create a show-stopping dessert without hours spent in the kitchen. Second, they bring a unique twist to classic favorites, making them perfect for gatherings or family events. Lastly, these bars can easily be adapted to fit dietary needs or preferences, allowing for a flexible yet delicious treat.
Ingredients You’ll Need
- For the Carrot Cake Layer:
- 2 cups grated carrots – Fresh, finely grated carrots provide moisture and natural sweetness.
- 1 cup granulated sugar – Sweetens the cake and balances the flavors.
- 1/2 cup brown sugar – Adds a deeper sweetness and caramel-like flavor.
- 1 cup vegetable oil – Keeps the cake moist and tender.
- 4 large eggs – Binds the ingredients together and adds richness.
- 2 cups all-purpose flour – The base structure of the cake.
- 1 teaspoon baking powder – Helps the cake rise.
- 1 teaspoon baking soda – Works with the baking powder for leavening.
- 1 teaspoon ground cinnamon – Gives the cake its signature spice.
- 1/2 teaspoon salt – Enhances all the flavors.
- 1 cup crushed pineapple (drained) – Adds moisture and sweetness.
- 1/2 cup walnuts (chopped) – Provides a crunchy texture.
- For the Cheesecake Layer:
- 16 oz cream cheese (softened) – The creamy base of the cheesecake.
- 1 cup powdered sugar – Sweetens the cheesecake layer.
- 1 teaspoon vanilla extract – Adds flavor to the cheesecake.
- 2 large eggs – Binds the cheesecake together.
- 1/4 cup sour cream – Enhances the creaminess and adds a slight tang.
How to Make
- Preheat your oven to 350°F (175°C). Line a 9×13 inch baking dish with parchment paper, leaving a bit of an overhang for easy removal later.
- In a large mixing bowl, whisk together the granulated sugar, brown sugar, and vegetable oil until combined. Add the eggs one at a time, mixing well after each addition.
- In another bowl, whisk together the flour, baking powder, baking soda, cinnamon, and salt. Gradually add the dry ingredients to the wet ingredients until just combined.
- Fold in the grated carrots, crushed pineapple, and walnuts until evenly distributed throughout the batter.
- Pour the carrot cake batter into the prepared baking dish, spreading it evenly across the bottom.
- In a separate bowl, combine the softened cream cheese, powdered sugar, sour cream, and vanilla extract. Mix until smooth. Add in the eggs one at a time, mixing just until blended.
- Pour the cheesecake mixture over the carrot cake batter, gently spreading it evenly on top. Use a knife to swirl the two layers together slightly for a marbled effect.
- Bake for 45-55 minutes, or until the center is set and a toothpick inserted into the cheesecake layer comes out clean. Allow to cool in the pan for about 30 minutes before transferring to the refrigerator for at least 2 hours.
- Once chilled, lift the bars out of the pan using the parchment overhang, cut into squares, and serve. Enjoy your delicious creation!
Variations & Substitutions
Nut-Free Version: If you or your guests have nut allergies, you can easily omit the walnuts in this recipe. Consider adding a sprinkle of coconut or an extra layer of grated carrot for added texture.
Healthier Option: Substitute half of the granulated sugar with applesauce or a natural sweetener like honey or maple syrup for a lower-sugar variant. You could also use whole wheat flour instead of all-purpose flour to add more fiber!
Gluten-Free Version: For a gluten-free adaptation, use a gluten-free flour blend in place of regular flour. Ensure all other ingredients (like your baking powder and sugar) are certified gluten-free to avoid contamination.
Spice Alternatives: If you prefer a different flavor profile, experiment with spices like nutmeg, ginger, or even a pumpkin spice mix. Each will bring its unique twist to the bars.
Common Mistakes to Avoid
One common mistake is overmixing the batter. This can lead to dense bars rather than the light and fluffy texture you want. Mix just until combined for the best results. Another is baking at an incorrect temperature. If your oven runs hot or cold, you might need to adjust the baking time to get that perfect set. Finally, not letting the bars cool completely before slicing can result in a messy cut and uneven slices. Always allow for complete cooling to enjoy beautiful, clean bars.
Storage, Freezing & Reheating Tips
For storage, keep the bars covered in an airtight container in the refrigerator for up to a week. If you plan to make them ahead, consider freezing them. They’re freezer-friendly and can be wrapped tightly in plastic wrap and then placed in a freezer-safe container for up to three months. For reheating, simply take them out of the fridge and let them come to room temperature or pop them in the microwave for about 10-15 seconds if you prefer them warm. Always ensure to thaw them properly if frozen.
Frequently Asked Questions
Can I make these bars ahead of time?
Absolutely! These bars can be made a day or two in advance. Just make sure to store them in the refrigerator for optimal freshness. They actually taste even better after a day as the flavors have time to meld perfectly!
Can I use other fruits in this recipe?
Yes, feel free to experiment with other fruits. Apples, pears, or even mashed bananas can be used in place of carrots to create your unique version. Just ensure the moisture content doesn’t alter the recipe negatively.
How do I know when my bars are done baking?
The bars are done when the center is set, and a toothpick inserted comes out clean. The edges may start to pull away from the sides of the pan as a visual cue that they’re ready.
Is it okay to add extra spices?
Definitely! Adding extra spices such as nutmeg or extra cinnamon will deepen the flavor. Just be mindful not to overpower the balance between the flavors.
What’s the best way to serve these bars?
These bars can be served cold, at room temperature, or even warmed slightly in the microwave. A dollop of whipped cream or a drizzle of cream cheese frosting will elevate them further!
Conclusion: These Carrot Cake Cheesecake Bars are not just a dessert; they are an experience. Combining richness with comfort, they have the ability to transform any gathering into a memorable occasion. By following this detailed guide, you’ll be well on your way to impressing family and friends alike with your baking skills. Enjoy every delightful bite!