Prep time: 30 minutes
Cook time: 12 minutes
Total time: 42 minutes
Servings: 12 cookies
When you think of comfort food, what comes to mind? For many, nothing quite satisfies like a warm cookie fresh out of the oven. Now, imagine taking that concept and elevating it to a whole new level with a delightful twist. Enter the Cheesecake Stuffed Red Velvet Cookies – an indulgent treat that combines the best elements of two beloved desserts into one magical bite.
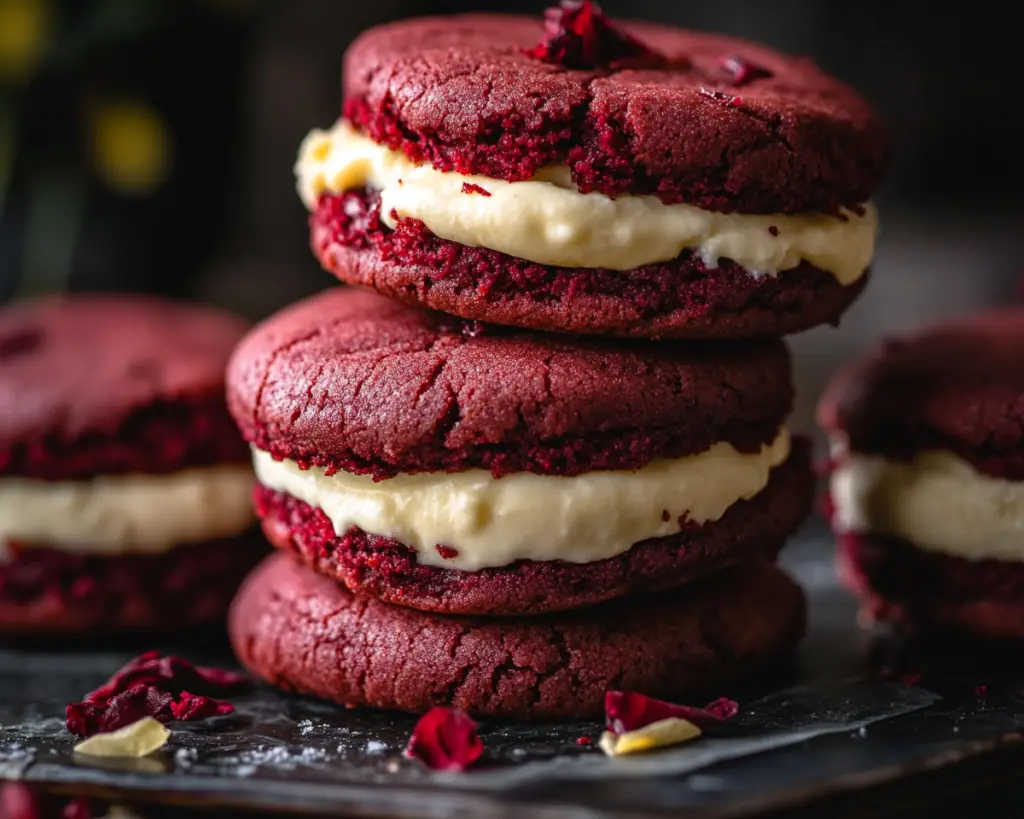
These cookies are not only visually stunning with their vibrant red hue, but they also offer a rich, buttery flavor with a surprisingly creamy cheesecake filling that will blow you away. Whether you’re preparing for a special occasion or simply looking to treat yourself, this recipe is as rewarding to make as it is to eat.
What makes this recipe special is its contrast. The classic red velvet cookie base feels soft on the outside, but once you break into it, you’re greeted with a luscious cheesecake filling. You will learn how to master the art of the chewy cookie while ensuring a rich cream cheese filling, along with practical tips, variations, and substitutes that make this recipe attainable for any home cook.
What Is Cheesecake Stuffed Red Velvet Cookies – Easy Creamy Surprise Recipe?
The Cheesecake Stuffed Red Velvet Cookie is a delightful mash-up of flavors and textures. Originating from the desire to create a decadent dessert that fuses two classic treats, this cookie is a showstopper. With its deep red color and white cream cheese filling, it embodies the essence of celebration and comfort. The **red velvet** flavor profile brings in a subtle cocoa note, while the tangy cream cheese filling adds a robust creaminess that perfectly complements the cookie’s sweetness.
The texture is what sets it apart. These cookies boast a soft, chewy exterior that encases a smooth and creamy surprise inside. They create a delightful contrast that will delight your taste buds. Each bite is an adventure, beginning with that initial soft outer layer followed by the burst of creamy filling that makes you yearn for more.
Additionally, these cookies are incredibly versatile and can easily be customized to suit various tastes. Whether you prefer a more intense chocolate flavor or want to incorporate different fillings, the possibilities are endless. This recipe will guide you through every step to ensure you master this dessert at home.
Why You’ll Love This
You will adore these cookies for a multitude of reasons. First and foremost, the **taste** is exceptional. The combination of the rich and buttery red velvet cookie paired with the smooth cheesecake filling creates an unforgettable experience with every bite. It’s a flavor profile that blends sweet, tangy, and slightly nutty notes, ensuring that it appeals to a wide audience.
Moreover, the **ease** of this recipe is a significant advantage. While the cookies may look gourmet and intricate, they are surprisingly simple to prepare. You don’t need to be a professional baker to achieve stunning results. Even **beginners** in the kitchen can follow these steps with minimal fuss.
In terms of **cost**, the ingredients used are relatively budget-friendly, making it an accessible option for anyone looking to bake at home. You’ll find most of the ingredients in your pantry or local grocery store.
Lastly, the **versatility** of this recipe cannot be overlooked. You can easily customize the filling or adjust the levels of sweetness, allowing you to tailor it to your preferences or dietary needs. Whether for holiday gatherings, birthdays, or just casual weekends, these cookies can adapt to any occasion.
However, it’s essential to note that some may believe red velvet is merely chocolate with food coloring, but that’s a misconception. In fact, red velvet has a unique flavor profile that stands apart and deserves its special place in the culinary world.
Ingredients You’ll Need
- 2 ½ cups all-purpose flour: This forms the base of your cookie dough. Be sure to measure accurately for the right texture. You can substitute with gluten-free flour if necessary.
- 1 cup unsweetened cocoa powder: This adds depth of flavor and the chocolatey aspect characteristic of red velvet.
- 1 tsp baking soda: This is crucial for the rise of your cookies, ensuring they’re fluffy and light.
- ½ tsp salt: A vital ingredient that enhances the flavors of both the cookie and the filling.
- 1 cup unsalted butter (softened): Provides the richness and creaminess expected in cookies. For a healthier twist, you can use coconut oil as a substitute.
- 1 cup granulated sugar: Sweetness is key, but you can adjust the amount depending on your preference.
- ½ cup packed brown sugar: The molasses in brown sugar adds moisture and a depth of flavor.
- 2 large eggs: These help bind the dough and add richness.
- 2 tbsp red food coloring: The key ingredient that gives the cookies their stunning color. Ensure it’s a quality product for the best results.
- 1 tsp vanilla extract: Adds wonderful aroma and depth of flavor.
- 8 oz cream cheese (softened): The heart and soul of the stuffing, lending the structure and creaminess.
- 1 cup powdered sugar: Sweetens the cheesecake filling without making it overly heavy.
- 1 tsp vanilla extract (for filling): Mirroring the cookie dough, this elevates the flavor profile of the cream cheese filling.
Each ingredient plays a pivotal role in creating the cookies, contributing texture, taste, and even visual appeal. By understanding their functions, you can make educated choices about substitutions based on dietary restrictions or personal preferences.
How to Make
- Preheat your oven: Start by preheating your oven to 350°F (175°C). This ensures even baking, making your cookies rise beautifully and achieve a lovely golden color. While the oven is heating, you can prepare your cookie dough, making the best use of your time.
- Prepare your baking sheet: Line a baking sheet with parchment paper. This prevents the cookies from sticking and helps them bake evenly. If you don’t have parchment paper, a silicone mat can also work effectively.
- Mix dry ingredients: In a large mixing bowl, whisk together 2 ½ cups of all-purpose flour, 1 cup of unsweetened cocoa powder, 1 tsp of baking soda, and ½ tsp of salt. This step is important as it ensures that these ingredients are evenly distributed throughout the dough, avoiding clumps of baking soda or salt.
- Cream butter and sugars: In another bowl, cream 1 cup of softened unsalted butter with 1 cup of granulated sugar and ½ cup of packed brown sugar. Beat this mixture until it’s light and fluffy, which usually takes 3-5 minutes. You can use a hand mixer or a stand mixer for this task.
- Add eggs and food coloring: Once the butter and sugar are well- blended, add in 2 large eggs one at a time, followed by 2 tbsp of red food coloring and 1 tsp of vanilla extract. Continue to mix until the ingredients are fully incorporated, and the mixture is a uniform red color. Don’t forget to scrape down the sides of the bowl to ensure everything is well-mixed.
- Combine wet and dry ingredients: Gradually add the dry mixture to the wet mixture, stirring just until combined. Avoid over-mixing to keep the cookies tender. You should have a soft, slightly sticky dough. This is a sign you’re on the right track!
- Prepare the cheesecake filling: In a separate bowl, beat 8 oz of softened cream cheese until smooth. Gradually add 1 cup of powdered sugar and 1 tsp of vanilla extract, mixing until you achieve a creamy texture. This filling will provide a luxurious contrast to the chewy cookie exterior, so make sure it’s well-blended.
- Assemble the cookies: Take about 2 tablespoons of the red velvet dough and flatten it in your palm. Place about 1 tablespoon of the cheesecake filling in the center, then fold the dough over the filling to enclose it completely. Make sure there are no gaps, or the filling might ooze out during baking!
- Bake: Place the filled cookies onto the prepared baking sheet, spacing them about 2 inches apart. Bake in the preheated oven for 10-12 minutes. Your cookies are done when the edges are set but the centers are still slightly soft. The residual heat will continue to cook the centers as they cool.
- Cool and enjoy: Once baked, remove the cookies from the oven and let them cool on the baking sheet for 5 minutes before transferring them to a wire rack to cool completely. This cooling process helps the cookies retain their shape. After they’ve cooled, you can enjoy the oozy cheesecake surprise in the middle!
The aroma of these cookies baking is an experience in itself. With each step, you’ll notice how the cocoa mingles with the butter, creating an inviting scent that beckons guests to the kitchen. Plus, with each bite, the chewy exterior blends perfectly with the creamy filling, making this a treat to remember!
Variations & Substitutions
Gluten-Free Red Velvet Cookies: If you’re baking for someone with gluten sensitivity, you can easily adapt this recipe. Substitute the all-purpose flour with a 1:1 gluten-free flour blend. Ensure that the blend contains a binding agent, such as xantham gum, which helps maintain the cookie’s shape and texture. The flavor will remain rich and delightful, allowing everyone to indulge in the joy of these cookies.
Cheesecake Swirl: For a twist on the cheesecake filling, consider swirling in some traditional fruit preserves or even chocolate syrup into the cream cheese mixture. Raspberry or strawberry preserves work particularly well, adding a refreshing tartness that cuts through the rich sweetness of the cookie. Just be mindful not to mix it in too thoroughly; you want to create beautiful swirls for an eye-catching presentation.
Chocolate Chips Add-In: If you’re a chocolate lover, incorporate about 1 cup of semi-sweet or white chocolate chips into your cookie dough mixture. This addition enhances the dessert’s texture and provides bursts of chocolate that harmonize beautifully with the red velvet base. It’s a great way to bring an extra level of **chocolate** decadence without overshadowing the cheesecake filling.
Vegan Version: For a plant-based adaptation, swap out the eggs and butter with vegan equivalents. Use unsweetened applesauce for the eggs (1/4 cup per egg) and a vegan butter or coconut oil. For the cream cheese filling, consider using a dairy-free cream cheese. The result will be just as indulgent while catering to vegan diets.
Mini Cookies: Instead of making large cookies, you can modify the size and create mini versions. Scoop out smaller amounts of dough and filling, adjusting the baking time to around 8-10 minutes. This makes for a delightful centerpiece at gatherings or a fun bite-sized treat for kids.
Each variation allows you to get creative in the kitchen while still delivering the essence of this delicious recipe. Feel free to mix and match ideas to truly make this dish your own!
Common Mistakes to Avoid
Baking can sometimes feel intimidating, especially when it comes to achieving the perfect cookie. One common mistake is overmixing the dough. Doing so can lead to tough cookies instead of the desired soft and chewy texture. Always mix just until the ingredients are combined, and stop to avoid gluten development.
Another common pitfall is inadequately measuring ingredients, particularly flour. Too much flour can result in dry cookies that crumble instead of soft ones that melt in your mouth. Always use the spoon-and-level method for measuring flour to avoid adding too much.
Also, be cautious not to skip the chilling time if your dough feels excessively sticky. Chilling can help the cookies hold their shape while baking, particularly with a filling that may want to ooze.
Lastly, keep an eye on the baking time. Each oven is unique, and what may take 12 minutes in one oven could be too long in another. Start checking your cookies around the 10-minute mark and remove them when the edges are set and the centers are still soft.
These small mistakes can make a significant difference, so keep these tips in mind for successful baking!
Storage, Freezing & Reheating Tips
To store your Cheesecake Stuffed Red Velvet Cookies, place them in an airtight container at room temperature for up to 3 days. Make sure they are completely cooled before sealing them, as any residual heat can create moisture, making the cookies soggy.
For longer storage, consider freezing them. Arrange the cookies on a baking sheet in a single layer and freeze them until firm. Once frozen, you can transfer them to a freezer-friendly bag or container. They will keep well in the freezer for up to 3 months.
To reheat, you can microwave a frozen cookie for about 15 seconds to give it that fresh-baked taste again. Alternatively, place them in the oven at a low temperature for about 5 minutes. This will help perch them back to life while preserving the integrity of the cheesecake filling.
Always remember to label your containers with the date, so you keep track of how long they’ve been stored.
Frequently Asked Questions
Can I make these cookies ahead of time?
Absolutely, you can prepare the dough and the filling a day in advance. Store the cookie dough in the refrigerator and the cheesecake filling in an airtight container. When you’re ready to bake, follow the steps as usual—this can save time if you’re preparing for a gathering or special occasion.
Can I substitute the cream cheese in the filling?
If you’re looking for a healthier alternative, consider using Greek yogurt or ricotta cheese blended until smooth. However, keep in mind that the flavor profile will slightly change, and it may not have the same richness as traditional cream cheese.
What do I do if the cookies spread too much during baking?
If your cookies spread excessively while baking, it could be due to overly soft dough. Always check the consistency of your dough before baking. If it seems too soft, consider chilling the dough for 30 minutes to help it firm up before baking.
How can I enhance the flavor of the cookie dough?
To elevate the flavors even further, experiment with adding spices like cinnamon or nutmeg. A pinch can add warmth and depth to your red velvet cookies that takes them to the next level.
Are these cookies suitable for special diets?
Yes! There are various modifications you can make to accommodate specific dietary needs. You can create gluten-free, vegan, or lower-sugar versions without sacrificing flavor.
Conclusion:
The Cheesecake Stuffed Red Velvet Cookies are more than just a delightful treat; they are an experience that envelops you in a world of flavor and texture. With their soft, chewy exterior and surprise filling, every bite feels like a celebration.
I encourage you to try this recipe with your friends and family, customizing the flavors to suit your preferences. Each cookie tells a story, whether it’s a quiet night in or a lively gathering. Don’t hesitate to share your creations, variations, or even your baking challenges. After all, the joy of baking should be shared!


