Prep time: 20 minutes
Cook time: 0 minutes
Total time: 20 minutes
Servings: 8
Creating a Chip & Dip Charcuterie Board is an excellent way to elevate your next gathering, whether you’re hosting a casual game day or a holiday party. This vibrant display of flavors and textures allows guests to mingle, snack, and indulge at their own pace. The beauty of a charcuterie board lies in its versatility and the opportunity to personalize it according to your guests’ tastes and dietary preferences.
What Is Chip & Dip Charcuterie Board?
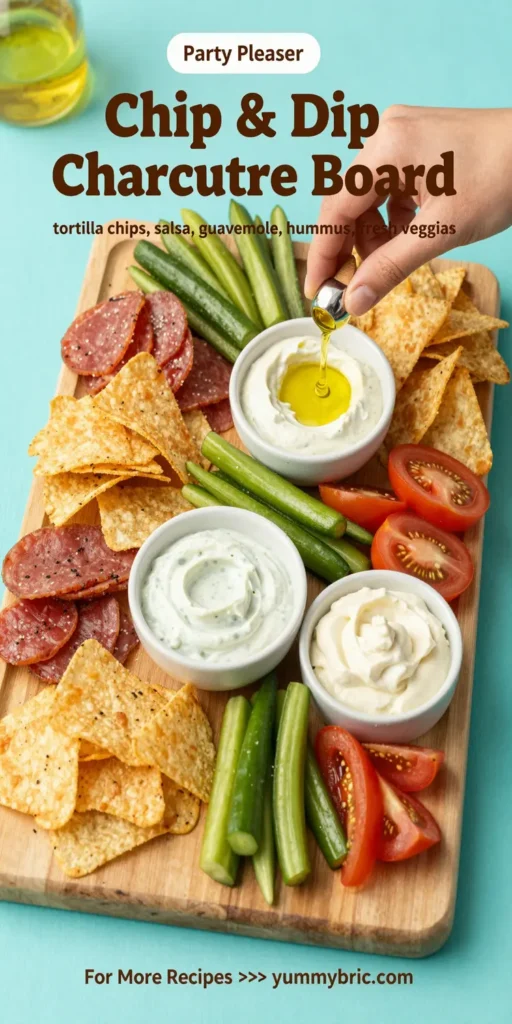
A Chip & Dip Charcuterie Board is essentially an assortment of chips, dips, and complementary snacks beautifully arranged for visual appeal. Unlike traditional charcuterie boards that may focus solely on meats and cheeses, this type of board provides an array of snacking options that include a variety of **chips**—like tortilla, pita, and potato chips—paired with a selection of **dips** such as salsa, guacamole, and hummus. The idea is to create an inviting mix that encourages sharing and tasting.
Why You’ll Love This
You’ll love the Chip & Dip Charcuterie Board for several reasons. Firstly, it is incredibly easy to customize; you can add your favorite flavors and textures. Secondly, it’s a fantastic way to cater to various dietary preferences, allowing for gluten-free snacks, vegan options, and a mix of flavors that can satisfy both the adventurous and the picky. Thirdly, it encourages socialization. Guests can interact while serving themselves and experimenting with different combinations of chips and dips, sparking conversation and camaraderie.
Ingredients You’ll Need
- Tortilla Chips: These add a satisfying crunch and are perfect for scooping up creamy dips.
- Pita Chips: A great alternative to traditional chips, these are sturdy and work well with thicker dips.
- Potato Chips: Classic and beloved, they add a salty option for guests.
- Guacamole: A rich, creamy dip made from ripe avocados, perfect for pairing with chips.
- Salsa: This fresh, zesty dip adds vinegar, tomatoes, and herbs, bringing brightness to the board.
- Hummus: A smooth, savory option made from chickpeas, great for both dipping and spreading.
- Cheese Cubes: Choose a couple of varieties such as cheddar and feta to offer different tastes.
- Fresh Veggies: Carrots, cucumbers, and bell peppers for a crunch that balances out the heavier dips.
- Olives: For a briny kick, olives add another layer of flavor to the board.
- Meats: Optional, but include thin slices of salami or prosciutto for guests who enjoy meat.
How to Make
- Begin by selecting a large, flat platter or cutting board as your base. You want something big enough to accommodate all your ingredients while offering enough space for guests to serve themselves.
- Arrange your **chips** in groups around the board. Be sure to include tortilla chips, pita chips, and potato chips, as this provides variety and color. Group similar types together to create visual appeal.
- Next, make small bowls of **dips**. You can use ramekins or small glass bowls. Fill these with guacamole, salsa, and hummus. Position the bowls toward the center of the board for easy access.
- Add in any **fresh veggies and olives** in sections between the chips and dips. This will create a vibrant look and ensure that lighter, fresher options are available for guests.
- Finally, include your cheese cubes and meats, as well as any other extras you desire. Arrange them in clusters to create an inviting layout. Be creative with the placement for a visually appealing effect.
Variations & Substitutions
Vegetarian Board: If you’re catering to a vegetarian crowd, you can easily adapt your Chip & Dip Charcuterie Board by substituting the meat with a variety of fresh herbs and nuts. You might include roasted chickpeas for added protein and texture. Adding an array of cheeses, such as goat cheese or mozzarella, can offer different flavor profiles as well.
Spicy Twist: For those who love a bit of heat, consider incorporating spicy salsa and jalapeño-infused hummus. You can also include *spiced nacho chips* to enhance the overall flavor. Adding some sliced jalapeños or **sriracha** drizzle on nacho cheese will also spice things up for those adventurous eaters.
Healthy Option: Replace regular chips with baked versions, and consider using a *Greek yogurt-based dip* in place of heavier dips like sour cream. You can also increase the quantity of **fresh veggies** while reducing the amount of cheese, allowing for a guilt-free indulgence while retaining flavor.
Common Mistakes to Avoid
One of the most **common mistakes** is not providing enough variety. This can lead to guests getting bored quickly. Make sure to offer a balance of **chips** and **dips** along with additional snacks like veggies and cheeses.
Another issue is not using enough **dipping options**. Sticking to one or two dips can limit the enjoyment. Instead, consider preparing three to four different types, offering both creamy and chunky textures.
Lastly, avoid overcrowding the board. **Overloading** it with too many items can make it visually overwhelming and actually hinder your guests from enjoying the best flavor combinations. Keep portions manageable and allow guests the freedom to explore their choices.
Storage, Freezing & Reheating Tips
If you have leftovers after your gathering, it’s important to store them properly to maintain freshness. Dips should be stored in airtight containers in the refrigerator and are good for about 3 to 5 days. Chips should be kept in a sealed bag to prevent staleness, ideally in a cool, dry place.
**Freezing is not recommended** for dips with high dairy content, as this can cause separation upon thawing. However, guacamole can be frozen for up to 3 months, but be sure to use a freezer-safe container. When you’re ready to enjoy it again, simply thaw it in the refrigerator overnight.
For reheating, only temperatures for chips need consideration. They can be lightly tossed in the oven for a few minutes to regain some crispness. Remove from the oven immediately once they turn golden to prevent burning.
Frequently Asked Questions
Can I use store-bought dips? Yes, absolutely! Using store-bought dips can save you time and effort. Look for high-quality brand options that feature natural ingredients, which often taste just as delicious as homemade versions. Pair with garnish options like fresh herbs to enhance the presentation.
What types of chips work best? Traditional tortilla chips are a favorite due to their versatility, but pita chips and even veggie chips offer unique flavors and textures that complement different dips. Choose a mix of chip types to appeal to various tastes and provide a colorful display.
How much should I prepare for a group? A standard rule of thumb is to have around 2 to 3 ounces of chips per person and about 1/2 cup of dip per person. Adjust based on the length of the event and whether this will be the main food offering or an appetizer.
Can I make the board ahead of time? Yes! You can assemble the board a few hours in advance. Just be sure to keep dips refrigerated until serving to maintain their freshness. If you are concerned about chips going stale, add them just before guests arrive to have them at their crispiest.
How do I make a Chip & Dip Charcuterie Board special? The key is in the presentation. Use a large wooden board or a colorful platter and lay ingredients in a visually pleasing way. Think heights, colors, and textures—use small bowls, fresh herbs, and garnishes to elevate the experience of your charcuterie board.
Conclusion: A Chip & Dip Charcuterie Board is an easy yet impressive culinary offering that can fit various occasions. It beautifully blends flavors and styles while encouraging engagement among guests. By effectively utilizing ingredients and placing them with purpose, you ensure that every nibble delights, leaving everyone satisfied. Enjoy the creativity and simplicity that this board brings to your gatherings!