Prep time: 15 minutes
Cook time: 0 minutes
Total time: 15 minutes
Servings: 12 balls
If you’ve ever found yourself wandering the snack aisle, scrutinizing labels filled with ingredients you can’t even pronounce, you’re not alone. Many of us crave something sweet yet healthy, and that is where the Chocolate Coconut Bliss Balls come in. These delightful bites are not only delicious but also incredibly easy to make. With their rich chocolate flavor paired with the tropical essence of coconut, you’ll be transported to a beachy paradise with every bite. This recipe provides you with a little indulgence without any post-snack guilt.
Why is this recipe special, you ask? First off, it’s a **no-bake** treat that allows you to whip up a healthy snack in just under 15 minutes. This is perfect for busy parents managing meal prep, beginners who might be intimidated by intricate recipes, or anyone who just wants a quick and satisfying snack. You’ll learn how to achieve a joyful balance of flavors, tips for easy preparation, and variations to suit different dietary needs.
What Is Chocolate Coconut Bliss Balls Recipe – Easy No-Bake Healthy Snack?
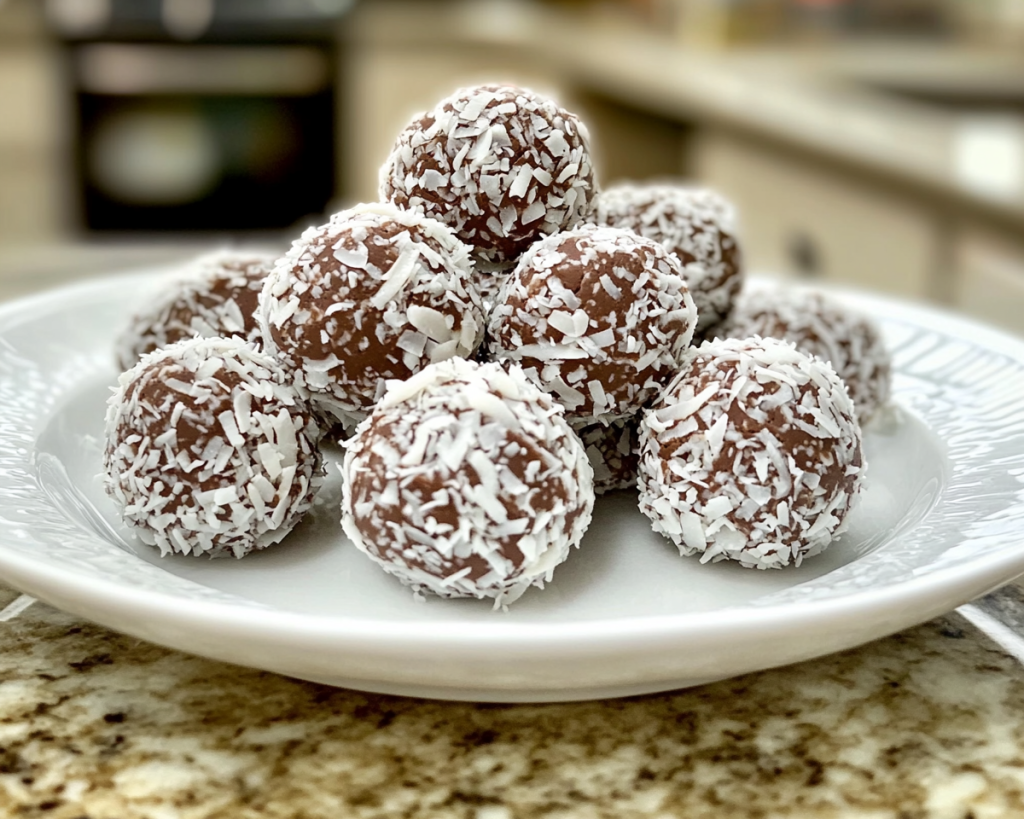
The Chocolate Coconut Bliss Balls are a delightful no-bake treat hailing from the idea of healthy indulgence. These small but mighty snacks are made primarily from nuts, seeds, and natural sweeteners, making them a perfect guilt-free option for an energy boost. Originating from the realm of health-conscious cooking, these bliss balls have earned a place in many kitchens due to their versatility and ease of preparation.
Texture-wise, a Chocolate Coconut Bliss Ball offers a chewy bite that melts in your mouth, with a delightful crunch from the nuts. The flavor profile balances the **richness of chocolate** with the subtle sweetness of dates, enhanced by the natural aroma of shredded coconut. Encased in a dusting of cocoa or coconut flakes, each bite is a heavenly combination that both kids and adults adore.
These little energy bites have gained popularity not only for their delectable taste but also for their nutritional profile. Depending on your choice of ingredients, they can cater to various dietary needs, including vegan and gluten-free options. You can whip these up in minutes, making them an ideal snack for during the week, a post-workout boost, or even a sweet treat for get-togethers.
Why You’ll Love This
You might be wondering why you should venture into the realm of making your own snacks instead of buying pre-packaged goods. First and foremost, the taste is unbeatable. You have complete control over the ingredients, allowing you to create a treat that’s just right for your palate. By making Chocolate Coconut Bliss Balls, you are opting for a **healthier alternative** to the typical sugary snacks found in stores.
Another enticing factor is the ease of preparation. This recipe requires minimal equipment; all you need is a food processor and a mixing bowl. Even if you’re just starting your cooking journey, you can easily master this simple recipe. You can experiment as you go, adjusting sweetness and flavors according to your preference, making a perfect fit for busy lifestyles where time is of the essence.
Cost-effective is another major plus. You can save a considerable amount of money by making your own snacks at home. Buying pre-packaged snacks can add up quickly, especially if you crave them often. In addition to being budget-friendly, these bliss balls allow you to utilize any nuts, seeds, or dried fruits you might already have on hand, making them a practical choice for meal prep.
Lastly, let’s not forget their versatility. With a few minor adjustments, you can adapt these bliss balls for various dietary needs, flavors, and even occasions. You may want to prepare a batch for an afternoon pick-me-up or as an **energy source** before workouts. However you choose to indulge, you’ll find they are both nutritious and delicious.
Ingredients You’ll Need
- 1 cup of medjool dates: These natural sweeteners lend stickiness and a rich flavor. Be sure to check that they’re soft; if they’re a bit dried out, soaking them in warm water for about 10 minutes will do the trick.
- 1 ½ cups of unsweetened shredded coconut: Coconut adds both flavor and a chewy texture. If you want a less intense coconut flavor, opt for unsweetened coconut flakes.
- ½ cup of raw nuts (like almonds or walnuts): Nuts provide healthy fats and protein. You can substitute with sunflower seeds to keep them nut-free.
- ¼ cup of unsweetened cocoa powder: This ingredient is essential for that delicious chocolate flavor. You could alternatively use carob powder for a caffeine-free option.
- 1 teaspoon of vanilla extract: For enhancing flavors, vanilla extract is a classic addition that brings warmth and richness.
- A pinch of salt: Salt helps to elevate sweetness and balance flavors. Just a small dash will do.
- ¼ cup of nut butter (optional): Using nut butter, like almond or peanut butter, can offer more creaminess and act as a binding agent. If you prefer, tahini or sunflower butter are suitable alternatives.
Each of the ingredients mentioned plays a crucial role in creating that perfect **Chocolate Coconut Bliss Ball**. For instance, if you’re looking to reduce sugar further, you can opt for a lower quantity of dates and incorporate other sweeteners like mashed bananas or applesauce. Understanding the function of each component helps in customizing the recipe to your liking.
How to Make
- Prepare the Ingredients: Begin by gathering all the essential ingredients listed above. Having everything ready will streamline the process. If your dates are on the drier side, soak them in warm water for a few minutes and then drain.
- Blend the Base: In a food processor, add the nuts and pulse them until they reach a coarse flour-like consistency. This should take about 30 seconds. You don’t want them to turn into nut butter; a crunchy texture is ideal. Next, add the drained dates, shredded coconut, cocoa powder, vanilla extract, and salt. Blend until everything is well combined, scraping down the sides when necessary.
- Add Some Creaminess (Optional): If you’re using nut butter, this is the time to incorporate it into the mixture. Adding nut butter provides additional creaminess and helps everything bind together more cohesively. Blend once again until the mixture is sticky enough to hold together.
- Form the Balls: With your hands, take a tablespoon-sized portion of the mixture and roll it into a ball. Place each ball onto a plate or a baking sheet lined with parchment paper. If the mixture is too crumbly, you can dampen your hands with a little water while rolling.
- Coat and Chill: For added flavor and texture, you can roll the balls in additional shredded coconut or cocoa powder. Once all the balls are formed, place them in the refrigerator for about 30 minutes to firm up.
- Enjoy! Your Chocolate Coconut Bliss Balls are now ready. Store them in an airtight container in the fridge, and allow yourself the pleasure of reaching for a healthy snack whenever cravings hit you.
Making these bliss balls is not just quick and easy but also allows for a lot of customizability. If you find that the texture isn’t quite right on the first go, don’t worry; this is part of the cooking journey. With a little practice, you’ll develop a knack for crafting these delicious bites exactly to your taste.
Variations & Substitutions
Nut-Free Bliss Balls: If you or anyone in your household has nut allergies, simply substitute the nuts with seeds, like sunflower seeds or pumpkin seeds. Not only will this keep the recipe safe, but it will also offer a new flavor profile. These nut-free options remain nutrient-dense while still providing that satisfying crunch.
Chocolate Mint Variation: If you want your bliss balls to have a refreshing twist, consider adding a few drops of peppermint extract to the mixture. The mint complementing the chocolate will make them taste like a mint chocolate dessert. This variation is especially delightful during the holiday season or summer parties.
Cacao Nib Crunch: For a different texture, incorporate cacao nibs into the mix. These little bits will provide a lovely crunch and a more intense chocolate flavor. They’re also packed with antioxidants, making your snack even healthier.
Protein-Packed Bliss Balls: For fitness enthusiasts or those looking to up their protein intake, simply add a scoop of protein powder into the mixture. Carefully choose a flavor that complements the chocolate, such as vanilla or chocolate itself, to enhance the overall taste without overpowering it.
Dried Fruit Alternative: If you love the flavor of dried fruits like apricots or cranberries, feel free to substitute some of the dates with them. This addition will give a unique sweetness and chewy texture that varies from batch to batch, making every batch a new experience.
These variations not only keep your snack game exciting but also tailor the recipe to fit specific dietary preferences or cravings you may have. Experimentation is key, so feel free to mix and match to find your perfect combination.
Common Mistakes to Avoid
When embarking on a cooking adventure, common pitfalls can lead to a less-than-perfect outcome. One frequent mistake when making Chocolate Coconut Bliss Balls is over-blending the mixture. Doing so can transform the nuts into butter, compromising the crunchy texture you desire. To avoid this, blend the nuts first, as suggested, and then add other ingredients without over-mixing.
Another mistake is underestimating the consistency. If your mixture is too dry, the balls will crumble and won’t hold their shape. If this happens, you can add a dash of nut butter or a bit of water to bind the mixture better. Conversely, if the mixture seems too wet, consider adding more shredded coconut or cocoa powder to pull it together.
Additionally, be sure to correctly store the bliss balls. Leaving them out at room temperature may cause them to lose their shape, especially during warmer months. Always opt for an airtight container in the fridge, ensuring they remain fresh and tasty.
Lastly, don’t skip on the resting time in the fridge. While you may be eager to dig in right away, allowing them to firm up for at least 30 minutes enhances their texture significantly. Skipping this step could lead to a gooey mess that doesn’t provide the gratifying chewiness you expect.
Storage, Freezing & Reheating Tips
To maintain the freshness and texture of your Chocolate Coconut Bliss Balls, proper storage is crucial. Storing them in an airtight container in the refrigerator will keep them lasting for up to a week. If you wish to keep them for longer, these delightful snacks can be frozen as well. Place the bliss balls in a labeled freezer-safe container, separating layers with parchment paper for easy access.
When you’re ready to enjoy your frozen bliss balls, simply take them out and let them thaw at room temperature for about 15-20 minutes before enjoying. This ensures that they retain their texture and delightful flavors. You can also enjoy them straight from the freezer if you prefer a firmer texture, especially during warm weather.
It’s important to adhere to food safety guidelines. Always label your containers with the date, so you can keep track of how long they’ve been stored. Staying organized ensures you enjoy these treats while they are at their best.
Frequently Asked Questions
Can I make these bliss balls kid-friendly?
Absolutely! The Chocolate Coconut Bliss Balls are naturally kid-friendly due to their sweet taste and appealing texture. You can involve your kids in the **making process**, allowing them to roll the balls, which makes it a fun activity as well as a learning opportunity in the kitchen.
What can I use instead of dates?
If dates aren’t available, you can use other dried fruits like figs or prunes for sweetness. However, note that this will alter the flavor slightly, so choose a dried fruit that you enjoy. Additionally, a combination of honey or maple syrup with oats could also work if you prefer to skip dried fruits altogether.
Do these bliss balls need to be refrigerated?
Yes! For the best texture and to maintain freshness, these bliss balls should always be kept in the refrigerator. They will last about a week when stored properly, providing you with a perfect on-the-go snack.
Can I eat these if I’m on a keto diet?
While traditional bliss balls may be a bit high in carbohydrates due to the dates and shredded coconut, you can modify the recipe by reducing the amount of dates, replacing them with a keto-friendly sweetener, and incorporating nuts or seeds with high fat content to suit your dietary needs.
What is the best way to enjoy these?
While you can enjoy Chocolate Coconut Bliss Balls straight out of the fridge or freezer, consider pairing them with a cup of herbal tea or a glass of almond milk for a satisfying treat. They can also make a great addition to your post-workout snack routine or an afternoon pick-me-up.
Conclusion:
In summary, the Chocolate Coconut Bliss Balls are a true gem in the realm of healthy snacking. They are quick to make, requiring minimal effort, and cater to various dietary preferences. You can enjoy the satisfaction of knowing exactly what’s in your snack while treating yourself or your loved ones to something truly delightful. Don’t hesitate to customize the recipe to your liking, whether through layers of flavor, texture, or dietary needs. I encourage you to give these bliss balls a try. You’ll find them not just delicious but also a nourishing option to keep you energized throughout the day. Happy snacking!