Prep time: 20 minutes
Cook time: 1 hour
Total time: 1 hour 20 minutes
Servings: 12 slices
Imagine walking into a cozy kitchen filled with the warm aroma of freshly baked bread, where the rich, sweet smell of dates mingles with the fragrant notes of toasted nuts. Classic Date Nut Bread is not just another loaf; it’s a nostalgic bite of comfort that evokes memories of holidays past and gatherings with loved ones. This old-fashioned holiday loaf is packed with natural sweetness, making it an ideal treat for breakfast, snacks, or dessert. In this article, I’ll guide you through everything you need to know to whip up this delicious recipe, sharing tips, variations, and plenty of encouragement along the way. You’ll learn why this recipe is beloved and how you can adapt it to fit your own tastes.
What Is Classic Date Nut Bread | Old-Fashioned Holiday Loaf Recipe?
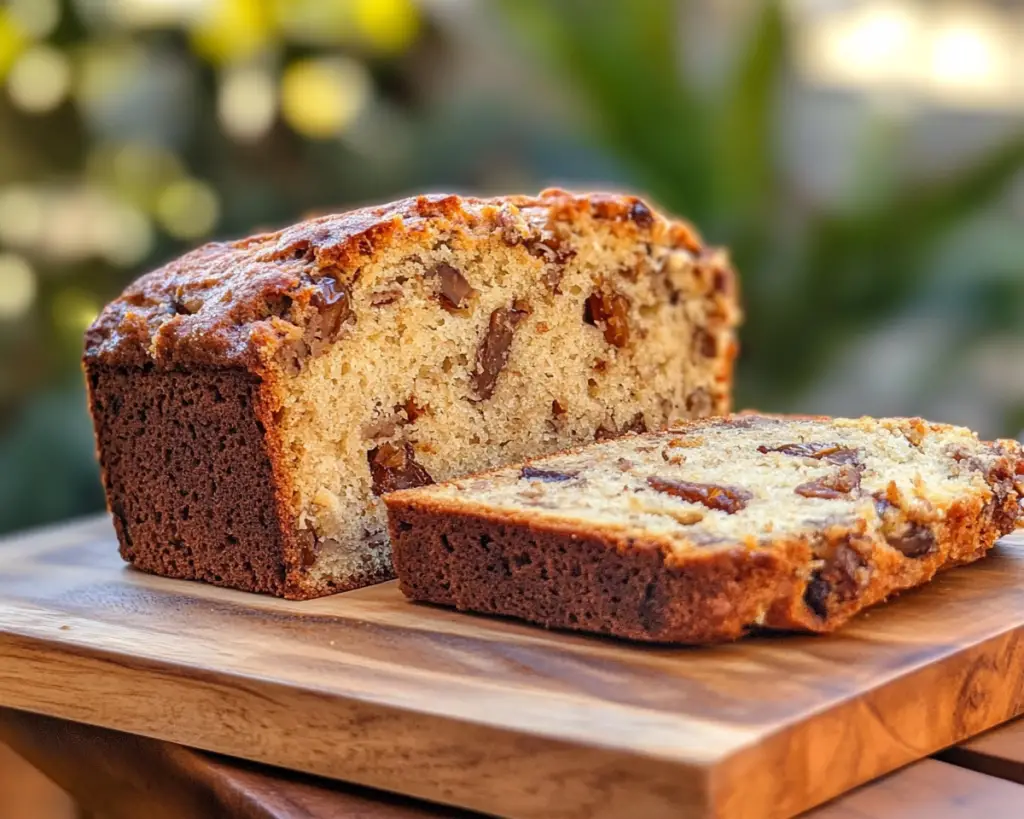
Classic Date Nut Bread has its roots steeped in tradition, often gracing tables during the holidays and special occasions. Its origins can be traced back to early 20th-century America, where simple ingredients could be transformed into something extraordinary through careful crafting. This bread is characterized by a soft, moist crumb that envelops sweet, chewy dates interspersed with crunchy walnuts or pecans.
The flavor profile is truly unique; the natural sweetness of the dates complements the savory notes of the nuts, creating a delightful balance. As the bread bakes, the sugars in the dates caramelize, giving it a slight depth and richness that makes each slice irresistible. Often enjoyed warm with a pat of butter or a smear of cream cheese, Classic Date Nut Bread is versatile enough to satisfy a variety of palates, making it a timeless favorite for bakers everywhere.
Why You’ll Love This
There are countless reasons to fall in love with Classic Date Nut Bread. First and foremost is the taste; the incredible combination of sweet, chewy dates and crunchy nuts creates a textured experience that dances on your taste buds. But don’t let the rich flavors intimidate you — this recipe is incredibly easy to follow, even for those who are just starting out in the kitchen. You’ll find that with the right ingredients and a little bit of time, you can create a loaf that rivals the offerings of artisan bakeries.
Another factor is the economical nature of this recipe. Dates and nuts are nutrient-rich and reasonably priced, providing a fantastic way to create a hearty bread without breaking the bank. Moreover, this bread is versatile; it can be enjoyed for breakfast, as a snack, or even as a dessert. While some might think date nut bread is merely a seasonal treat, it’s a year-round delight that should have a consistent place in your baking repertoire.
Although you might think homemade bread is hard to achieve, you’ll be amazed at how straightforward and satisfying this project is! Just remember to measure your ingredients carefully and take your time during the mixing and baking stages. Having fun experimenting with this recipe will only enhance your skills while indulging your palate.
Ingredients You’ll Need
To create this delightful Classic Date Nut Bread, you will need the following ingredients:
- Dates: About 1 cup, pitted and chopped. Dates provide natural sweetness and moisture to the bread. If you can’t find fresh dates, dried dates will work as well, though they may need to be soaked in warm water for 10 minutes to soften.
- Nuts: 1 cup of chopped walnuts or pecans. Nuts add a crunchy texture and rich flavor. Feel free to change the type of nut based on your preference.
- All-Purpose Flour: 2 cups. This will be the base of your loaf, providing structure. You may substitute with whole wheat flour for a healthier option.
- Sugar: 1 cup of granulated sugar. This sweetens the bread and enhances the caramelization of the dates. For a healthier alternative, consider using coconut sugar or a sugar substitute.
- Eggs: 2 large eggs. Essential for binding the ingredients and adding moisture. If you’re looking for a vegan substitute, try flax eggs or applesauce.
- Baking Soda: 1 teaspoon. This provides the lift necessary for the bread, creating a lighter texture. Make sure it’s fresh for the best results.
- Salt: 1 teaspoon. Balances the sweetness and enhances overall flavor.
- Vanilla Extract: 1 teaspoon. This adds a warm, inviting flavor to the bread, enhancing the sweetness of the dates.
- Warm Water: 1 cup. This is used to help soften the dates and create moisture for the batter.
These ingredients come together harmoniously to create a luscious loaf that can easily become a favorite in your household. Make sure to have everything prepped and ready, as it makes the baking process smoother and more enjoyable.
How to Make
Now, let’s dive into the step-by-step process of creating your Classic Date Nut Bread.
- Preheat your oven: Begin by preheating your oven to 350°F (175°C). This is an essential step to ensure that your bread bakes evenly. While your oven heats up, you can focus on preparing your ingredients.
- Prepare the baking pan: Grease a 9×5-inch loaf pan with butter or non-stick spray. You can also line it with parchment paper to make releasing the bread easier once it’s done baking.
- Soak the dates: In a mixing bowl, combine the chopped dates with 1 cup of warm water. Let them soak for about 10-15 minutes. This softens the dates and allows them to break down more easily into the batter.
- Mix the wet ingredients: In a large bowl, beat the eggs and sugar together until they are light and fluffy. You can use a hand mixer or a whisk arm to achieve this. Once combined, add in the soaked dates (draining any excess water) along with the vanilla extract. Stir thoroughly until everything is well mixed.
- Combine the dry ingredients: In a separate bowl, whisk together the all-purpose flour, baking soda, and salt. This step ensures that your leavening agent is evenly distributed throughout the flour, preventing any lumps.
- Combine wet and dry: Gradually fold the dry ingredients into the wet mixture using a spatula. Mix until just combined. Be careful not to overmix, as this can result in a dense loaf.
- Add the nuts: Gently fold in the chopped nuts of your choice, ensuring that they are evenly distributed throughout the batter. The nuts will not only add a beautiful crunch but will also infuse the bread with additional flavors.
- Pour the batter: Transfer the batter into the prepared loaf pan, smoothing it out evenly with the spatula. This ensures even baking and a nice crust on top.
- Bake: Place your loaf pan in the preheated oven and bake for 60-70 minutes or until a toothpick inserted into the center comes out clean. Keep an eye on it during the last few minutes of baking to prevent overcooking.
- Cool: Once the bread is baked, remove it from the oven and allow it to cool in the pan for about 10 minutes before transferring it to a wire rack to cool completely. This step helps in achieving a perfect texture.
As your bread bakes, the mouthwatering aroma fills the kitchen, and you’ll find yourself eagerly anticipating that first, warm slice. The golden crust will greet you with its inviting texture, while the first bite reveals the moist crumb, dotted with sweet dates and crunchy nuts.
Variations & Substitutions
Nut-Free Variation: For those with nut allergies or preferences, you can make this bread without nuts. This alternative still retains its delightful flavor and texture, though it may feel slightly different without the nutty crunch. You can add a dash of cinnamon or nutmeg for additional warmth and complexity.
Chocolate Chip Date Bread: If you’re looking to indulge a little more, consider adding 1 cup of chocolate chips to the batter. The chocolate will melt slightly during baking, enhancing the sweetness of the dates and providing a delightful contrast to the earthy flavor of the bread. This is especially appealing to kids and chocolate lovers!
Whole Wheat Version: For a healthier twist, substitute half or all of the all-purpose flour with whole wheat flour. This variation will yield a denser loaf with a slightly nutty flavor. Remember to watch the baking time, as whole wheat can cook faster.
Vegan Date Nut Bread: To make this recipe vegan, substitute the eggs with flax eggs (1 tablespoon of ground flaxseed mixed with 2.5 tablespoons of water for each egg) or 1/4 cup of unsweetened applesauce. This will maintain the moisture and binding required for a successful loaf.
Spiced Date Nut Bread: For those who love a bit of spice, consider adding ground cinnamon and nutmeg to the dry ingredients. About 1 teaspoon of cinnamon and a pinch of nutmeg will elevate the bread with a seasonal warmth that is perfect for the holidays.
Each of these variations allows you to tailor the Classic Date Nut Bread to your taste while maintaining the essence of this beloved recipe. Feel free to mix and match based on what you have on hand!
Common Mistakes to Avoid
Baking can be tricky, but with a little knowledge, you can avoid some common pitfalls that might derail your Classic Date Nut Bread.
Overmixing the batter: One of the biggest mistakes in bread making is overmixing. When you combine the wet and dry ingredients, mix just until you see no more flour. Overmixing activates the gluten in the flour, resulting in a dense and chewy loaf rather than a soft and tender one.
Incorrect oven temperature: An oven that’s too hot can cause the outside of the bread to brown quickly while leaving the inside undercooked. Always preheat your oven and consider using an oven thermometer to ensure accuracy.
Improperly measuring flour: Flour should be measured accurately for the best results. Avoid scooping directly from the bag, as this can compress the flour and lead to using too much. Instead, spoon it lightly into a measuring cup and level it off with a knife.
Not allowing it to cool: Patience is key when it comes to baking. If you cut into the bread while it’s still warm, it can crumble and fall apart. Allow it to cool completely on a wire rack for the best texture and presentation.
Addressing these common mistakes will ensure that you produce a perfectly baked loaf of Classic Date Nut Bread every time. Remember, cooking is as much about the journey as it is about the destination!
Storage, Freezing & Reheating Tips
Taking care of your Classic Date Nut Bread after cooking is essential for maintaining its freshness and flavor. Proper storage will keep it delicious for days!
To store, wrap the cooled loaf in plastic wrap or aluminum foil and place it in an airtight container at room temperature. This will help to retain moisture, keeping the bread moist for about 3-4 days. If you notice it starts to dry out a bit, don’t worry; a quick warm-up in the microwave for a few seconds can bring back some of that lovely texture.
If you wish to keep the bread for longer, freezing is a fantastic option. Slice the bread into individual servings and wrap each slice tightly in plastic wrap before placing them in a freezer bag. This way, you can enjoy a slice whenever the craving strikes without needing to bake a new loaf. It will stay fresh in the freezer for up to 3 months.
When you’re ready to enjoy your frozen date nut bread, simply remove a slice and allow it to thaw at room temperature. For an extra indulgence, warm it up in the microwave or toaster oven for a few minutes to rekindle that freshly-baked taste and aroma.
Always remember to practice good food safety habits. Ensure that you cool your bread completely before storing to prevent condensation, which could lead to spoilage.
Frequently Asked Questions
Can I use other dried fruits in this recipe? Absolutely! While dates are the star of the show, feel free to experiment with apricots, raisins, or cranberries. Each dried fruit will impart its unique flavor, adding variety to your loaf.
Is it necessary to soak the dates? Soaking the dates is recommended as it softens them, making them easier to incorporate into the batter and ensuring they contribute moisture to the bread. If you’re in a rush, you can skip this step, but soaking enhances the final texture.
Can I make this recipe gluten-free? Yes, you can! For a gluten-free variation, use a 1:1 gluten-free flour blend. Ensure that the blend includes xanthan gum for the best texture. The loaf will be just as delightful without the gluten.
How can I make my bread more flavorful? Consider adding spices like cinnamon or nutmeg to the dry ingredients or incorporating ingredients like citrus zest, which can brighten the flavor profile. You could also substitute part of the sugar with brown sugar for a deeper, caramel-like flavor.
How do I know when my bread is done baking? The best way to check is to insert a toothpick into the center of the loaf. If it comes out clean or with just a few crumbs, your bread is done. Also, you can gently tap the top of the bread; if it sounds hollow, it is likely fully baked.
Conclusion:
With its rich flavor, moist crumb, and delightful texture, Classic Date Nut Bread is a recipe that deserves a spot in your baking rotation. As you explore this recipe, I encourage you to try your own twists and variations to make it uniquely yours. Whether you enjoy it warm from the oven with some butter or as part of a leisurely brunch, your homemade date nut bread is sure to be a hit. So grab your ingredients, gather your loved ones, and experience the joy of baking with this nostalgic recipe! Happy baking!