Prep time: 30 minutes
Cook time: 15 minutes
Total time: 45 minutes
Servings: 24 cookies
When it comes to baking, few treats can evoke the same sense of nostalgia and delight as classic Red Velvet Bear Cookies. Whether you’re a busy parent looking for a fun project with your kids or a beginner hoping to impress friends with your baking skills, this recipe is sure to brighten your day. Imagine the smell of fresh, warm cookies wafting through your home, inviting everyone to indulge. With their striking red hue, soft texture, and creamy frosting, these cookies are a feast for both the eyes and the palate.
What makes this recipe extra special is the blend of flavors and textures that come together harmoniously. The combination of rich cocoa and buttermilk creates a delightful sweetness that is balanced with the slight tanginess of the frosting. You will also learn useful tips and variations to make this recipe your own, whether you prefer them gluten-free or enhanced with chocolate chips.
What Is Classic Red Velvet Bear Cookies?
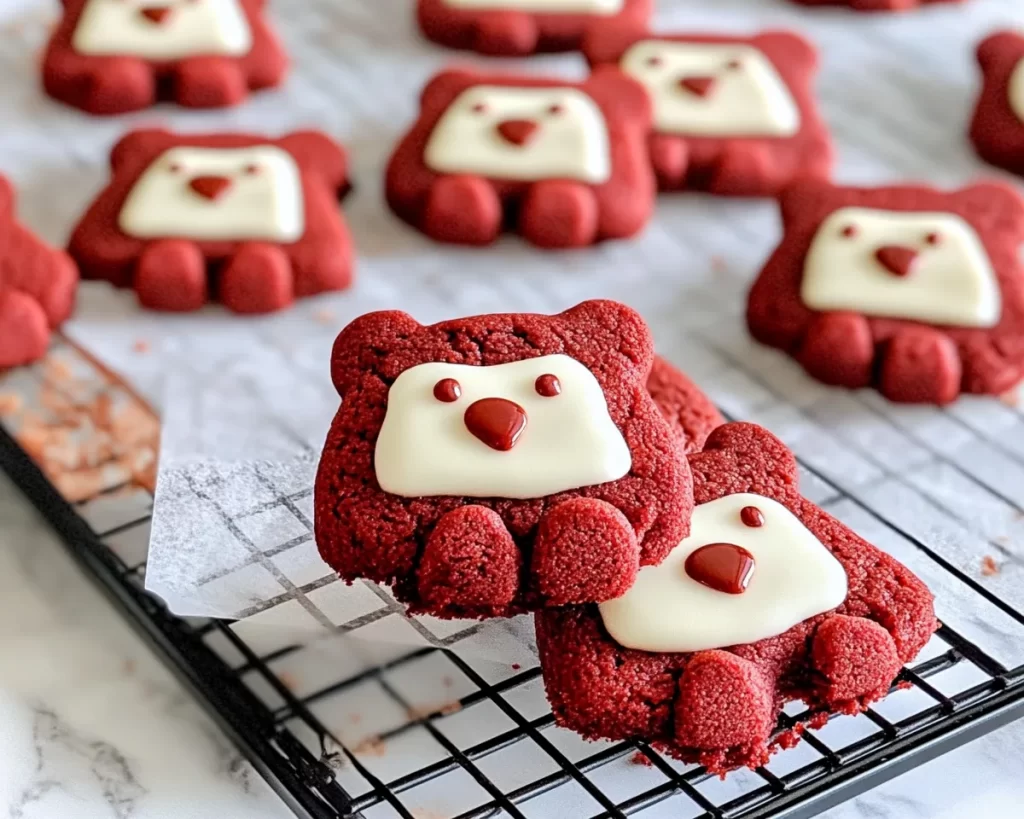
Classic Red Velvet Bear Cookies are a fun, whimsical twist on traditional red velvet cake transformed into colorful, bear-shaped cookies. The origins of red velvet cake date back to the Victorian era, but the cookie version emerged as a favorite among bakers with a penchant for creativity. The texture of these cookies is soft and cake-like, making them a real treat. They are characterized by their vibrant red color, which often comes from the combination of cocoa powder and red food coloring.
The flavor is a unique blend of mild cocoa and sweet vanilla, creating a delightful taste experience with every bite. When paired with a cream cheese frosting, these cookies transcend ordinary dessert expectations, becoming a delicious indulgence that everyone will love. Their playful appearance makes them perfect for celebrations, such as birthday parties or holiday gatherings, inviting people of all ages to partake in the fun.
Beyond their charming shape and color, these cookies also offer versatility. You can create different designs, like chocolate chip variations or even fun sprinkles on top, to cater to any occasion or preference. With this guide, you’ll have all the tools you need to create your very own batch of Classic Red Velvet Bear Cookies that are not only delicious but also fun to make.
Why You’ll Love This
There are countless reasons why you’ll fall head over heels for these cookies. First and foremost, they are incredibly tasty! The rich flavor profile of red velvet, paired with the creaminess of the frosting, creates a mouthwatering treat that is hard to resist. Additionally, the cookies are relatively easy to make, requiring minimal baking skills, which makes them perfect for beginners in the kitchen.
Cost-effectiveness also plays a role; many of the ingredients are staples that you likely already have in your pantry. This means you can whip up a batch without breaking the bank. Not to mention, they’re adaptable to various dietary needs. If you prefer gluten-free options, a simple swap using gluten-free flour can accommodate those in your life.
It’s essential to note that red velvet cookies can sometimes be perceived as challenging due to the use of food coloring. However, as long as you’re attentive to the measurements and methods, you’ll be surprised by how straightforward this recipe is. Cooking these cookies is not just an act, but a delightful experience that engages the senses— from the vibrant color to the sweet aroma that fills your kitchen.
Ingredients You’ll Need
- All-purpose flour: The base of the cookies; it provides structure. You can substitute with gluten-free flour for a gluten-free version.
- Cocoa powder: Adds depth to the flavor. Use unsweetened cocoa powder to maintain the balance of sweetness in the recipe.
- Granulated sugar: Sweetens the cookies and helps to create a soft texture.
- Brown sugar: Enhances the overall flavor and moisture in the cookies.
- Baking soda: Provides leavening, giving the cookies their soft and fluffy texture.
- Salt: Balances the sweetness and enhances the flavors.
- Vegetable oil: Keeps the cookies moist; can be replaced with melted butter for a richer flavor.
- Large eggs: Acts as a binding agent, adding richness.
- Buttermilk: Contributes to the distinct tang of red velvet flavor; you can substitute with milk plus vinegar or lemon juice if needed.
- Red food coloring: Gives the cookies their signature color. Feel free to adjust based on your preference for hue.
- Vanilla extract: Adds a warm, sweet flavor that complements the cocoa.
- Cream cheese: Essential for the frosting; creates a rich, tangy topping.
- Powdered sugar: Sweetens the frosting while giving it a smooth texture.
- Milk: Helps to achieve the desired consistency for the frosting.
- Sprinkles (optional): Adds a fun, decorative touch if desired.
Gather these ingredients and prepare to create a delicious batch of cookies that will resonate with friends and family alike. Each ingredient plays a crucial role in the final product, enhancing both the flavors and textures that make these cookies stand out.
How to Make
- Preheat your oven to 350°F (175°C). This step is crucial as you’ll want the cookies to bake evenly. Line your baking sheets with parchment paper to prevent sticking.
- In a large mixing bowl, combine the all-purpose flour, cocoa powder, baking soda, and salt. Make sure to whisk them together well to ensure that the baking soda is evenly distributed, which is important for even rising.
- In another bowl, mix the granulated sugar and brown sugar with the vegetable oil until well combined. The mixture should be smooth and resemble a wet paste. This step is crucial for achieving the right texture in your cookies.
- Add the eggs, buttermilk, and vanilla extract to the sugar and oil mixture. Mix them thoroughly until everything is well combined. This will add moisture and flavor to the cookies.
- Gradually add the dry ingredients to the wet mixture. Be careful not to overmix; fold the ingredients until just combined. The dough should be thick and rich, showcasing the beautiful red hue.
- Now, add the red food coloring. Start with a few drops and mix until you achieve your desired shade. Remember that these cookies should be vibrantly red for the perfect presentation.
- Using a cookie scoop or tablespoon, drop the cookie dough onto the prepared baking sheets. Ensure that you leave enough space between each cookie, as they will spread during baking.
- Place the baking sheets in the preheated oven and bake for 10-15 minutes or until the edges are set but the centers remain slightly soft. The cookies will continue to firm up as they cool, so do not over-bake.
- Once baked, remove the cookies from the oven and let them cool on the baking sheets for about 5 minutes before transferring them to wire racks to cool completely.
- While the cookies are cooling, prepare the frosting. In a mixing bowl, beat the cream cheese until smooth, then gradually powder in the powdered sugar. If the mixture is too thick, add a splash of milk until the desired consistency is reached.
- Once the cookies are completely cooled, frost them generously with the cream cheese frosting. If desired, add colorful sprinkles on top for an extra festive touch!
Making these Classic Red Velvet Bear Cookies involves a series of simple but significant steps. From blending ingredients to the moment they emerge from the oven, the anticipation will have you watching every minute. Do not rush the cooling process, as it allows the flavors to meld perfectly. If you’re new to baking, don’t be discouraged—these cookies offer the perfect beginner-friendly task that results in a delightful treat.
Variations & Substitutions
Gluten-Free Red Velvet Bear Cookies: You can easily modify this recipe to be gluten-free by substituting all-purpose flour with a gluten-free flour blend. It’s important to choose a high-quality blend that already contains a binding agent, like xanthan gum, to achieve the same great texture. The end result will be just as soft and delicious.
White Chocolate Chip Red Velvet Bear Cookies: For an added treat, incorporate white chocolate chips into the dough, adding both sweetness and a creamy texture. The contrast of the white chocolate against the red cookies is visually appealing and provides a delightful twist on the traditional flavor.
Vegan Red Velvet Bear Cookies: Make these cookies vegan-friendly by replacing the eggs with flaxseed meal or applesauce. Use almond or oat milk instead of buttermilk, and opt for a vegan butter alternative in the frosting. The result will be equally scrumptious, proving you can enjoy classic flavors while adhering to dietary preferences.
Red Velvet Bear Cookies with Creamy Peanut Butter Frosting: If you’re a peanut butter lover, consider frosting your cookies with a peanut butter frosting instead of cream cheese. Simply blend creamy peanut butter with powdered sugar and a little bit of milk until smooth. This variation provides a delightful contrast to the rich cake flavor.
These variations not only offer the opportunity to personalize your baking experience but also cater to different dietary needs and preferences. Adjusting a few simple ingredients can open up a world of flavor while adhering to various lifestyles.
Common Mistakes to Avoid
As with any recipe, it’s easy to make small missteps that can lead to less-than-perfect cookies. One common issue is overmixing the dough. Overmixing can lead to tough cookies, which is not what we want. Always remember to mix ingredients just until combined, yielding soft and tender cookies.
Another frequent pitfall is not properly measuring your ingredients. Using too much flour can make your cookies dry and crumbly. Always spoon flour into your measuring cup and level it off for the best results.
Make sure to pay attention to the baking time as well. Undercooked cookies may seem soft, but they will harden as they cool, while overbaked cookies will be dry. Keep an eye on them during the last few minutes of baking to ensure the perfect texture.
Lastly, don’t underestimate the importance of letting your cookies cool completely before frosting them! Frosting warm cookies can lead to melted, mushy frosting that can ruin your beautiful presentation. Exercise patience, and your cookies will shine.
Storage, Freezing & Reheating Tips
Storing your Classic Red Velvet Bear Cookies properly ensures that they stay fresh and delicious for days to come. Once your cookies are completely cooled, place them in an airtight container at room temperature. They can typically last for up to one week, but keep an eye on the texture to enjoy them at their best.
If you want to extend your cookie enjoyment, these cookies freeze exceptionally well. To freeze, place them in a single layer on a baking sheet and pop them in the freezer until they’re firm. Once frozen, transfer them to a resealable plastic bag or airtight container. When ready to enjoy, pull out a cookie or two and let them thaw at room temperature or microwave them for a few seconds for a warm treat.
When reheating, it’s best to use an oven or toaster oven rather than a microwave to prevent the cookies from becoming rubbery. Preheat the oven to a low temperature, about 300°F (150°C), and warm the cookies for a few minutes until heated through. This method preserves the original texture and taste of your cookies, bringing back that fresh-baked charm.
Additionally, be mindful of food safety. Always make sure that your ingredients are fresh and that you’re following safe practices in the kitchen, especially when it comes to dairy.
Frequently Asked Questions
Can I use gel food coloring instead of liquid food coloring?
Absolutely! Gel food coloring tends to provide a richer color without adding as much liquid to the batter, which is beneficial for achieving the deep red hue in these cookies. Just start with a small amount and add more until you reach your desired shade.
What can I do if my cookies spread too much while baking?
If your cookies are spreading a lot, it might be due to warm dough or an incorrect flour measurement. Make sure your butter or oil is at room temperature, and chill the dough for about 30 minutes before baking if it feels too soft.
Can I add nuts to the cookie dough?
Of course! Adding nuts such as pecans or walnuts can introduce a delightful crunch and an additional layer of flavor to your red velvet cookies. Just chop them coarsely and fold them into the dough before baking.
How can I make the frosting less sweet?
If you find the traditional cream cheese frosting too sweet, consider adding a pinch of salt to balance the flavors. Additionally, using less powdered sugar or incorporating a bit of sour cream can tone down the sweetness while maintaining that creamy texture.
What is the best way to transport these cookies?
For transporting cookies, stack them in a tall, airtight container lined with parchment paper. This prevents them from sticking together and ensures they remain intact during transit. If you’re packing them for a special occasion, place a layer of parchment paper between each row of cookies for added protection.
Conclusion:
In conclusion, Classic Red Velvet Bear Cookies are a delightful treat that combines nostalgic flavors with a whimsical presentation. They are sure to charm anyone who lays eyes on them, and with this recipe, you have the power to customize and perfect them to your liking. Whether for a special occasion or simply a sweet snack for the family, these cookies invite creativity and enjoyment in the kitchen.
So, roll up your sleeves, gather your ingredients, and dive into the delightful world of cookie-baking. Don’t forget to make it a memorable experience by baking with loved ones and experimenting with different flavors and decorations. Happy baking, and be sure to share your creations with friends and family!


