Ah, Creamy Baked Mac and Cheese. Just saying those words brings a wave of warmth, nostalgia, and cravings all at once, doesn’t it? I still remember the first time I made this dish. It was a chilly evening, the kind where you want nothing more than to wrap yourself in a cozy blanket and hunker down with something delicious. I had some old pasta sitting in the pantry (you know, that one box that you keep trying to ignore), and I thought, “Why not make something comforting?” Little did I know that I was about to embark on a cheesy, creamy adventure that would bring pure joy not only to my taste buds but also to my soul.
Honestly, there’s something magical about mac and cheese. It’s not just a dish; it’s a childhood memory, a shared family moment, and, dare I say, a piece of art that comes from the heart. When I think of mac and cheese, I remember my Aunt Mabel, who made the creamiest one annually during the holidays. As kids, we would practically camp out by the oven, desperate for that first cheesy bite. Now, many decades later, as I stand in my own kitchen, stirring a velvety cheese sauce and listening to the gentle bubbling of pasta in boiling water, I realize this dish is more than just its ingredients; it’s a tapestry woven with love, family, and moments spent at the dinner table.
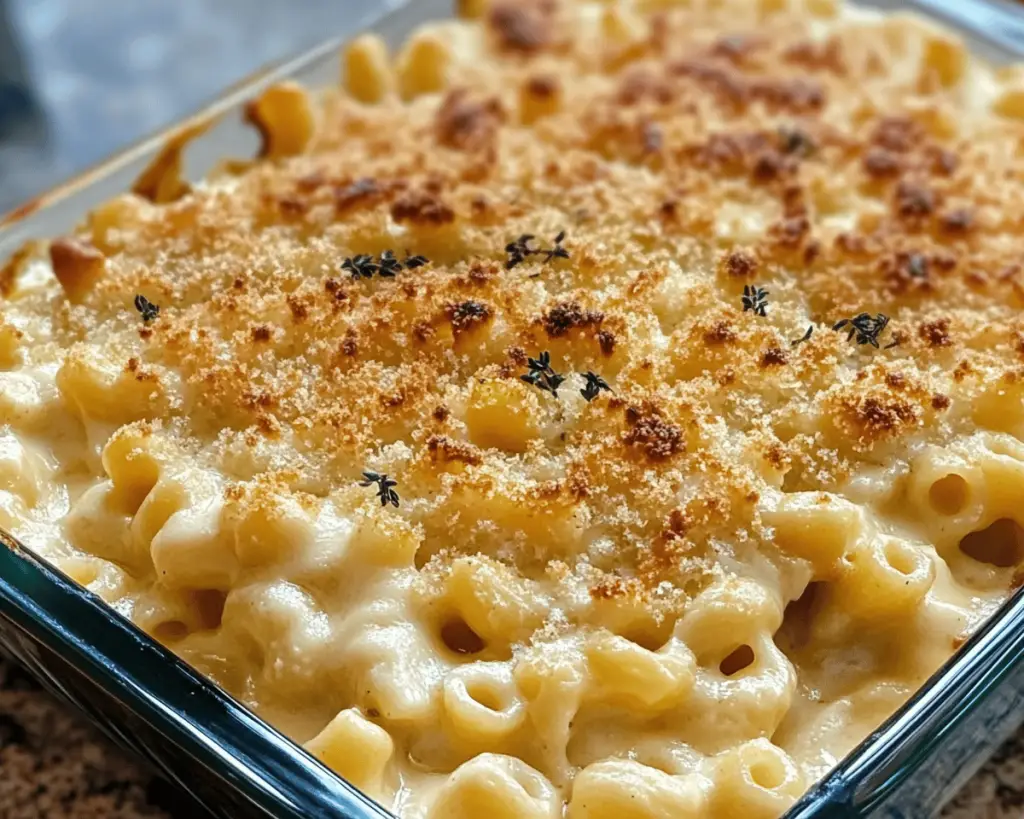
There’s also something to be said about the layers of crispy breadcrumbs you sprinkle on top, glistening from a brief flirtation with heat, providing a delightful crunch that contrasts with the luscious creaminess below. It’s like a warm hug from the inside out, and who wouldn’t want that? If you’re ready to embrace your inner chef and whip up a batch of this classic comfort food, I promise it’ll be one of the best decisions you ever make.
**What Goes Into Creamy Baked Mac and Cheese?**
Let’s break this down into delightful items you need for this dreamy dish. Like I always say, no matter how simple the ingredients, it’s about the love you put into it. For me, cooking is deeply personal, and I like to put a little bit of myself into every meal.
– **Elbow Macaroni**: The classic choice, right? I mean, you could use shells or cavatappi if you’re feeling fancy, but there’s something about the elbow that feels nostalgic. Just remember to boil them until they’re al dente—nobody enjoys mushy pasta!
– **Unsalted Butter**: This is where the magic of that creamy sauce starts. Now, don’t get me wrong, I have used salted butter in a pinch, but I just love controlling the salt level, you know? Plus, the aroma of melting butter is better than a fancy perfume.
– **All-Purpose Flour**: We’re making a roux, people! This is the secret to that silky-smooth cheese sauce. Don’t get scared; it sounds way fancier than it is. Just whisk it with the butter until it’s a little golden.
– **Milk**: Whole milk for a luscious finish, please! Sometimes I sneak in a splash of heavy cream for that extra indulgence, but between you and me, it can get a wee bit rich—just the way I like it!
– **Cheddar Cheese**: Ah, the star of the show! I always opt for sharp cheddar because it gives that robust flavor, but a mix of cheeses is a delightful twist. Think Monterey Jack, Gruyère, or even a bit of smoked gouda! Just grate it yourself; the pre-shredded stuff has anti-caking agents that can mess with the meltiness.
– **Paprika**: This is my little secret to give it a slight kick and that gorgeous color! You can even use smoked paprika if you want an extra depth of flavor.
– **Salt and Pepper**: Basic but essential! I can’t stress enough how a little seasoning goes a long way. I tend to be generous with the pepper, but you do you!
– **Breadcrumbs**: Ah, the topping! I love using panko breadcrumbs for that extra crunch, but you could use regular breadcrumbs, crushed crackers, or even crushed potato chips. Yup, you heard me right—potato chips bringa retro vibe that is just delightful!
– **Parmesan Cheese**: And for the topping, a sprinkle of grated parmesan adds a lovely nutty flavor that takes the dish right over the top!
You see? It’s all about understanding your ingredients and letting them speak for themselves.
**Is Creamy Baked Mac and Cheese Actually Good for You?**
So, here’s the reality check: this dish is indulgent. Like, we’re talking “give me a hug and a slice of cheesecake” kind of indulgence. But you know what? Life is short, and we deserve to enjoy every bite. It’s rich, creamy, and downright comforting, and there’s nothing wrong with treating yourself to a hearty meal every now and then!
Now, I don’t want to act like the health police, but there are some benefits to be had here. The **cheddar cheese** is a wonderful source of calcium and protein, and hey, pasta can occasionally provide energy, right? The **milk** is also a solid source of vitamin D. Just don’t go telling your doctor that mac and cheese is a health food—let’s keep that our little secret. It’s about balance: a cozy mac and cheese night every so often is a beautiful way to relish life’s little joys without guilt!
**Here’s What You’ll Need**
Here’s a no-fluff list of what you need to whip up some creamy baked mac and cheese for about 4 to 6 servings:
– 8 ounces elbow macaroni
– 4 tablespoons unsalted butter
– ¼ cup all-purpose flour
– 3 cups whole milk
– 3 cups shredded sharp cheddar cheese
– 1 teaspoon onion powder (because why not?)
– ½ teaspoon garlic powder (optional, but highly recommended)
– ½ teaspoon paprika
– Salt and pepper to taste
– 1 cup panko breadcrumbs
– ½ cup grated Parmesan cheese
**How to Make Creamy Baked Mac and Cheese Step-by-Step**
Alright, my fellow foodies! Let’s get down to business. I promise this will be a fun, painless process—just remember to crank up your favorite tunes and have fun with it.
1. **Boil Those Noodles**: Start by cooking the elbow macaroni according to the package instructions. Remember to salt the water like the sea! Aim for al dente, because we’re going to bake it later. Drain and set aside, but don’t rinse—those starchy bits help the cheese sauce cling!
2. **Roux Time**: In a large pot over medium heat, melt the **4 tablespoons of butter**. Once it’s all melty and bubbly, sprinkle in the **¼ cup of flour**. Whisk it together like you mean it, cooking for about 1-2 minutes until it turns a lovely golden color. This is the roux—a fancy word for the foundation of your cheese sauce.
3. **Milk, Milk, Baby**: Slowly whisk in the **3 cups of whole milk**, stirring continuously so there are no lumps. Cook this on medium-high until it thickens to a custard-like consistency, which should take about 5-7 minutes. It’s like magic, watching it transform right before your eyes.
4. **Cheesefest**: Now, remove the pot from the heat and stir in the **3 cups of shredded cheddar cheese**—and trust me, you’ll want to taste a handful for quality control. Add the **onion powder, garlic powder, paprika**, and season generously with salt and pepper. This is where the flavor really comes alive. Just be careful not to eat all the cheese before it makes it to the pasta!
5. **Combine the Goodness**: Dump in your drained macaroni and give it a good stir until everything is coated in that glorious cheese sauce. Taste again and adjust the seasoning if needed.
6. **Pour into a Baking Dish**: Transfer all that cheesy goodness into a greased 9×13-inch baking dish, spreading it evenly.
7. **Top it Off**: In a separate bowl, mix the **panko breadcrumbs** with **1 tablespoon of melted butter** (this is where the crunchiness comes in). Sprinkle that mixture evenly over the mac and cheese, and then top it off with the **½ cup grated Parmesan cheese**.
8. **Bake**: Pop it into a preheated oven at 350°F (175°C) for about 25 to 30 minutes, until it’s bubbling and the top is golden brown. You might want to keep an eye on it toward the end; my cousin once burned hers, and it left a lasting impression—let’s just say some charred mac and cheese is not very appetizing!
9. **Cool and Serve**: Once it’s out of the oven, let the dish cool for a few minutes. Nobody wants to burn their tongue on the first bite (trust me, I’ve been there)! Serve it up hot and watch everyone’s eyes light up.
**Little Extras I’ve Learned Along the Way**
Now here’s where the fun really begins! This recipe is a blank canvas; feel free to shake things up based on your taste buds or the available ingredients in your pantry!
– **Fancy It Up**: Add some cooked bacon, crumbled sausage, or even lobster if you’re feeling like a million bucks. I once made a “leftover mac” where I added some roasted vegetables, and you know what? It was a smashing success!
– **Spice It Up**: If you’re like me and can’t get enough flavor, try adding hot sauce, crushed red pepper flakes, or a sprinkle of chili powder for a kick. A bit of caramelized onions can also add a sweet depth that you didn’t know you were missing.
– **Make-Ahead Magic**: This mac and cheese actually freezes like a champion. Assemble it in your baking dish but don’t bake it yet; cover it tightly and stick it in the freezer. When you’re ready to indulge, just take it out and bake from frozen—just allow a little extra time in the oven.
– **Sous Vide?**: I won’t shy away from saying I once tried to sous vide the cheese sauce for an extra gourmet twist. Wild, right? It ended up taking forever, but for those of you who are gadget fans, go for it! Experiment and see what you think.
Look, cooking is personal, and just because I have my version doesn’t mean you can’t take it and make it your own! The most important part is that you take the time to enjoy the process and savor the end result.
This one means a lot to me. I promise, the creamy, cheesy, bubbly goodness that emerges from the oven will transport you back to simpler, cozy moments. Let me know if you try it—I’d love to hear your twist!