Prep time: 20 minutes
Cook time: 4 hours (setting time)
Total time: 4 hours 20 minutes
Servings: 6
If you’re looking for a dessert that captivates the senses and transports you to tropical paradises, look no further than creamy coconut panna cotta. This airy and luscious dessert balances the rich flavors of coconut and the delicate sweetness of cream, making it an irresistible choice for any occasion. Whether it’s for a family dinner, a charming gathering with friends, or a special celebration, this panna cotta is not just a treat for the taste buds; it’s a feast for the eyes as well.
The beauty of this recipe lies in its simplicity. With just a handful of ingredients, you’ll create a dessert that feels gourmet yet can easily fit into your busy lifestyle. You’ll learn not only how to make panna cotta but also helpful tips to ensure it turns out perfectly every time. Let’s embark on this delightful culinary journey together!
What Is Creamy Coconut Panna Cotta Recipe?
Creamy coconut panna cotta originates from Italy and is a delightful variation of the classic panna cotta, which means “cooked cream.” This luscious dessert is made primarily from coconut milk, heavy cream, sugar, and gelatin, resulting in a velvety smooth texture that melts in your mouth. The star ingredient, coconut milk, imparts a rich and nutty flavor that pairs beautifully with the sweet cream, creating a dish that’s both refreshing and indulgent.
Unlike traditional desserts that can be overly sweet, this panna cotta strikes the perfect balance. The mild sweetness enhances the dessert without overpowering your palate. When served chilled, it offers a refreshing end to a meal, making it ideal for warm weather gatherings or as a light summer treat. This dessert can also be beautifully garnished with fresh fruit, a drizzle of caramel, or a sprinkle of toasted coconut flakes, transforming each serving into an artwork of flavors and textures.
The charm of panna cotta is its versatility. While the classic version is made with vanilla, the coconut variation adds an exotic twist, allowing your dessert to reflect a variety of cultures and flavors. It can be enjoyed alone or paired with fruit compotes or syrups, affirming its status as a crowd-pleaser. With just a little effort, you can create a dessert that impresses and satisfies.
Why You’ll Love This
There are countless reasons to adore this creamy coconut panna cotta recipe: it’s not only delectable but also quick and easy to prepare. With a total cook time of just 20 minutes, you can focus on other parts of your meal without feeling rushed. Plus, you can prep this dessert ahead of time—the longer it sets, the better the flavors meld together. The creamy texture and rich coconut flavor provide an indulgent experience, but it’s surprisingly light, making it suitable for any occasion.
Additionally, coconut panna cotta is a budget-friendly dessert that uses simple ingredients, meaning you won’t break the bank to create something special. This makes it an ideal choice for busy parents trying to whip up a quick sweet treat or beginners in the kitchen who want to impress with minimal effort. You can easily make this dessert dairy-free by substituting almond or soy milk for the heavy cream, opening the door to various dietary preferences without sacrificing taste.
One common misconception is that panna cotta is intimidating to make, but this recipe will dispel that myth. By following a few simple steps and keeping an eye on your ingredients, you’ll achieve a result that’s creamy, decadent, and aesthetically pleasing. Consider serving it in beautiful glasses or jars to elevate its presentation at any gathering.
Ingredients You’ll Need
- Coconut milk: 1 can (400ml) – Essential for the rich flavor; you may substitute with light coconut milk for a lower-calorie option.
- Heavy cream: 1 cup – Adds creaminess; can be replaced with dairy-free cream for a vegan version.
- Sugar: ½ cup – Sweetens without overpowering; interchangeable with honey or maple syrup.
- Gelatin: 2 ½ teaspoons (or 1 packet) – The setting agent; vegan alternatives include agar agar, though the setting time may vary.
- Vanilla extract: 1 teaspoon – Enhances the flavor; consider using vanilla bean paste for an upscale touch.
- Salt: A pinch – Balances the sweetness and heightens the flavor profile.
Understanding the role of each ingredient can help you gauge how to customize the panna cotta to fit your taste preferences. For instance, opting for full-fat components provides richness, while light versions yield a lighter, less decadent treat. When selecting coconut milk, make sure to enjoy the natural flavor and aroma that only good-quality coconut can offer, as it plays a crucial role in the dish.
How to Make
- Prepare the gelatin: Start by sprinkling the gelatin over 3 tablespoons of cold water in a small bowl. Allow it to bloom for about 5 minutes. This step is crucial as it empowers the gelatin to dissolve properly later on.
- Combine the base ingredients: In a medium saucepan, combine the coconut milk, heavy cream, and sugar over low heat. Stir gently until the sugar dissolves. It’s important to avoid boiling the mixture; you’re merely looking to warm it up so everything melds together.
- Add gelatin: Once the coconut and cream mixture is warm, remove it from the heat. Stir in the bloomed gelatin, mixing thoroughly until it completely dissolves. If you see tiny clumps, gently reheating the mixture will help the gelatin integrate smoothly.
- Flavor it: Mix in the vanilla extract and a pinch of salt. The salt is key to balancing flavors. Not only does it complement the sweetness, but it also rounds out the overall taste. This is your moment to adjust flavors; feel free to taste it and decide if more sweetness is needed.
- Pour into molds: To shape your panna cotta, carefully pour the mixture into individual molds or serving glasses. Leave a little space at the top; the panna cotta will expand slightly as it sets.
- Chill and set: Place the filled molds or glasses in the refrigerator and allow them to set for at least 4 hours. For the best results, overnight is even better. Timing is essential; rushing this step could result in a soupy panna cotta.
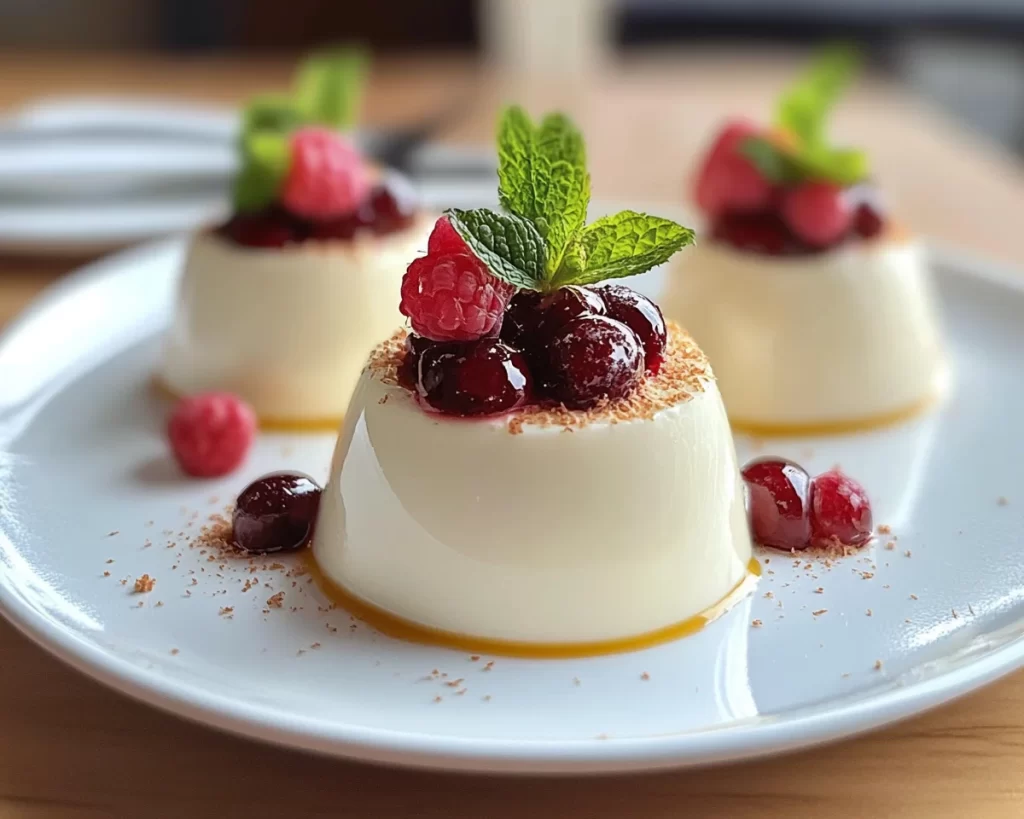
- Unmold and serve: After setting, to unmold, dip the bottom of each mold into warm water for just a few seconds to loosen. Carefully invert onto a plate or serve directly in the glass. Garnish with your favorite toppings like fresh berries, shredded coconut, or a drizzle of caramel sauce.
These steps may seem straightforward, but they hold the key to crafting a delightful panna cotta. The combination of warming and cooling allows the ingredients to meld beautifully, resulting in a dessert you’ll be proud to serve. Pay keen attention to the gelatin; ensuring it is fully dissolved will be the secret to that dreamy texture.
Variations & Substitutions
Coconut Lime Panna Cotta: This variation gives your panna cotta a zesty twist. Before serving, add the juice of half a lime to the mix and a bit of lime zest for extra flavor. The citrus cuts through the creaminess, adding brightness that’s perfect for warm weather. This is a great option for those looking to enliven their dessert, keeping it fresh and exciting.
Chocolate Coconut Panna Cotta: For chocolate lovers, incorporate half a cup of melted dark chocolate into the cream mixture. This adds depth and decadence, merging flavors that most people adore. It’s a rich option that works wonderfully for special occasions or when craving something truly indulgent. Just make sure to adjust the sugar level according to your sweetness preference.
Panna Cotta with Fruit Topping: Adding a layer of fruit at the top can transform your panna cotta. Consider a simple berry compote made with strawberries, blueberries, or raspberries. Just cook the fruit with a little sugar and lemon juice until it softens and coats the back of a spoon. This tart topping contrasts wonderfully with the creamy base, adding both flavor and visual appeal.
Dairy-Free Version: To create a completely dairy-free panna cotta, use full-fat coconut milk in place of the heavy cream and coconut milk. Balance the flavors with a bit of maple syrup instead of sugar for a natural sweetness. The texture may differ slightly, but it will still deliver on the rich coconut flavor that makes this dessert so addictive.
Each of these variations allows you to tailor the panna cotta to your tastes or dietary needs. With simple adjustments, you can create a dessert that feels customized, delighting your guests with every bite.
Common Mistakes to Avoid
One of the most common mistakes in making panna cotta is not allowing the gelatin to fully dissolve. If you notice clumps of gelatin in your final dish, it can create an unpleasant texture. To avoid this, always ensure the gelatin is completely dissolved in a warm mixture before pouring it into molds.
Additionally, skipping the chilling time can lead to disastrous results. It is critically important that you give the panna cotta enough time in the refrigerator to set properly. Patience is key; if you try to rush this step by placing it in the freezer, you risk creating a grainy dessert.
Also, beware of boiling the mixture once you’ve added the gelatin. Overheating can prevent it from setting properly, which will leave you with a soupy mess instead of the creamy texture you desire. Make sure you keep the heat at a low simmer to maintain the integrity of the dessert.
Storage, Freezing & Reheating Tips
For best results, panna cotta can be stored in the refrigerator for up to 3 days. Simply cover the molds or glasses with plastic wrap or a lid to keep them fresh. If you need to store them longer, it’s advisable to keep the panna cotta unmolded, as this will maintain texture and flavor better.
Unfortunately, panna cotta does not freeze well. The cream and coconut blend lose their creamy texture and can become grainy once thawed. If you do need to prepare it ahead of time, enjoy it fresh within a few days of making, or consider making smaller batches.
If you happen to have leftovers, simply store your panna cotta in the fridge for a quick dessert on the go. You might even discover that the flavors deepen even further as they sit, making each bite an unexpected delight.
Frequently Asked Questions
What can I use instead of gelatin for a vegan version?
For a vegan panna cotta, you can use agar agar as a substitute for gelatin. Agar is derived from algae and sets just as well as gelatin. However, you might need to experiment with the setting times and quantities, as agar agar can vary in strength. Generally, using about 1 teaspoon of agar for every cup of liquid can yield good results, but make sure to follow specific instructions depending on the kind of agar you use.
Can I make this recipe in advance?
Absolutely! One of the best features of panna cotta is that it can be made a day or two in advance. Just ensure you allow sufficient time for it to set properly in the refrigerator. Preparing the dessert ahead of time not only helps with meal prep but also allows the flavors to meld beautifully over time.
How do I know when the panna cotta is set?
When your panna cotta is set, the surface should look firm yet jiggle slightly in the center. It shouldn’t be liquid-like at all, but it should hold its shape when unmolded. If it’s still wobbly after four hours, it may need additional time in the refrigerator to fully set.
Can I add flavors to the panna cotta other than coconut?
Yes! While coconut is the overriding flavor in this recipe, you can definitely experiment with other flavors. Consider adding espresso for a coffee-flavored panna cotta, matcha for a green tea variant, or even citrus like lemon or orange. Always remember to balance the sweetness according to the flavor you choose, as some flavors will amplify or mellow the sweetness naturally.
How can I prevent my panna cotta from having air bubbles?
To prevent air bubbles, be careful not to stir the mixture too vigorously while combining ingredients. A gentle fold usually suffices; it helps to maintain the creamy consistency. Also, pouring the mixture slowly into molds can help minimize the introduction of air bubbles. If you do see bubbles on the surface, a light tap on the counter will often cause them to rise and pop.
Conclusion:
This creamy coconut panna cotta recipe is a sumptuous, versatile dessert that’s delightfully easy to make. It’s an inviting addition to any occasion, combining a tropical essence with a silky-smooth texture that flows over the taste buds. By creating this treat, you’ll tantalize friends and family alike with your culinary skills, as they savor every luscious bite.
Don’t hesitate to make this recipe your own; play with different flavors, toppings, and solutions to fit your lifestyle. Above all, savor the joy of creating and sharing this exquisite dessert—because you deserve it! So roll up your sleeves and get ready to wow your loved ones with your new signature dish. Happy cooking!


