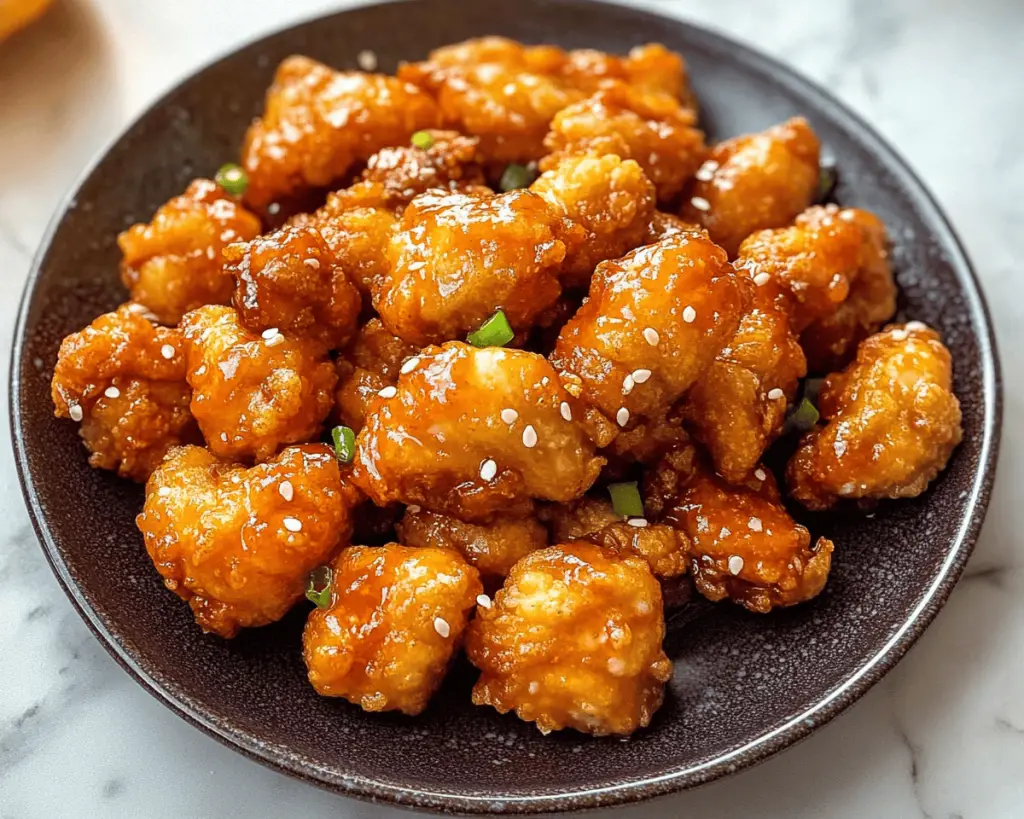
You know that feeling when you take a bite of something, and it feels like home? That’s how I feel about **Crispy Orange Chicken**. Growing up, I was lucky enough to have a mom who wasn’t just a good cook—she was a great magician in the kitchen. She could take the simplest ingredients and turn them into something spectacular. But if there was one dish that hastily became my favorite, it was her *Crispy Orange Chicken*.
I distinctly remember the weekends when my family would gather around the dining table, the aroma of citrus and soy sauce wafting through the house. My mom would get giddy when she noticed us hanging around the kitchen, ready to swipe a piece of chicken here and there—even before it hit the table! Honestly, it became a game of ‘who could grab the most pieces of crispy goodness before they cooled down.’ That delightful crunch followed by a sweet tang of orange is just something that sticks with you.
Over the years, I’ve tinkered with the recipe, adding a few personal twists here and there. I mean, let’s face it—I have a bit of a sweet tooth! But the heart of the dish remains the same, and every time I make it, I can’t help but smile. It reminds me of home, of laughter, and of love. So, grab your apron, and let’s dive into the beauty of this utterly delightful **Crispy Orange Chicken**!
What Goes Into Crispy Orange Chicken?
Let’s break it down. This dish is all about that heartwarming balance of flavors, and each ingredient plays a special role.
1. **Chicken**: For this recipe, I prefer using **boneless, skinless chicken thighs**. They’re more forgiving than chicken breasts and offer a juicier bite. Plus, you can cut them into bite-sized pieces without worrying too much about them drying out. I may or may not have caught myself munching on a few pieces of leftover chicken; I guess it’s a habit I inherited from my mom!
2. **Cornstarch**: This is the secret weapon for that *ultra-crispy* coating. Don’t skip on the cornstarch—trust me, it’s going to give you those satisfying crunches that make you swoon. I remember the first time I made this on my own and thought, “Why not use flour instead?” Let’s just say my experience was less crunchy and more soggy. Lesson learned!
3. **Garlic & Ginger**: These two are the dynamic duo of flavor. A bit of freshly minced **garlic** and **ginger** adds a depth that pairs beautifully with the citrus and soy sauce. I’ve always loved chopping garlic; there’s just something so satisfying about the distinct aroma! It’s like a gentle reminder of how much flavor can come from something so small.
4. **Soy Sauce**: Not just any soy sauce here, folks! I always opt for **low-sodium soy sauce**. It gives that umami hit without overwhelming the dish with saltiness. My best friend always jokes about my soy sauce obsession. I could literally add it to anything! Well, maybe not ice cream—though you never know!
5. **Fresh Orange Juice & Zest**: The star of our show! Use the freshest **oranges** you can find. And don’t forget to zest a little bit too; the **zest** really amplifies the orange flavor! Whenever I zest an orange, I feel like a kitchen wizard. Orange magic in the air! Just be careful not to get too much of the white pith, or it’ll turn bitter.
6. **Brown Sugar & Honey**: Ahh, the sweet counterpoint to the tangy orange! I use **light brown sugar** for sweetness with that hint of molasses and a spoonful of **honey** for some extra depth—the kinda stuff that makes you feel like you’re hugging the dish with each bite!
7. **Red Chili Flakes**: This is optional, but a little sprinkle of **red chili flakes** adds just the right amount of kick. You know how some dishes need that extra pizzazz? This is it. My cousin once added way too much and swore she could breathe fire—so you may want to taste test your spice levels!
8. **Green Onions**: For garnish and that added crunch. Also, they make everything look a little snazzier, don’t you think? Every time I finish a dish and sprinkle green onions, I feel like I’ve completed a work of art.
There’s something so lovely about each ingredient working together to create a dish that speaks comfort and joy. Cooking is like a symphony—balance is key, and when everything comes together, magic happens.
Is Crispy Orange Chicken Actually Good for You?
Here’s the thing: yes and no. It really depends on how you spin it. On one hand, it’s chicken and, paired with oranges, you’re getting some nutrition there. I mean, it’s packed with protein from the chicken, Vitamin C from the freshest oranges, and can be adjusted for health with a few tweaks.
But, let’s be real—this isn’t exactly going to be on the list for your next health retreat, right? It’s a little on the indulgent side with that crispy coating and the sweetness from the sugar and honey. But here’s what I’ve learned: sometimes, you need to lean into the indulgence. We work too hard during the week to not treat ourselves, and when you whip this up on a cozy weekend night, it’ll be totally worth it. Plus, you can pair it with steamed broccoli or a side salad, and hey, it’s a meal.
At the end of the day, food is about balance and happiness. I promise, a bit of crispy orange chicken once in a while can work wonders for your soul. Happiness is a great ingredient!
Here’s What You’ll Need
– 1 pound boneless, skinless chicken thighs
– 1/2 cup cornstarch
– 2 cloves garlic, minced
– 1 tablespoon fresh ginger, minced
– 1/3 cup low-sodium soy sauce
– 1/2 cup fresh orange juice (about 2-3 oranges)
– Zest of 1 orange
– 1/4 cup light brown sugar
– 2 tablespoons honey
– 1/2 teaspoon red chili flakes (optional)
– Green onions, sliced, for garnish
– Cooking oil for frying (I use peanut oil, but vegetable oil works too)
This recipe serves about 4, but honestly, if you’re like me, it might serve just 2… if you’ve got a hungry heart!
How to Make Crispy Orange Chicken Step-by-Step
Okay, take a deep breath because you’re about to impress yourself! Here’s how we turn these beautiful ingredients into something magical.
1. **Prepare the Chicken**: Start by cutting the chicken thighs into bite-sized pieces. Don’t overthink it—just aim for chunks that are manageable. Oh, and if they’re still a little frozen, don’t worry; you can work with that. I’ve been known to chop chicken directly from the freezer because sometimes life happens, you know?
2. **Coat with Cornstarch**: In a bowl, toss the chicken pieces with cornstarch until they’re evenly coated. This is where the magic begins—this boring-looking bowl of chicken is about to transform. But remember: too much cornstarch will clump. Just a light and even coat is what we’re after.
3. **Fry Time**: Heat a generous amount of oil in a large skillet over medium-high heat. Make sure it’s hot enough; you want a satisfying sizzle when you drop the chicken in! You can always test the oil by tossing in a small drop of batter or chicken—if it bubbles, you’re good to go.
4. **Fry the Chicken**: Cook the chicken in batches; overcrowding the pan will make everything soggy, and no one wants that! Fry them until they’re golden brown and crispy, about 4-5 minutes per side. I’m telling you, watching those crispy pieces bubble away is a small joy in itself.
5. **Make the Sauce**: While the chicken is frying, let’s whip up that glorious sauce! In a small saucepan over medium heat, combine soy sauce, orange juice, zest, garlic, ginger, brown sugar, honey, and red chili flakes. Stir until the sugar dissolves and the mixture thickens slightly, about 5-7 minutes. The aroma is going to be heavenly.
6. **Combine**: Once all the chicken is cooked, toss it in the sauce, ensuring every piece gets coated—so satisfying! I like to shake the pan gently to make sure everything gets that shiny glaze.
7. **Serve**: Transfer the chicken to a plate, sprinkle with sliced green onions (and maybe a few extra chili flakes if you’re feeling adventurous).
Now the real fun begins! Serve it over a bed of steamed rice or even noodles if you’re in the mood. The crunchiness combined with the sweet, tangy sauce on top of a warm rice bowl is bliss.
Little Extras I’ve Learned Along the Way
Cooking is one of those beautiful things in life where you learn something new every time, especially with a beloved dish like this. Here are some tips and variations I’ve picked up along the way:
– **Make Ahead**: If you’re planning for a gathering, you can prep the chicken and sauce ahead of time. Just fry it up and glaze it right before serving. It tastes fresh and delicious, and your friends will think you slaved for hours!
– **Veggie Boost**: Want to sneak some veggies in? Bell peppers or snap peas sautéed along with the chicken are delightful additions. You could even throw in some broccoli; it’s like dressing up the dish for a fancy night out.
– **Sweetener Swap**: If you’re looking for a healthier alternative, you can swap the brown sugar for coconut sugar or even maple syrup. It gives that hint of sweetness with a bit of a twist!
– **Cooking Method**: I’ve dabbled with air frying this recipe too! Just coat your chunks and air-fry them for about 12-15 minutes on high until they’re golden and crunchy. It’s not quite the same as oil-frying, but it’s a wonderful alternative if you’re looking to cut down on oil.
– **Serving Ideas**: If you’re feeling adventurous, why not try it with some steamed buns? Seriously, you haven’t lived until you’ve stuffed crispy orange chicken into a soft bun—pure bliss.
Cooking this dish always feels like a warm embrace for me, embodying those heartwarming memories of family dinners and overflowing plates. The laughter, the moments of too much sauce splattered on the counter (I can’t be the only one, right?!), and the smiles around the table are what make it all worth it.
So, I’ve shared all my quirks, no-judgment stories, and slightly chaotic kitchen moments. Embrace them while you cook! This one means a lot to me. Try it out and let me know how yours turns out—I’d absolutely love to hear your twist on the classic. Happy cooking!