**Meta Title**: Crusty Italian Bread Recipe | Golden, Rustic, and Chewy
**Meta Description**: Discover how to make Crusty Italian Bread that’s golden, rustic, and wonderfully chewy. Perfect for sandwiches or as a side!
—
There’s something utterly magical about a fresh loaf of Italian bread emerging from the oven. The golden crust crackles as you tap it, and the warm aroma wafts through your kitchen, instantly transporting you to a rustic Italian bakery. I can still remember the first time I experienced that delightful moment—it was a rainy afternoon, and the scent of baking bread filled our home. I rushed into the kitchen, barely able to contain my excitement, and that first bite? A warm hug for the soul, with a delightful crunch that gave way to a soft, chewy interior. That’s what you’ll create with this Crusty Italian Bread recipe!
Let’s embark on a journey to the heart of Italian cuisine, where making bread is as much about the process as it is about the final product. Whether you’re using this crusty bread for sandwiches, serving it with dinner, or simply enjoying it fresh with olive oil, this loaf is sure to impress.
What is Crusty Italian Bread?
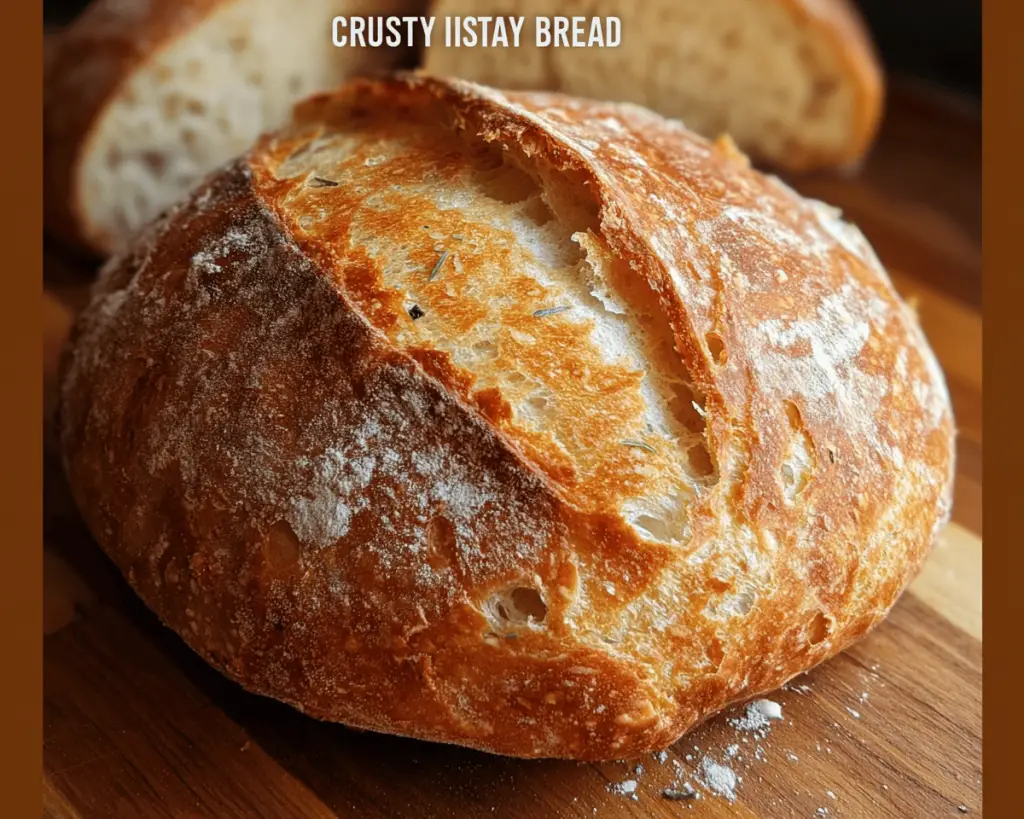
Crusty Italian bread, often referred to as “pane casereccio,” embodies the essence of Italian baking traditions. This rustic loaf is characterized by its **thick, golden-brown crust**, which gives a satisfying crunch when you bite into it. Inside, you’ll find a soft, chewy texture dotted with airy bubbles, making it perfect for soaking up sauces or enjoying with just a smear of butter or jam.
The ingredients are simple: **flour, water, yeast**, and **salt**—but the magic lies in the way you handle them. This bread is often made through a lengthy fermentation process, allowing the flavors to develop and creating that wonderful chewy texture we all love. It’s a beloved staple in Italian households and restaurants alike, celebrated for its versatility and comforting qualities.
Why You’ll Love This Crusty Italian Bread
– **Incredible Aroma**: The smell of baking bread can transform your home into a cozy haven.
– **Chewy Texture**: The crusty exterior and soft, airy interior offer a delightful contrast.
– **Versatile Uses**: Perfect for sandwiches, bruschetta, or as an accompaniment to soups and stews.
– **Crispy Crust**: Achieves that iconic golden crust that bread lovers crave.
– **Homemade Satisfaction**: There’s nothing quite like the pride that comes from baking your own bread.
– **Simple Ingredients**: With just a few pantry staples, you can create bakery-quality bread.
– **Budget-Friendly**: Save on store-bought loaves and make delicious bread at home.
Ingredients You’ll Need
Here’s what you need to whip up your very own crusty Italian bread:
– **4 cups bread flour**: For the best texture; bread flour has a higher protein content.
– **1 ½ cups warm water (about 110°F)**: Activates the yeast to help the dough rise beautifully.
– **2 teaspoons sea salt**: Enhances flavor and strengthens the dough.
– **1 teaspoon sugar**: A small amount to feed the yeast and enhance browning.
– **2 teaspoons active dry yeast**: The powerhouse behind fermentation.
*Pro Tip*: Bread flour works best, but you can substitute with all-purpose flour if that’s all you have on hand. Just expect a slightly different texture.
How to Make Crusty Italian Bread
Let’s dive into the magic of bread-making! Follow these steps, and you’ll soon have a beautiful loaf ready to enjoy.
**Step 1: Activate the Yeast**
1. In a small bowl, combine the warm water and sugar. Sprinkle the yeast over the top and let it sit for about 5-10 minutes until it becomes frothy. This means your yeast is alive and ready to work its magic!
**Step 2: Make the Dough**
2. In a large mixing bowl, whisk together the flour and salt. Create a well in the center, pour in the frothy yeast mixture, and mix using a wooden spoon or your hands until a shaggy dough forms.
**Step 3: Knead the Dough**
3. Turn the dough out onto a lightly floured surface. Knead it for about 10 minutes, adding a sprinkle of flour as needed until the dough is smooth and elastic. You want to be able to stretch the dough without it tearing apart.
**Step 4: First Rise**
4. Shape the dough into a ball and place it in a lightly oiled bowl, covering it with a damp cloth. Allow it to rise in a warm, draft-free place until doubled in size, about 1 to 2 hours.
**Step 5: Shape the Loaf**
5. Once risen, punch the dough down to release gas and turn it out onto a floured surface. Shape it into a round or oval loaf, depending on your preference. Place it on a parchment-lined baking sheet or a lightly floured baking stone.
**Step 6: Second Rise**
6. Cover the loaf with a cloth and let it rise again for about 30 to 45 minutes until puffy. Meanwhile, preheat your oven to 450°F (230°C).
**Step 7: Score the Bread**
7. Before baking, use a sharp knife or a baker’s lame to gently score the top of the loaf. This allows steam to escape and helps create that beautiful crust.
**Step 8: Bake**
8. Place the bread in the preheated oven. To create steam (which helps develop the crust), toss a few ice cubes into a baking dish on the lower rack or spray the oven walls with water. Bake for 25-30 minutes until the bread is golden brown and sounds hollow when tapped on the bottom.
**Step 9: Cool**
9. Once baked, remove the loaf and let it cool on a wire rack for at least 30 minutes. This step is crucial; cutting into the bread too soon can alter its texture!
Expert Tips, Tricks & Variations
– **Autolyse for Better Flavor**: If you have the time, allow your flour and water mixture to sit for 20-30 minutes before adding the yeast and salt. This process enhances flavor and texture.
– **Gluten Development**: Instead of kneading, consider using the stretch and fold method. Every 30 minutes, stretch the dough and fold it over itself a few times to develop gluten without all the hard work.
– **Experiment with Flour**: For a nuttier flavor, try substituting up to 1 cup of whole wheat flour. Just be aware that this will create a denser loaf.
– **Herb Infusion**: Mix dried herbs like oregano or rosemary into the dough for a flavorful twist.
– **Storage**: Leftover bread can be stored in a paper bag for a few days or sliced and frozen.
What to Serve With Crusty Italian Bread
Here are some delicious ideas to enjoy alongside your newly baked bread:
– **Olive Oil & Balsamic Vinegar**: Perfect for dipping, adding a touch of richness to your loaf.
– **Garlic Butter**: Melted garlic butter slathered on warm slices adds an irresistible savory element.
– **Pasta Dishes**: Enjoy it with classic marinara or a creamy Alfredo for a satisfying meal.
– **Soups and Stews**: Ladle up a hearty minestrone or beef stew and scoop with your bread.
– **Charcuterie Platter**: Pair crispy slices with cheeses and cured meats for an elegant appetizer.
Storage, Freezing & Meal Prep
To store your Crusty Italian Bread, let it cool completely before wrapping it in a clean kitchen towel. You can also place it in a paper bag to maintain the crust’s crispiness. It will last for around 2-3 days at room temperature.
If you want to keep it longer, slice the loaf and freeze it. Just put slices in a zip-top freezer bag and lay them flat in the freezer. They can stay fresh for up to 3 months! To reheat, pop slices straight from the freezer into a toaster, or wrap the whole loaf in foil and warm it in a 350°F oven until heated through.
For meal prep, consider doubling the recipe. You can have fresh bread on hand for your meals throughout the week!
Frequently Asked Questions
**Can I make this bread without a stand mixer?**
Absolutely! While a stand mixer makes kneading easier, you can knead by hand on a floured surface. Just be prepared to put in some elbow grease, about 10-12 minutes of kneading to develop the gluten.
**How long should I let my dough rise?**
The rising time can vary based on your kitchen’s temperature. Ideally, you want the dough to double in size, which typically takes about 1 to 2 hours in a warmer environment.
**What if my bread is too dense?**
A dense loaf can result from not kneading it enough, using old flour, or not letting the dough rise adequately. Ensure you have a good, fresh yeast and that you’re following the rising times.
**Can I add additional ingredients like cheese or olives?**
Definitely! You can fold in ingredients like cheese or olives after the first rise. Just be sure to adjust the amount of flour if you add a lot.
**How can I tell when my bread is done baking?**
The best way to check for doneness is to tap the bottom of the loaf. If it sounds hollow, it’s ready! Additionally, the crust should be golden brown.
Now it’s your turn—grab your ingredients and create this magic in your kitchen tonight! Don’t forget to share your results with me, and tag me when you try it! Enjoy the process and the wonderful aroma of baking bread that will fill your home. Happy baking!
[Read also: Classic Bruschetta Recipe]