Prep time: 30 minutes
Cook time: 50 minutes
Total time: 1 hour 20 minutes
Servings: 8 servings
If you’re looking for a dessert that perfectly balances creamy decadence and a slightly toasted exterior, you’re in for a treat with the Decadent Burnt Basque Cheesecake Loaf. Imagine sinking your fork into a rich, custard-like interior with a beautifully caramelized outside. This recipe is not just a visual spectacle but a delightful experience for your taste buds. You might have missed this hidden gem in traditional desserts, but once you’ve tried it, there’s no turning back. In this article, you will learn everything you need to elevate your baking game, including the method to make this delicious cheesecake loaf, tips for success, variations to tailor it to your taste, and answers to frequently asked questions.
What Is Decadent Burnt Basque Cheesecake Loaf Recipe?
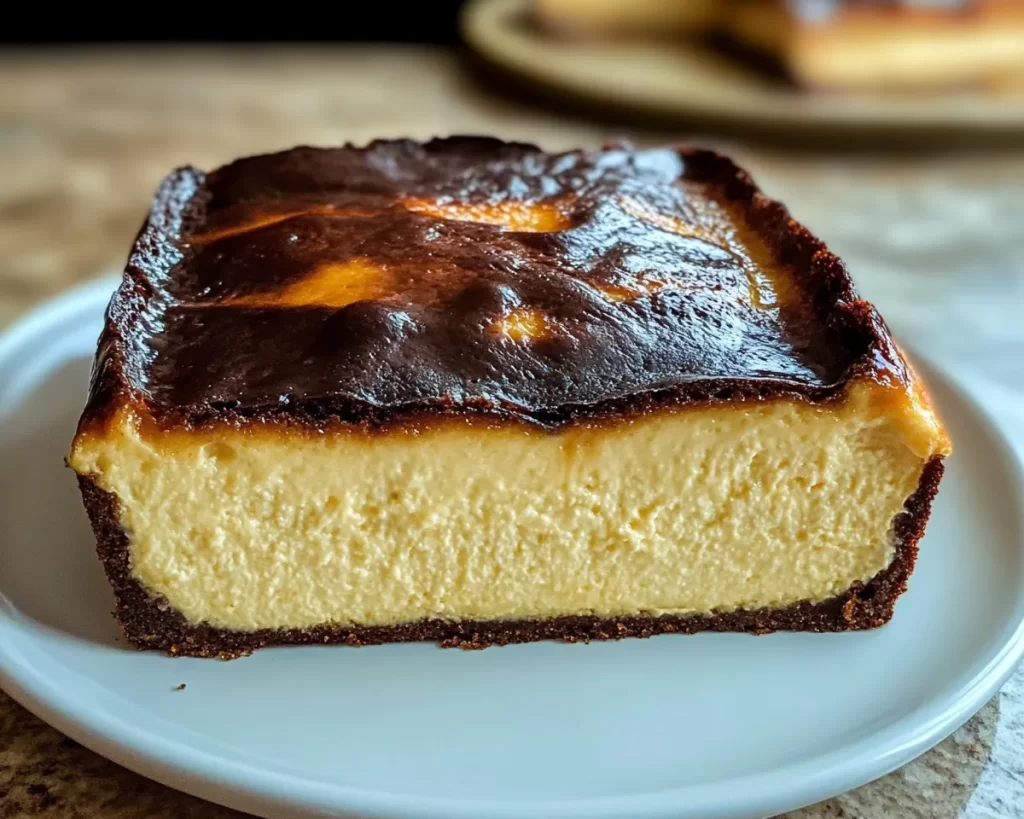
The Decadent Burnt Basque Cheesecake, originally hailing from the Basque region of Spain, has recently surged in popularity across the globe. This loaf rendition retains those delightful qualities but offers a unique twist, transforming the classic cake format into a convenient, easy-to-slice loaf. The flavor is an exquisite blend of subtle sweetness and a distinct tang from the cream cheese, complemented by the slight bitterness of its burnt exterior.
The texture is what sets this dessert apart. Expect a creamy, almost pudding-like inside that melts in your mouth, while the outside develops a rich golden-brown crust that brings an unexpected contrast. This beautifully rich flavor profile is achieved by using simple, staple ingredients, making it an accessible dessert for both seasoned bakers and beginners.
Why You’ll Love This
This recipe is not just about the taste; it’s also incredibly easy to prepare. Unlike traditional cheesecakes that require a precise water bath for even baking, the Decadent Burnt Basque Cheesecake Loaf can be baked in a simple loaf pan. You don’t need any complicated techniques—just mix, pour, and bake. Additionally, the ingredients are inexpensive and widely available, which makes this dessert a great choice for busy parents or anyone on a budget.
Another reason to love this recipe is its versatility. Whether you’re serving it as a rich ending to a dinner party or enjoying a slice with morning coffee, the possibilities are endless. You can even customize it to your taste, adding flavors or toppings that suit your preferences. Many people mistakenly think cheesecake is too complicated, but this recipe changes that mindset; it’s simple and blissfully rewarding.
Ingredients You’ll Need
- 16 oz (450g) cream cheese – The star of the dish, lending its creamy texture and tangy flavor. Use full-fat cream cheese for best results.
- 1 cup (200g) granulated sugar – Sweetens the cheesecake, balancing the acidity of the cream cheese. You can substitute with coconut sugar for a more caramel-like flavor.
- 3 large eggs – They provide structure and richness. Free-range or organic eggs are recommended for the best flavor.
- 1 cup (240ml) heavy cream – Adds moisture and enhances the richness. This cannot be replaced with low-fat alternatives, as it affects the texture.
- 1 teaspoon vanilla extract – Brings warmth and depth to the flavor profile. Use pure vanilla extract for superior quality.
- ½ cup (65g) all-purpose flour – Helps bind the ingredients together; however, you can use gluten-free flour if needed.
- ¼ teaspoon salt – Enhances the other flavors. Don’t skip this element as it makes a noticeable difference.
Each ingredient plays a crucial role in creating the creamy gelatinous offset and ensuring the perfect texture that defines this cheesecake loaf. Always opt for the highest quality ingredients you can find for a richer and more flavorful outcome.
How to Make
- Preheat your oven: Start by preheating your oven to 400°F (200°C). This will ensure that your cheesecake loaf rises properly and forms that beautiful burnt exterior. Use an oven thermometer for accurate temperature readings, especially if your oven tends to run hot or cold.
- Prepare the baking pan: Line a loaf pan (preferably 9×5 inches) with parchment paper, leaving some overhang on the sides to make removal easier later. This step is crucial to prevent sticking. You can use non-stick spray on the parchment paper for extra insurance.
- Mix the cream cheese and sugar: In a large mixing bowl, combine the cream cheese and sugar. Using an electric mixer on medium speed, beat until the mixture is smooth and free of lumps. This step can take approximately 3-5 minutes. Your batter should feel light and airy, with no visible chunks of cream cheese.
- Add the eggs: Beat in the eggs one at a time, ensuring each is fully incorporated before adding the next. This helps to create a creamy consistency. Scrape down the sides of the bowl periodically to make sure everything is well mixed.
- Incorporate the heavy cream: Slowly add the heavy cream to the mixture while continuing to mix on low speed. The addition of cream will create that irresistibly creamy texture. It may look a little loose, but don’t worry—it will thicken as it bakes.
- Finish with dry ingredients: Gently fold in the flour and salt using a spatula until just combined. Be careful not to overmix, as this can affect the texture. You should see no visible flour remnants, but avoid vigorous stirring.
- Pour into the prepared pan: Transfer the cheesecake batter into the lined loaf pan, smoothing out the surface with a spatula. Wiggle the pan gently to release any air bubbles that may have been trapped during mixing.
- Bake: Place the loaf pan in the preheated oven and bake for about 50-60 minutes, or until the top is a deep golden brown and a toothpick inserted in the center comes out with a few moist crumbs. The center will jiggle slightly—that’s perfectly okay.
- Cool it down: Remove the cheesecake loaf from the oven and let it cool at room temperature for 30 minutes. Once it has cooled, refrigerate it for at least 4 hours or overnight to help set the flavors.
- Serve: Once chilled, use the parchment paper overhang to lift the cheesecake loaf out of the pan. Slice it with a sharp knife and serve it alone or adorned with your favorite toppings, such as fresh fruits or a drizzle of chocolate sauce.
Baking can be intimidating, but this recipe makes it approachable. The steps are straightforward, so even novice bakers can shine. Keep an eye on the cheesecake as it bakes; the aroma will guide you to the right timing.
Variations & Substitutions
Citrus Burst Variation: Infuse your cheesecake loaf with a bright zing by adding the zest of one lemon or orange into the batter. The acidity from the citrus will give your cheesecake a delightful contrast to its richness. This variation is perfect for spring and summer gatherings where fruity flavors will shine.
Chocolate Lover’s Variation: If you’re a chocolate lover, consider mixing in ½ cup of unsweetened cocoa powder along with your dry ingredients. This will create a chocolate version of the burnt Basque cheesecake loaf, balancing the bitterness of the dark cocoa with the sweetness of sugar. Serve with whipped cream and chocolate shavings for an indulgent dessert.
Gluten-Free Variation: For those with gluten sensitivities, simply replace the all-purpose flour with a gluten-free flour blend. It’s vital to read the blend’s instructions for measurements, as they often differ slightly from regular flour. The texture might vary slightly, but it will still be incredibly delicious.
Vegan Variation: To make this cheesecake vegan, substitute cream cheese with a vegan alternative, use flaxseed eggs instead of regular eggs, and replace heavy cream with coconut cream. While the texture may not be identical to the original, it will still deliver that rich, decadent taste that you’re craving.
Flavorful Add-ins: If you want to get creative, feel free to fold in a cup of finely chopped nuts or even crushed cookies. Adding crushed Oreos would give a delightful crunch and enhance the flavor profile. Experimenting with your favorite flavors on any occasion is encouraged, making this dessert endlessly customizable.
Common Mistakes to Avoid
One frequent issue is overmixing the batter, which can lead to a dense cheesecake. Gently fold in the ingredients to preserve the airy texture that defines this dish. Another common mistake is baking at an incorrect temperature, which can cause uneven texture and overcooked edges. Always use an oven thermometer to ensure accuracy.
Additionally, some may not allow for ample cooling time. The cheesecake needs to chill completely to set correctly and enhance the flavors. Skipping this process could result in a mushy texture when it’s sliced. Finally, remember to use parchment paper; without it, the loaf may stick and ruin your beautiful creation.
Storage, Freezing & Reheating Tips
When it comes to storage, the Decadent Burnt Basque Cheesecake Loaf can be kept in an airtight container in the refrigerator for up to 5 days. For longer storage, wrap individual slices in plastic wrap or foil and place them in a freezer-safe bag. This way, they’ll last up to three months in the freezer. Just be cautious; once thawed, consume the cheesecakes within a week for the best quality.
For reheating, gently microwave each slice for about 15-20 seconds until it becomes slightly warm. This will help to revive the creamy texture. Taking care with reheating is essential; overheating can lead to a rubbery, unappetizing result.
Keep in mind proper food safety practices when storing your cheesecake. Always ensure that it cools completely before placing it in the refrigerator. If left at room temperature for more than two hours, it should be discarded to avoid foodborne illnesses.
Frequently Asked Questions
Can I use low-fat cream cheese?
Using low-fat cream cheese will alter the texture and flavor of your cheesecake loaf. It may not turn out as creamy or rich as the full-fat version. If you want a lighter version, consider using the regular cream cheese and reducing portion sizes instead.
How do I know when cheesecake is done?
The cheesecake is done when the top is a deep golden brown and the center jiggles slightly when you shake the pan. A toothpick inserted in the center should come out with a few moist crumbs, not wet batter.
Can I make this cheesecake ahead of time?
Yes! This cheesecake loaf can be made up to one day in advance. After baking, let it cool and refrigerate it until you’re ready to serve. This can actually enhance the flavors as they meld together, creating an even more delicious dessert.
What’s the best way to slice it?
For the cleanest slices, use a sharp knife that’s been dipped in hot water. Wipe the knife clean after each cut to avoid tearing the edges and ruining the beautiful appearance of your cheesecake loaf.
Can I add toppings to my cheesecake loaf?
Absolutely! Fresh fruits, a drizzle of caramel or chocolate sauce, or a dollop of whipped cream can elevate your cheesecake. Just ensure that any toppings complement rather than overpower the rich flavor of the cheesecake itself.
Conclusion:
In summary, the Decadent Burnt Basque Cheesecake Loaf combines ease, flavor, and versatility into one delightful dessert. Whether you’re a beginner or a baking pro, this recipe promises to impress with its creamy texture and rich taste. So go ahead—try your hand at creating this show-stopping dessert, customize it to your liking, and don’t hesitate to share your delicious results with friends and family. Your kitchen wonders await!