Prep time: 15 minutes
Cook time: 0 minutes
Total time: 15 minutes
Servings: 4
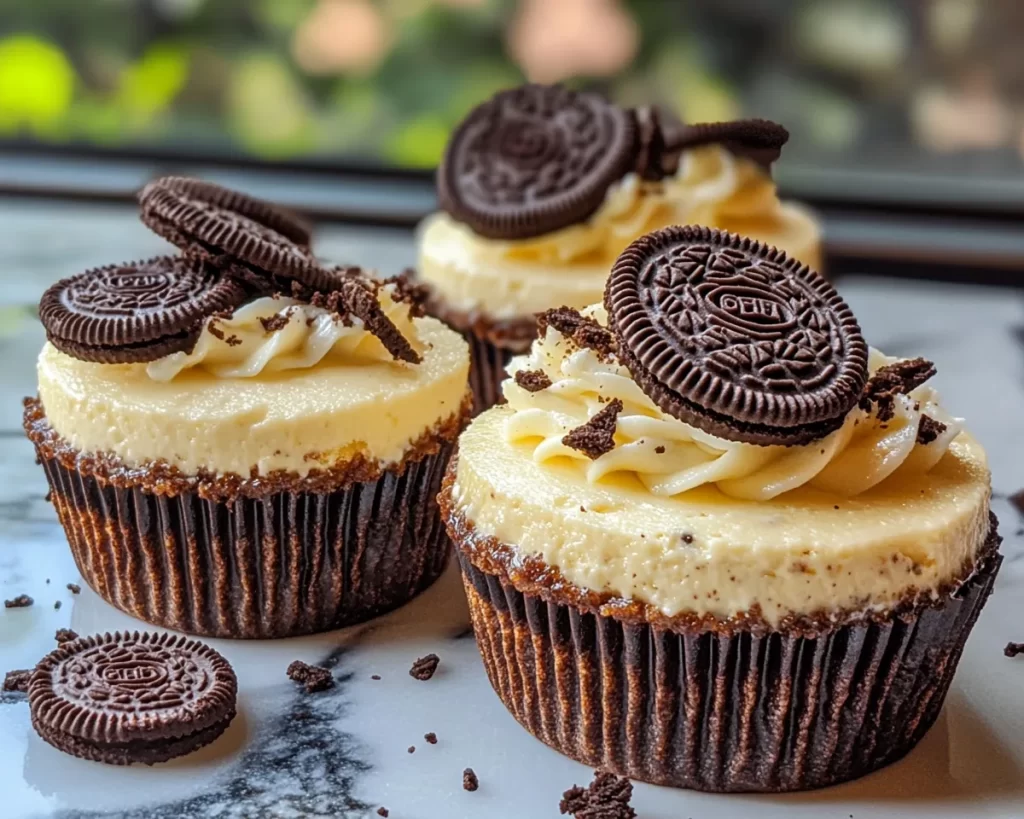
Indulging in a delightful dessert is one of life’s simple pleasures, and making a creamy, rich dessert doesn’t always have to take hours in the kitchen. Introducing **Dessert Recipes: No Bake Oreo Cheesecake Cups in 15 Minutes**, an easy and fun treat that you can whip up seamlessly, whether for a last-minute gathering or just a sweet craving at home. Imagine the luscious creaminess of cheesecake paired with the iconic crunch of Oreo cookies. These layers of deliciousness will make your taste buds dance with joy and leave your guests wanting more.
What Is Dessert Recipes: No Bake Oreo Cheesecake Cups in 15 Minutes?
This dessert recipe simplifies the commonly loved cheesecake into single-serving cups that are not only beautiful but also ideal for portion control. With no baking required, you can prep these in just 15 minutes. The cheesecake filling made with cream cheese and whipped cream is light yet incredibly flavorful, and when combined with crushed Oreos, it adds a crunchy texture that complements the smoothness of the cheese remarkably well. These cups are perfect for parties, picnics, or even just a cozy night in when you crave a sweet indulgence without the fuss.
Why You’ll Love This
This recipe is approximately foolproof, making it a fantastic choice for busy parents or kitchen beginners. It requires minimal time and effort while yielding an impressive dessert that looks like you slaved away for hours. **No Bake Oreo Cheesecake Cups** allow you to treat yourself while keeping it practical—perfect for meal prep or quick desserts at parties. The mixture of flavors—the buttery, chocolaty crust combined with the rich and creamy filling—is irresistibly delicious. You can also customize each cup with toppings like chocolate sauce, fruit, or extra Oreo crumbles to suit your taste.
Ingredients You’ll Need
To create your **No Bake Oreo Cheesecake Cups**, gather the following ingredients:
- Oreos: 24 cookies, finely crushed. These will provide a rich chocolatey base and add texture.
- Unsalted butter: 4 tablespoons, melted. It helps bind the crushed Oreos together to form a crust.
- Cream cheese: 8 ounces, softened. This is the main ingredient for your cheesecake filling, adding richness and creaminess.
- Powdered sugar: 1 cup. It sweetens the filling, balancing the cream cheese’s tanginess.
- Vanilla extract: 1 teaspoon. This adds a lovely flavor that complements the cheesecake well.
- Heavy cream: 1 cup, whipped. This lightens the filling and adds a fluffy texture.
How to Make
1. Begin by preparing the crust. In a medium bowl, combine the finely crushed Oreos with melted unsalted butter. Stir until the mixture resembles wet sand. Ensure that all the crumbs are coated with butter for optimal flavor.
2. Next, take your serving cups—consider using mason jars for a cute presentation. Divide the Oreo crust mixture evenly among the cups, pressing it down firmly with your fingers or the back of a spoon to form a solid base.
3. In another bowl, beat the softened cream cheese using a hand mixer on medium speed until it becomes smooth and creamy. Add the powdered sugar and vanilla extract, mixing until completely incorporated and the mixture is lump-free.
4. In a separate bowl, whip the heavy cream until stiff peaks form. Gently fold the whipped cream into the cream cheese mixture using a spatula. This step is crucial; folding will maintain the lightness of the mixture.
5. Once combined, layer the fluffy cheesecake mixture evenly over the Oreo crust in each cup. Use a spoon or spatula to smooth the top. If desired, create a swirling pattern in the filling for a visual appeal.
6. Finally, add a sprinkle of crushed Oreos on top for garnish and an extra crunch. Chill the cups in the refrigerator for at least 1 hour before serving to set the filling.
Variations & Substitutions
Fruit Toppings: Incorporate fresh fruits such as strawberries, raspberries, or banana slices for a refreshing twist. You can alternate layers of pureed fruit under the cheesecake for added flavor and color.
Nutty Crunch: If you’re a fan of nuts, try mixing chopped nuts like pecans or walnuts into the crust mixture. This will provide a delightful crunch and elevate the texture of your cheesecake cups.
Vegan Option: Substitute cream cheese with vegan cream cheese and replace heavy cream with a whipped coconut cream for a vegan-friendly version. Ensure the cookies are also vegan for an entirely plant-based treat.
Chocolate Ganache: For a rich finish, top the cheesecake cups with a layer of chocolate ganache. Simply melt dark chocolate with a bit of cream, allow it to cool slightly, and then pour it over the filled cups before chilling.
Common Mistakes to Avoid
One common mistake is not fully softening the cream cheese. Make sure to let it sit at room temperature for about 30 minutes. This helps it blend more easily, resulting in a smoother filling.
Another mistake is overmixing the whipped cream. When incorporating whipped cream into the cheese mixture, use gentle folding motions to keep the mixture light and airy. Overmixing can deflate the whipped cream, resulting in a denser texture.
Lastly, don’t skip the chilling time. This step is essential for the filling to set properly. If you serve it too soon, the filling may be runny.
Storage, Freezing & Reheating Tips
Store your **No Bake Oreo Cheesecake Cups** in an airtight container in the refrigerator for up to 3 days. It’s best to keep the toppings separate until serving to maintain freshness. If you want to freeze them, cover each cup tightly with plastic wrap or aluminum foil. They can be frozen for up to 1 month.
To thaw, simply transfer the cups to the refrigerator and let them sit overnight. Avoid refreezing once thawed to maintain quality. When reheating the cups, allow them to come to a cooler temperature naturally; don’t microwave, as that may alter texture. Just enjoy them cold for the best flavor!
Frequently Asked Questions
Can I use a different type of cookie for the crust?
Absolutely! While Oreos provide the classic flavor, feel free to use any chocolate cookies or even graham crackers or digestive biscuits. Just make sure to adjust the amounts of butter accordingly.
What if I don’t have vanilla extract?
If you find yourself without vanilla extract, you can substitute it with almond extract or omit it entirely. Just keep in mind this will slightly alter the final flavor.
How should I serve these cheesecake cups?
You can serve these directly in the cups for a casual presentation or pipe extra whipped cream on top and decorate with fresh fruit or chocolate shavings for a more elegant display.
Can I make these ahead of time?
Yes, these can be made up to 2 days in advance. Just ensure they’re stored in the refrigerator to maintain freshness.
Are these cheesecake cups gluten-free?
To make them gluten-free, simply use gluten-free Oreo cookies or any gluten-free cookie alternative for the crust.
Conclusion: Nothing beats the joy of indulging in a decadent dessert like these **No Bake Oreo Cheesecake Cups**. With a rich, creamy filling and a delightful crunch from the Oreo base, they’re a crowd-pleaser for sure. Whip them up in just 15 minutes and savor every bite, knowing you’ve crafted a luxurious dessert with ease. Whether for a gathering or a quiet night at home, these cups are the perfect treat to satisfy your sweet tooth and bring smiles to those you share them with. Enjoy!