Prep time: 30 minutes
Cook time: 35 minutes
Total time: 1 hour 5 minutes
Servings: 12
Indulging in a slice of rich, decadent chocolate cake is often a childhood memory, and nothing captures that pleasure better than an Easter Chocolate Layer Cake. This remarkable dessert is not just a feast for your taste buds but also an eye-catching centerpiece for festive gatherings. The layers of moist chocolate cake balanced with luscious frosting create an experience that is nothing short of heavenly. In this recipe, you’ll learn how to make this delightful cake from scratch, along with tips to customize it to match your personal taste and preferences.
Easter celebrations often call for something extra special, and this cake fits the bill perfectly. It’s a celebration of chocolate in various textures and flavors, layered generously with sweet frosting. This recipe promises tender cake layers that melt in your mouth, perfectly sweet frosting, and simply the right amount of chocolate, making it a staple for your seasonal dessert repertoire. You’ll also discover techniques to avoid common pitfalls and optimize your baking experience.
What Is Easter Chocolate Layer Cake?
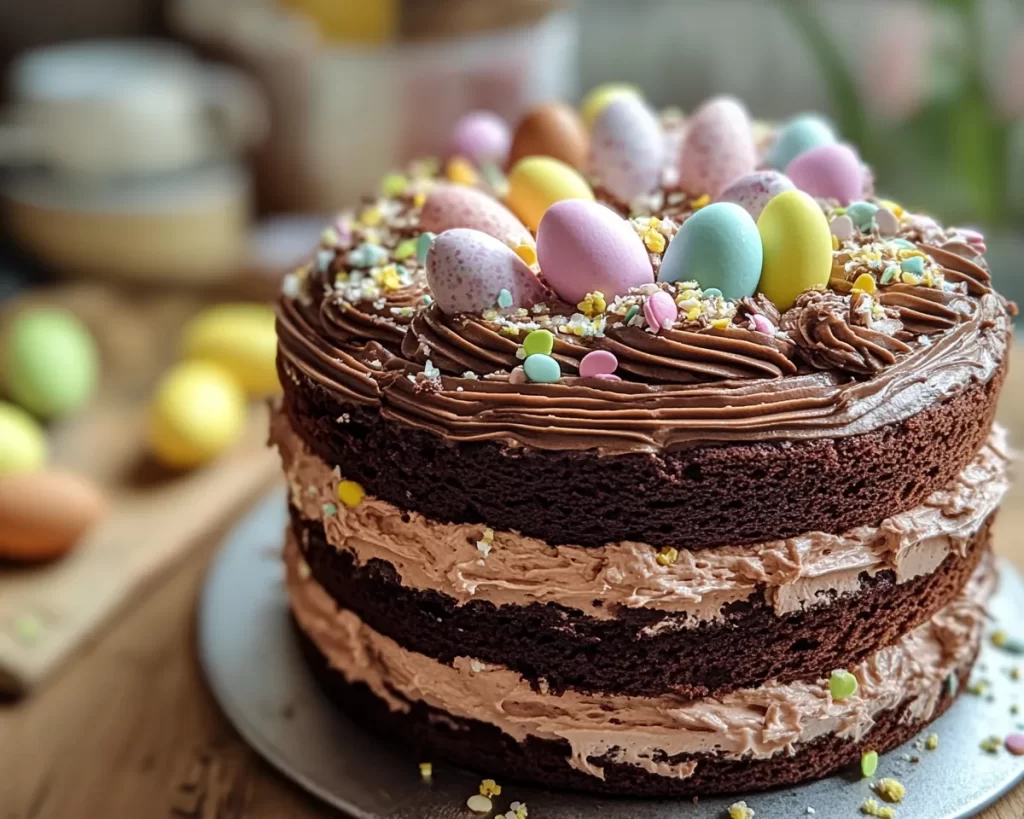
Easter Chocolate Layer Cake is a classic dessert that symbolizes festivity and celebration. The origins of this cake can be traced back to traditional Easter baking, where families often gather to share meals and desserts during spring. What makes this cake truly special is its moist and rich chocolate layers that contrast beautifully with the creamy frosting, creating a delightful indulgence with every bite.
The cake typically features layers of light and fluffy chocolate sponge that are both rich in flavor and texture. The frosting, often a buttercream or ganache, adds a silkiness that balances the cake’s density. As you slice into this glorious creation, you’ll notice its vibrant colors and the lavish presentation inviting everyone at the table to take part in the celebration. Each layer serves as a reminder of the joy that comes with sharing delicious food with loved ones.
Moreover, this cake is incredibly versatile and adaptable, allowing you to add your own twist to it. From fruity fillings to alternative flours for a gluten-free version, you can create a personalized experience that resonates with your tastes. Whether you’re a seasoned baker or a beginner, this Easter Chocolate Layer Cake provides a wonderful opportunity to showcase your creativity and baking skills.
Why You’ll Love This
There are countless reasons to fall in love with this Easter Chocolate Layer Cake. First and foremost, the flavor profile is a combination of rich chocolate and sweet frosting that will undoubtedly satisfy any sweet tooth. You’ll find that the easy preparation process makes this dessert accessible, whether you’re an experienced baker or just starting out. The step-by-step instructions ensure that you can replicate this cake with confidence.
In terms of cost, making this cake from home can save you money compared to purchasing a similar cake from a specialty bakery, without sacrificing quality or taste. Additionally, its versatility is unmatched. You have the freedom to customize each layer with various fillings or toppings to suit your preferences and dietary restrictions. You can even experiment with different baking methods to match your culinary style.
Another misconception about chocolate cakes is that they are notoriously difficult to make, but with this recipe, you’ll discover that it’s actually quite simple. Many home bakers worry about achieving the perfect texture and flavor balance, but with the tips provided, you will be well on your way to creating a show-stopping dessert.
Ingredients You’ll Need
For this delightful Easter Chocolate Layer Cake, gather the following ingredients:
- All-purpose flour: The base of the cake; provides structure. You can replace it with gluten-free flour if necessary.
- Cocoa powder: The star ingredient that gives the cake its rich chocolate flavor. Consider using Dutch-processed cocoa for a deeper color.
- Baking soda: The leavening agent that helps the cake rise. Ensure it’s fresh for the best results.
- Baking powder: Works alongside baking soda for extra lift.
- Salt: Enhances the flavors of the other ingredients.
- Sugar: Adds sweetness; you can substitute with brown sugar for added moisture and caramel notes.
- Eggs: Provides moisture and binds the cake structure. Flax eggs can serve as a vegan substitute.
- Whole milk: Contributes to the cake’s moisture and creates a tender crumb. Almond or oat milk can be used for a dairy-free version.
- Vegetable oil: Adds moisture and richness. You can also use melted butter for a richer flavor.
- Vanilla extract: Enhances the chocolate flavor, giving it depth. Pure vanilla is highly recommended.
These ingredients come together harmoniously to create an unforgettable cake that stands out on any holiday table. Each component has a specific role and is vital for achieving the perfect texture and flavor.
How to Make
Making the Easter Chocolate Layer Cake involves a series of straightforward steps that will lead you to a beautifully layered masterpiece. Let’s dive into the process:
- Preheat your oven: Start by preheating your oven to 350°F (175°C). Properly preheating ensures a consistent baking environment, which is crucial for your cake’s rise and texture.
- Prepare your cake pans: Grease and flour two 9-inch round cake pans. This will prevent your cakes from sticking and make it easy to remove them once baking is complete.
- Mix dry ingredients: In a medium bowl, whisk together 2 cups of all-purpose flour, 3/4 cup of cocoa powder, 1 1/2 teaspoons of baking soda, 1 1/2 teaspoons of baking powder, and 1 teaspoon of salt. This step helps break up any lumps in the cocoa powder and distributes the leavening agents evenly.
- Combine wet ingredients: In a large mixing bowl, combine 1 1/2 cups of sugar, 2 large eggs, and 1 cup of whole milk. Beat together with an electric mixer until the mixture is light and frothy, about 3-4 minutes.
- Add oils and flavors: Incorporate 1/2 cup of vegetable oil and 2 teaspoons of vanilla extract into the sugar and egg mixture, mixing until well combined.
- Combine wet and dry ingredients: Slowly add the flour mixture to the wet ingredients. Mix on low speed until just combined, avoiding overmixing to ensure your cake remains tender.
- Add boiling water: This key step requires you to add 1 cup of boiling water to your batter. Stir carefully until fully incorporated. The hot water helps to dissolve the cocoa, resulting in a moist cake.
- Pour into pans: Divide the batter evenly between the prepared pans. Use a spatula to smooth the tops for even baking.
- Bake: Place the pans in your preheated oven and bake for 30-35 minutes, or until a toothpick inserted into the center comes out clean. Keep an eye on the time, as ovens can vary.
- Cool the cakes: Once baked, allow the cakes to cool in the pans for about 10 minutes, before transferring them to a wire rack to cool completely.
- Prepare the frosting: While the cakes are cooling, you can prepare your frosting. A basic chocolate buttercream frosting will complement this cake wonderfully. Beat together 1 cup of softened unsalted butter, 3-4 cups of powdered sugar, 1/2 cup of cocoa powder, and 2-4 tablespoons of milk until light and fluffy.
- Layer the cakes: Once the cakes are completely cool, place one layer on a serving plate. Spread a generous layer of frosting on top, then place the second cake layer on top of it. Frost the top and sides as desired.
- Decorate: For a festive touch, consider adding chocolate shavings, sprinkles, or edible flowers on top. This not only enhances the visual appeal but also provides additional texture and flavor.
- Slice and serve: Finally, slice your beautiful cake into even pieces and enjoy the delightful creation you’ve made. Pair it with a scoop of vanilla ice cream or fresh berries for a truly indulgent experience.
These steps provide a detailed roadmap for creating an impressive Easter Chocolate Layer Cake. Each instruction is designed to ensure the best outcome, guiding you through both common techniques and key moments that help elevate your baking.
Variations & Substitutions
Gluten-Free Chocolate Layer Cake: If you or your guests have dietary restrictions, you can easily adapt the recipe using gluten-free flour. This will create a cake that’s just as rich and flavorful, but suitable for those who are gluten-sensitive. Make sure to use a gluten-free baking blend that includes xanthan gum for better structure.
Vegan Chocolate Layer Cake: For a vegan option, substitute the eggs with flax eggs (1 tablespoon of ground flaxseed mixed with 3 tablespoons of water equals one egg), and replace the milk with almond or soy milk. Additionally, consider using coconut oil instead of vegetable oil for a tropical twist. This variation will yield a moist, plant-based cake that everyone can enjoy.
Chocolate Mint Layer Cake: To infuse a fresh twist, add peppermint extract to your frosting. Consider using a store-bought mint chocolate frosting or homemade mint frosting for a refreshing flavor that pairs beautifully with chocolate. You can even add crushed mint candies for added texture.
Chocolate Raspberry Layer Cake: For a fruity punch, layer in fresh raspberry preserves or fresh raspberries between the cake layers. The tartness of the raspberries beautifully complements the richness of the chocolate, creating a balanced flavor profile.
Decadent Mocha Chocolate Layer Cake: Incorporate strong brewed coffee into your batter along with the hot water. Coffee enhances the chocolate flavor and adds depth to your cake. For an extra kick, consider using coffee-flavored frosting.
Common Mistakes to Avoid
Many home bakers fear the possibility of a dry cake, often caused by overmixing the batter. When combining your wet and dry ingredients, mix until just combined; this will help maintain the cake’s moisture. Another common mistake is opening the oven door too early during baking, which can cause the cake to sink. Wait until at least the halfway mark before checking.
Make sure all your ingredients are at room temperature before beginning, especially your eggs and milk. Cold ingredients can prevent the batter from emulsifying properly. Lastly, ensure that you are measuring your flour correctly — too much flour can lead to a dense cake.
Storage, Freezing & Reheating Tips
Once you’ve baked your Easter Chocolate Layer Cake, you may want to know how best to store it. If you’re not serving the cake immediately, wrap it tightly in plastic wrap and store it at room temperature for up to 2 days. If you want to keep it longer, refrigeration is acceptable, but the cake may lose some moisture — cover it with a clean towel or foil to help minimize this.
For longer-term storage, consider freezing the cake. Wrap each cooled layer in plastic wrap, then in aluminum foil to prevent freezer burn. When ready to enjoy, thaw the layers in the fridge overnight before decorating and serving.
Reheating is generally not necessary for a chocolate cake, as serving it at room temperature provides the best texture and flavor. However, if you prefer a warm slice, you can microwave individual slices for 5-10 seconds.
Frequently Asked Questions
Can I make this cake ahead of time?
Absolutely! The cake layers freeze wonderfully, so you can bake them days or even weeks in advance. Just be sure to wrap them well in plastic wrapping and foil to maintain their freshness.
What type of cocoa powder should I use?
For a rich flavor, Dutch-processed cocoa powder is recommended, but natural cocoa powder works well too. Just remember that they play slightly different roles in how the cake rises, so keep that in mind if substituting.
Can I use a different frosting?
Yes! While a chocolate buttercream is traditional, feel free to explore other frostings like cream cheese frosting, whipped cream, or even a fruit-based frosting to match your taste preferences.
How do I ensure my cake layers come out evenly baked?
Make an even batter distribution in your pans and place them in the center of the oven. Avoid opening the oven door during baking, as this can lead to uneven baking.
Can I add a filling between the cake layers?
Absolutely! Filling options like fruit jams, pastry cream, or even mousse can elevate your cake. Just remember to apply a layer of frosting to help keep the filling from soaking into the cake layers.
Conclusion:
The Easter Chocolate Layer Cake is a celebration of rich flavors and delightful textures, making it perfect for any occasion. Its versatility allows for countless variations, ensuring that each creation can be unique to your taste and preferences. I encourage you to try out this recipe, customize it to your liking, and share it with your friends and family. They will undoubtedly be impressed by your baking prowess, and that slice of chocolate cake will become a cherished moment of joy at your table. So, preheat that oven and get ready to create an unforgettable dessert!


